Baquacil Allergy

Has anyone had an allergic reaction to Baquacil products? This is our first year using Baquacil and my wife went for a swim and her eyes swelled up to the point she could barely see and has developed a rash all over her body. For some reason she wants to keep the Baquacil and we stopped using the CDX and are using the algaecide program now. Anyone have any advice besides getting rid of baquacil like I want to .
  • Like
Reactions: Lynda Norris

Refurbishing inground liner pool …….

I wanted to share my photos and my process pics…..

in 2013 i did a refubish on this pool….. no knowing anything about pools and there is no way i get through that without TFP- you guys saved my bacon many times!!! So flash forward 10 years and its time for replacement and of course to correct all the dumb errors the first time out…..this is the recap for the first time out….. you can see there were all kinds of problems and it was in rough shape…. Not unusual for a house in foreclosure…….


this time out…. I started making calls for a new liner in Nov last year…. It didn’t make much sense to put a new liner in just to shut the pool down for the winter, and we thought- why spend $1600 on a liner just to set it in our garage for 6 months…. So we decided to wait until march/April……. Hahahahahahahah!!!

that same line was now $2500…. I also decided to replace the light- the fitting gaskets- do foam on the sides and bottom…

we decided to go with a black bottom liner 30Mil with no banding at the top…..61C24C4B-3996-4D75-989C-F486B50EFEBD.jpeg

Attachments

  • B932522B-65F6-4F29-95AA-F5D27B2E1F4B.jpeg
    B932522B-65F6-4F29-95AA-F5D27B2E1F4B.jpeg
    570.9 KB · Views: 63
  • DA09B6F8-156F-413B-A773-548FB5B30BCF.jpeg
    DA09B6F8-156F-413B-A773-548FB5B30BCF.jpeg
    506.4 KB · Views: 58
  • C0C050A9-72AD-4FE5-BD85-301837F8DB9A.jpeg
    C0C050A9-72AD-4FE5-BD85-301837F8DB9A.jpeg
    640.3 KB · Views: 58
  • FF1A49B6-0BD9-46F1-8DEC-A9949B32A9A6.jpeg
    FF1A49B6-0BD9-46F1-8DEC-A9949B32A9A6.jpeg
    496.2 KB · Views: 58
  • C0CD4C2A-9F28-40B0-8573-185B42E40D15.jpeg
    C0CD4C2A-9F28-40B0-8573-185B42E40D15.jpeg
    932.6 KB · Views: 58
  • DB3F231F-881E-4FF2-8342-6BDAED6D2E76.jpeg
    DB3F231F-881E-4FF2-8342-6BDAED6D2E76.jpeg
    745.7 KB · Views: 61
  • 5DD5A843-14D1-4E32-A4FA-F8155170E011.jpeg
    5DD5A843-14D1-4E32-A4FA-F8155170E011.jpeg
    516.3 KB · Views: 62
  • DAD1D96D-31A9-4B01-9B1D-0E51A2F199B0.jpeg
    DAD1D96D-31A9-4B01-9B1D-0E51A2F199B0.jpeg
    487.3 KB · Views: 69
  • 642D270A-4D7A-47F7-BC0A-3E90C8B2C884.jpeg
    642D270A-4D7A-47F7-BC0A-3E90C8B2C884.jpeg
    619.1 KB · Views: 76
  • Wow
  • Like
Reactions: dfwnoob and Newdude

Contemplating making the SWCG jump

I have been on this forum for all of a week now and have gotten some great advice on my chemistry that has worked exactly 100% as-advertised. It is becoming obvious that the best solution for our situation in the long-term is to put in a SWCG so the system can be a bit more self-sufficient during periods of absence. My panel is a Pentair EasyTouch 8 and appears to be already SWCG capable, based on my caveman observation of a 12 amp low voltage breaker labeled "IntelliChlor" in the upper right corner of the panel. The P/N, as best I can discern without taking the front off, is 520583. As I read through the archives it looks like the IC40 is almost a plug-n-play, or as close to that as one gets, provided I can find the right place to plumb it into the system. I don't know if I have the time or inclination to start cutting into the pipes myself, but am I at least barking up the right tree as far what to install?

UPDATE: Further inspection reveals P/N 520593.
  • Like
Reactions: Newdude

I am hugging my SWG today

my CYA was low so I debated buying a few pucks and letting them dissolve in the floater. Raise CYA, maybe lower PH all while chlorinating some.

That was until I picked up a single tablet at Walmart last night and scanned the price!! $19 for a single tablet, they did have a 5pd bucket that was around $55 but that's insane!
If I didn't has a SWG I would be considering filling it full of dirt

The 4 pd bag of CYA that was $8 2 years ago is $20 now.
  • Like
Reactions: Newdude

Funny, NOT Funny...close your gates!!!

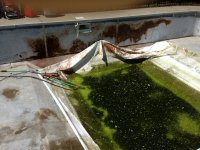
Made my rounds to water some hanging plants. Keep the watering can under the sink by the pool. Walked out the gate (where I'm standing to take pic) to get to the other side of the house to water plants. Thought nothing of it. When I was done watering, I came back to this. Given the water pattern, I'm guessing a dog ran into the pool in the shallow end (small water pattern), got itself free from the cover (rumpled cover), used the steps, shook off the water and trotted away. I always keep my gates closed when I'm not around, left them open when I went to water the plants.

Stuff can happen QUICK. Stay safe out there and keep 'em gates closed!

(NOTICE: Yes, I know that gates can have springs. Mine do but are not turned "on" at the moment as the gates are new and we are waiting for pins & stops. Spring loading will damage the gates at this point.)
DOG.jpg

Fighting mustard algae

Hi, I have been fighting mustard algae for at least 6 weeks. I tried the slam and mustard algae protocol from here and got it clear for a few days. Then before reading, I tried the yellow-gone. Ammonia based. Got it blue and semi clear. Then back to super yellow. Used yellow gone again, super chlorinated. Soaked all the stuff while chlorine was high. Brushed. It was blue and smi clear again. Was moving the ladder to brush and green nasty water was pouring out. I took the ladder out, need to deep clean. I have been slamming for last 3 days, test morning and night, keeping or adding chlorine to FC of 12. I got to a nice blue but then it went back to green tinge.

Current test at 11am:
Cya 30
FC 5.5(added to get back to 12)
Cc .5
Ta 100
PH 7.4

Overnight, I lost 0 chlorine and cc has been .5 since yesterday morning. Pool is cloudy and slight green tinge.

What are my next steps? This is killing my "cheap, easy trouble free pool" budget and my fun.
  • Like
Reactions: Pam in Texas

Pool way too good to be true...

So my cover pump is still draining the top of ny pool, but I reached in the skimmer opening and got a water sample.

My tests were:

PH 7.2 (not accurate because of FC?)
FC 10.5
TA 80
CA 50
CYA 30

I couldn't find a slow release Chlorine thing to leave in the pool, so I left 3 pucks in a puck floater when I closed it at shock.

I assume, since it's just been sitting stagnent & the FC is high in the part that I had the floater in, and prob 0 across from it I can't wait to get the cover off and see how it goes for my first year opening a pool I closed.
  • Like
Reactions: Newdude

New pool build

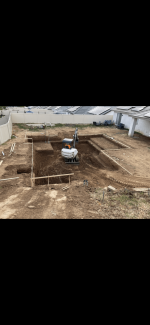
Hello Everyone, this is my owner builder pool. Dig is started.
36x 20x 33 L shaped pool
Deep end 8 ft deep, shallow 3.5 deep. Lots of seating. Running Pentair equipment, LED bubblers on my 7x 20 swim step. 18 in raised spa, 24 inch raised deep end bond beam for a deck to jump off. Planning on a slide also. Might do 3 18 inch waterfalls on the 24inch bond beam.

Attachments

  • IMG_5579.png
    IMG_5579.png
    437.9 KB · Views: 234

The Best Plaster Pool Startup

Additional clarifications on the Bicarb (or Positive CSI) Startup.

THE BEST PLASTER POOL START UP

How a startup program deals with and prevents the detrimental process of “plaster dust” forming in newly plaster pools is the key in helping to preserve a quality plaster finish that will last 20+ years.

Plaster “dust” is a calcium carbonate precipitate that often forms when filling new pools. Some people have been led to believe the release of calcium from new plaster (which forms the “dust”) is normal and cannot be prevented. That is incorrect. There is a start-up program that prevents plaster dust altogether by filling newly plastered pools with the right quality of positive Saturation Index (CSI) water and following one other simple step as explained below.

Understanding the Science of New Plaster

Water that is balanced with an CSI (or LSI) of 0.0 is good for cured pool plaster. However, that same balanced water is aggressive and detrimental to brand new plaster that is less than two to three weeks old, especially during the initial filling of new pools. This simple fact comes as a surprise to some who believe that perfectly balanced water (0.0 CSI) is always the goal. The reason for this is that about 20% – 25% of hardened plaster (cement) is a byproduct material known as calcium hydroxide. That compound is relatively soluble and dissolves in 0.0 CSI balanced water during the first 2 to 3 weeks which then leads to plaster dust formation and a compromised plaster surface. It is that dissolution process that causes the pH of the water to rise above 8.5 and creates a more porous plaster surface. The soluble calcium hydroxide is then converted (by CSI positive water) into insoluble calcium carbonate which precipitates and forms visible plaster dust.

The fortunate and good news is that filling pools with water that has an CSI of +0.5 or above prevents calcium hydroxide from being dissolved from the plaster in the first place. Since the calcium hydroxide remains in the plaster, it is then carbonated (converted) into a protective layer of denser and harder calcium carbonate surface intact. That is known as a “carbonation process” and takes about two to three weeks to be completed. When this startup is performed, the plaster surface is smoother and more stain-resistant than otherwise.

The Proper Startup Steps for Plaster Pools (Including quartz and pebble finishes).

[] Be Patient with new plaster: The first crucial step is to not fill the pool immediately after final troweling. Waiting a few hours (preferably four hours) to begin filling the pool will allow the fresh plaster in the deep-end bowl (which is troweled and finished last) to harden sufficiently before being submerged in water. Even positive CSI water will dissolve plaster material if it hasn’t been given enough time to hardened (hydrate) sufficiently.

[] Fill with the best water: Ensure that the fill water has an CSI of about +0.5 with a minimum alkalinity of 120 ppm. If the tap or fill water doesn’t meet this standard, which is often the case with tap water in this country, it will be too late to balance the water after it has filled the pool. The improper source water will have already done damage by dissolving many pounds of calcium from the plaster. No startup program will undo that damage after the fact.

After waiting a few hours, and once the specially balanced tap water begins to fill the pool, fill as quickly as safely possible. Any startup program that doesn’t require the two above conditions doesn’t provide the best care and protection for new plaster. As mentioned above, up to 40 pounds of calcium hydroxide can be dissolved and removed from plaster surfaces when the above steps are not followed. This is why many plaster finishes, including quartz and pebble, often become unsightly in the few months that follow due to greater porosity of the cement surface.

Research by onBalance indicates that that the fill water should have a “combined” total of alkalinity and calcium content of at least 400 ppm minimum (which essentially achieves the required CSI of about +0.5) to prevent the dissolution of calcium hydroxide from the plaster and the formation of plaster dust. (A combined total of 500 ppm is the ideal amount; 600 ppm is the maximum).

For example, if the fill water has an alkalinity of 80 ppm and 200 ppm of calcium hardness, raise the alkalinity of the fill water to 200 ppm (prior to using it to fill the pool) to achieve a combined total of 400 ppm (200 TA & 200 CH equals 400 ppm). Having an alkalinity above 120 ppm should provide adequate pH buffering and carbonation which helps prevent the pH from rising above 8.3.

When the above startup program is followed, there will be little or no plaster dust formation, the pH will be easier to keep and maintain below 8.2 and it will help retain a durable finish and preserve the vivid color in pigmented pool plaster. This is known as the Bicarb startup, which adds sodium bicarbonate to pre-condition the water and has been used successfully for over 40 years by many pool companies.

The Calcium Startup as Promoted by Orenda

The Calcium startup that Orenda Technologies promotes a good startup program. It also appropriately recommends waiting a few hours before starting the filling process along with adjusting the fill water to a positive CSI prior to entering the pool (similar to the Bicarb startup). The difference is that the Orenda program suggests raising the calcium hardness to a high level (by adding calcium chloride) to achieve a positive CSI instead of raising the alkalinity level.

[] A word of caution: The Calcium Startup is effective when the plaster quality is good. However, when the plaster quality is substandard, calcium hydroxide may bleed out, plaster dust may develop, and the pH of the water may rise above 8.3.
When the tap or fill water has a low alkalinity (less than 100 ppm), there may not be enough (pH) buffer strength to control and keep the pH down (below 8.3) when poor quality plaster results in some calcium hydroxide releasing into the water. We suggest that the fill water have an alkalinity above 120 ppm to aid in better carbonation and pH buffering.

[] A note about plaster quality: While it is true that a poor pool startup can ruin a high-quality plaster finish, especially an acid startup, it is equally true that poor quality pool plaster and workmanship will negate a good startup program, or in other words, a good startup process cannot fix bad plastering. Poor quality plaster and workmanship can result in the unpreventable loss of some calcium hydroxide and calcium chloride from the plaster regardless of the startup program. Any loss of plaster material results in greater plaster porosity and color fading.

In addition, poor quality plaster can result in excessive craze cracking, plaster turning whitish in streaks, spots and blotchiness, color fading, calcium nodules, and graying mottling of white plaster. Plastering mistakes that lead to these problems involve excessive water-to-cement ratio, excessive calcium chloride additive, excessive water troweling, and too early filling. A good startup program cannot prevent or alleviate those plaster mistakes, nor does aggressive water cause any of the above issues.

Poor chemical startups and poor long-term maintenance cause problems such as uniform calcium scaling or uniform etching throughout a pool, and localized damage where non-diluted chemicals come into direct contact with the plaster surface.

Good Tap water for Filling New Plaster Pools

In some areas of the country, the tap water already has a positive CSI with sufficient levels of alkalinity and calcium (combined total of at least 400+ ppm) and can be simply used, as is, to fill new plaster pools without having to do any chemical additions with bicarb or calcium. If that is the case, thank your lucky stars. There will be no need to do a special water compounding program. However, the only way to know is to, as we constantly emphasize, test the water before filling the pool.

Occasionally, the pH of the fill water may be higher than 8.4. If so, boric acid or regular muriatic acid can be added as part of the Bicarb startup process to lower and keep the pH below 8.3.

Here is a link to a research and scientific report on the beneficial effects of the Bicarb startup and comparison with two other startup methods.

No more grackles

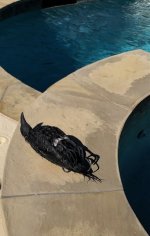
In case it helps anyone else, we found a solution to keeping the grackles (and all of their 'you know what') out of and away from the pool... We used to have swarms of grackles and they would perch on the power lines behind our house. We tried spinners that flashed, noise makers, etc. - all of the bird scare stuff, but none of them deterred the grackles. Now, we hardly ever see grackles in the backyard at all. We still see doves and all other birds, though, so you don't have to worry about scaring them off.

The solution was a fake dead crow from off of Amazon: https://www.amazon.com/gp/product/B07SGQMF4C/ref=ppx_yo_dt_b_search_asin_title?ie=UTF8&psc=1
There are others than this particular one, but I'm sure it doesn't matter - it just needs to look dead.

I read that grackles are smart, so I used to move the fake dead crow around every night, so that in the morning when the grackles showed up, it looked like yet another crow had succumbed LOL. It seemed like from the time I first put it out there, it took several days, maybe a week, and then they were gone. They didn't do the whole funeral thing like crows apparently do... they just got spooked I guess. Eventually I stopped moving it and we just leave it out there. Anyway, it's been 7 months now and no grackle problems - the 'crow' still looks good and I'll just keep leaving it out there near the pool area until it gets worn enough that it needs replaced. I hope this helps you - good luck!

Fake dead crow.jpg

Connecting ABS filter outlet to PVC for my SWG.

It's been a long time since I posted.

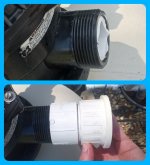
A few years back, I cemented a 1.5" to 2" PVC pipe adapter inside this ABS filter outlet on my Sand Dollar filter for my AGP. There's a union that connects to my salt water chlorinator after this. Today, it broke off (I'll spare you the details). It probably wasn't a great idea to cement PVC to ABS plastic anyway.

Since I doubt I can free the remaining piece of PVC from inside to repeat the same flawed connection method, I'm looking for a better way. The threads on the outside of the black outlet measure 2.5"across. I assume this is some kind of standard connection, but probably not PVC, so I would need some kind of adapter to 2" PVC.

What is the proper way to make this type of connection, and where can I buy the parts? In the meantime, I'm off to buy some more bleach! pixlr_20220529155543679.jpg
  • Like
Reactions: Donah

My New Old Pool Dig Out

I am about to embark on a mission of my own to dig up a previously filled in pool. I did a little preliminary work this weekend with the bobcat and found my bond beam to be in rough shape. This thread has given me valuable tools to possibly tackle the project myself. I have some concrete background and I am in the heavy equipment industry so those things will hopefully help me in the this mission. I have included a pic of what I have discovered so far. This Saturday I will excavate the remaining dirt to see the condition of the remaining shell. Wish me luck. More pics to follow and I know I could use a ton of advice. pool first day dig.JPG
pool first day dig 1.jpg
  • Like
Reactions: GDN and Davileet

Owner-built pool build

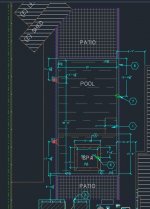
I'm planning to self-build a pool in Houston. Here's some details. I'm looking for feedback, suggestions, advice - open conversation (at this point).
Pool Basics
  • 22" W x 25' L x 4-1/2' (water level) D Pool (actual 5' depth)
    • + 22'W x 14'L x 6" D tanning ledge
    • with a 8'x8' x 38"D infinity-edge spa
  • Gunite construction
  • Pool equipment pad will be added alongside a workshop expansion slab, about 10' from the pool
  • Planned build Jan '22-Jun '22
  • No decking on long sides of pool - I'll be putting astroturf.
  • The short edges will have wood patios. (this is the inspiration).
Pool Equipment
  • Pump: Pentair IntelliFlo 011056
  • Filter: Hayward W3C4030 Pentair CCP520
  • Heater: Hayward W3H200FDN Pentair MasterTemp 200k or 250k (depending on availability & price)
  • UV sanitizer: DeltaUV ES46
  • SWG: IntelliChlor IC40
  • Spa blower: Air Supply Silencer 1.5HP 240V
  • Automation: Pentair IntelliCenter i5PS w/ valve expansion 522038Z
  • (2) Bubblers: CMP Brilliant Wonders 4"
  • (2) Skimmers: Hayward SP1072S2
  • (2) Spa drains: Hayward 1053AVPAK2
  • (4) Pool returns, (1) Spa: CMP 25524-200-000
  • (8) Spa venturi's: CMP 25580-290-000
  • (1) Pool lights: Florida Sunseeker Pooltone Std Color, 12V 18W
  • (1) Spa light: Florida Sunseeker Pooltone Std Color Spa, 12V
No main drain.

The work I won't be doing myself ("what's contracted out"), and why
  • Structural engineering: required by Texas
  • Land & topographical survey: required for permitting
  • Private utilities location: I lack equipment
  • Plaster: I've always been frustrated by mudding drywall, and suspect this would be a similar frustration
  • Bricklaying (for pool bath): similar to plaster, I expect frustration
  • Slab pouring and smoothing: cheap enough
  • Rebar: cheap enough, and because I'll be racing the clock at that point
  • Gunite: I lack the tools and experience
(Actual) Timeline* and cost (last updated: 2/25)
  • TOTAL = 33.5d, $35,994
  • Overhead electrical moved underground = 35d, $3,311
  • Relocate DCW main line = 9d, $667
  • Site layout = 2d, $99
  • Permit = 17w, $4,592
  • Excavation = 3d, $10,191
  • Electrical rough-in = 1/2d, $248
  • Plumbing rough-in = 4d, $823
  • Rebar = 1/2d, $3,393
  • Gunite = 1d, $12,670
*NOTE: total timeline < summation, because many items happen in-parallel. This timeline indicates overall start-to-finish.

Attachments

  • Pool layout 1.jpg
    Pool layout 1.jpg
    87.4 KB · Views: 84
  • Pool elevation 1.jpg
    Pool elevation 1.jpg
    43.4 KB · Views: 80
  • Like
Reactions: Sean ATX

DIY Solar Cover Roller

Someone in another thread had asked about how I built my own solar cover roller. So here it is.

Initially, I had purchased a SolarRoller and it worked pretty well for about three years after which the aluminum pipe corroded through. So I looked at several alternatives and came up with the following:

The design is based on a 1 1/2" ABS DWV pipe which because it is foam core floats unlike PVC or the original aluminum which tended to make the center of the cover sink. I used 10' pipe with a coupler but it would be better to use a continuous piece of pipe if you can find it that long.

To attach the cover to the pipe I used a faster with a 2" long 1/4 piece of the pipe in a clamp configuration (see pictures). I used the fasteners that came with the original solar roller but you could also use automotive panel fasteners with a hole drilled through the clamp and the pipe.

To roll up the cover, I reach under the cover for the pipe and just twist the pipe and the cover rolls up on itself. To unroll, I partially unroll the cover on the deck before pushing it all the way in and then simply unroll or pull on the ends of the cover to unwrap it.

Here are the pictures of the parts

Cover clamp and fastner
Clip.JPG


Cover Rolled Up
Cover%20Off.jpg


Cover Unrolled
Cover%20On.jpg


Pipe Close Up
Roller.jpg

IntelliCenter Quick Reference/Information Guide

Preface - As the new Pentair IntelliCenter Automation Control System moves further into the mainstream of pool automation, there appears to be an increase in the amount of just basic questions recently regarding IntelliCenter installation, configurations and standard operation.

Most of these basic requests for information come from folks that are building a pool for the first time and who may looking to incorporate the new Pentair IntelliCenter Control System within that build.

It seems that some of the issues encountered for many of these new owner/builders is due to the difficulty in searching for and locating the applicable installation, owner and quick reference guides online, as well as locating other useful information in order to make important decisions regarding the IntelliCenter, prior to their new pool installation. In addition, many of the professional pool builders are not yet well versed in the IntelliCenter, to include its installation and functionality and consequently are of little help for these owners.

Lastly, much of the Pentair documents are difficult to understand at times, especially for the new pool owners and many of the terms and definitions used in the IntelliCenter documentation, are not always easily understood and interpreted and can also be conflicting.

Given these challenges for new pool owner/builders, I thought it might be beneficial to attempt to provide some basic general information, definitions and explanations to the information found within the various IntelliCenter documents and to also provide links to the applicable documentation and other relevant information relating to Pentair’s newest pool automation system.

NOTE: The following information is provided as a general and informative overview only. It’s NOT intended as a substitute for thoroughly reading and observing any warnings, cautions, notes and guidelines that are contained within the applicable Pentair documentation. Links to these documents are provided below (Links to Applicable Documentation and Additional IntelliCenter Information) and certainly should be referenced for more detailed information regarding proven industry-standard practices, IntelliCenter installation, set-up and programming.

Table of Contents -
  1. Pentair IntelliCenter Overview
  2. IntelliCenter Features
  3. IntelliCenter Specific Definitions and Descriptions (A through H)
  4. IntelliCenter Specific Definitions and Descriptions (I)
  5. IntelliCenter Specific Definitions and Descriptions (L through Z)
  6. Related Pool Equipment/Accessories Definitions and Descriptions
  7. Optional Remote Controllers and Accessories
  8. IntelliCenter Control System Components and Personality Kit Descriptions
  9. EasyTouch / IntelliTouch Upgrade to IntelliCenter Information
  10. Links to Applicable Documentation and Additional IntelliCenter Information
  11. Pentair Customer Service and Technical Support Contact Information


1. Pentair IntelliCenter Overview -
The Pentair IntelliCenter provides automation control over your pool/spa equipment to include pumps, lights, heaters, cleaners, sanitation and chemistry control devices, water features, valve actuators, solar heating, spa blowers and pool covers. In addition, the IntelliCenter Control System can be used to automate other powered items as well, such as landscape lighting, patio and gazebo lights, etc.

The IntelliCenter was first introduced to the consumer pool equipment market in the 4th quarter of 2018.

The IntelliCenter Automation Control System can be programmed and controlled remotely from virtually anywhere while utilizing a PC/laptop computer, iPhone, iPad, Surface, Android mobile device and most other mobile digital devices. In addition, optional wired and wireless remote control devices can also be utilized to control the IntelliCenter but these optional control devices are typically not needed in most installations.

Most of these user interfaces allow a user to control most of their pool and spa functions from virtually anywhere that internet/cellular connectivity exists.

The IntelliCenter is also compatible with the Amazon Echo “Alexa” virtual assistant, allowing voice commands to control pool functionality (see also: IntelliCenter and the Amazon Echo (Alexa) app.)

The IntelliCenter Control System is a mostly scalable / modular system. It can also be used in combination with other popular home automation systems as well (see: IntelliCenter Home Automation Integration and Control) with varying degrees of complexity and requiring varying degrees of “IT knowledge” as well.

With the IntelliCenter, a user can create and customize automated schedules with multiple start and stop times to control filter and spa jet pumps, lights, heaters, spa blowers and other pool devices and accessories. The IntelliCenter system contains several historical usage data features that provide a convenient way to help the pool owner conserve energy.

Popular “bundled” systems can be ordered or in the case of “non-standard” installations, systems can be built “á la carte”. See: IntelliCenter Bundled and Component Parts List, for breakdowns of bundled and “á la carte” components.

Legacy and newer EasyTouch and IntelliTouch Control Systems can be upgraded to the IntelliCenter Control System as well and are covered in more detail in Section 9. below.

2. IntelliCenter Features - The following are the major features of the Pentair IntelliCenter Control System as somewhat outlined in the Pentair documentation.
  • 4” x 3” capacitive touch sensitive color screen at the control panel which also incorporates a manual and automatic day/night color screen mode.
  • Remote connectivity is provided by either wired or wireless (Wi-Fi) ethernet connections.
  • Multi-function schedules and programs with adjustable scheduling timers for easy system scheduling.
  • 100 schedules are provided. Filter Pump/Auxiliary Power Circuits, Feature Circuits and Circuit Groups (macros) can be assigned to these schedules.
  • 5, 8 or 10 Power Circuits (for line-voltage items (240 Vac or 120 Vac) such as Filter, Spa and water features pumps, lights etc. Up to 40 Filter Pump/Aux Circuits can be configured with the use of up to three expansion enclosures (i10X)
  • 32 Feature (virtual) Circuits which allow control over other items such as speeds/flows on Pentair VS/VF/VSF pumps, control for valve actuators, heater(s) control and covers.
  • 16 Circuit Groups: Ability to assign FLTR/AUX power circuits and Feature Circuits to these programmable macros controlled by a single button or scheduled program.
  • Supports up to 16 IntelliFlo VS, VF and VSF pumps including 8 speeds/flow settings per pump (as applicable). Also supports two-speed pumps.
  • Supports standard pool/spa lighting as well as IntelliBrite, GloBrite, MicroBrite and MagicStream LED color lights and light shows. In addition, other light manufactures that emulate the IntelliBrite colors and shows are also supported.
  • Support for two valve actuators (“P” models (A&B) or four Valve Actuators (“PS” models) (Intake, Return and A and B valve circuits). Expandable up to 10 valve actuators with the use of the optional IntelliCenter Valve Expansion Module.
  • Support for an optional Indoor Control Panel and/or Outdoor Control Panel, Wireless Hand-Held Remote. Also supports up to four Spa-Command and iS10 Spa-Side Remotes, and two iS4 and one QuickTouch II Wireless Spa-Side Remotes (typically not required).
  • IntelliChlor Salt Chlorine Generator (SCG) integration. Supports one IntelliChlor per Load/Power Center or Expansion Enclosure.
  • IntelliChem Controller support
  • Spa Manual Heat Function
  • Support for two bodies of water
  • Spa-Side Control Enable/Disable
  • Solar Heating Option/Support
  • 16 Heat Pump Support: RS-485 Support and Heat Pump Cooling Support (if applicable).
  • Real Time Clock (12 or 24 hour)
  • Assignable and customizable FLTR/AUX Circuits, Feature Circuits and Circuit Group names.
  • Special Circuit Types/Functionality support
  • Imperial or Metric Support
  • Air/Water/Solar Temperature Sensor calibration ability
  • Passcode Protection
  • Onboard and easily accessible USB port for use with a standard type USB “flash/thumb drive which allows for uploading/downloading system configuration files and manual upgrades to the systems’ firmware.
  • Automatic “Over-the-Air” (OTA) firmware upgrade pushes.

3. IntelliCenter Specific Definitions and Descriptions – The following definitions are provided in order to minimize confusion with some of the terms or definitions used within the Pentair documentation.

Circuit Breakers:​
NOTE: I am providing the following as general information ONLY. This information as well as any other electrical information provided in this guide, is not intended to be instructional or as an installation guide for the novice in any way. If you are not qualified and proficient in electrical installation practices and procedures, please consult with a licensed professional that IS qualified and proficient in swimming pool electrical installations.
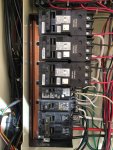
IMG_5490.JPGLine-voltage circuit breakers utilized in the IntelliCenter Control System are manually operated electrical switches designed to provide a means of removing power from a particular circuit. They are also automatically operated electrical switches designed to protect electrical circuits from damage caused by excess current from an overload or short circuit. The circuit breakers normally used in the IntelliCenter Load Center are designed to interrupt current flow either, after a fault is detected or as a means to manually switch off power to a particular circuit.​
Electrical power (150 amps maximum) is provided from the main house electrical panel to the Load Center. These circuit breakers then distribute electrical power from the Load Center bus-bar to the electrical devices that are connected to and controlled by the IntelliCenter.​
Each IntelliCenter Load Center can support up to ten (10) circuit breaker spaces (5) double-pole 240 Vac breakers or (10) single-pole 120Vac breakers or any combination thereof.​
Circuit breakers are not included with the IntelliCenter Load Center and must be purchased separately.​
Pool equipment such as most pool pumps, heaters, blowers, etc., typically utilize 240 Vac double-pole breakers. Pool equipment such as pool/spa lights, low-voltage lighting transformers and other miscellaneous pool equipment typically utilize 120 Vac single-pole breakers.​
Line-voltage circuit breakers utilized in the IntelliCenter Control System should only be the approved and recommended circuit breakers that are specified in the IntelliCenter Automation System for Pool and Spa Installation Guide.​
2020-02-10_15-54-41.jpg
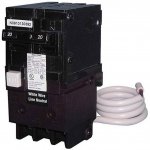
NOTE: It is recommended that when using any Pentair IntelliFlo Pumps in conjunction with an IntelliCenter installation, the Pentair PA220GF GFCI double-pole circuit breaker(s) should be utilized instead of the similar Siemens QF220 GFCI breaker. The Pentair PFG (PA220GF) breakers are noted to possess a higher quality control and are designed to help prevent the GFCI circuit breakers from falsely tripping due to IntelliFlo pump harmonics (courtesy: Jimrahbe). See this TFP post for additional information.​

There are2020-02-14_14-47-57.jpg also three (3) low-voltage circuit breakers included with the IntelliCenter Control System Load and Power Centers.​
- 18V, 5 Amps provided for the Control System​
- 24V, 4 Amps provided for any connected Valve Actuators​
- 12V, 12 Amps provided for the optional Salt Chlorine Generator Transformer (if applicable)​
Circuits, Auxiliary or “Aux” Power: A controllable On/Off power circuit for line-voltage items (240 Vac or 120 Vac), such as pumps (see the NOTE2020-02-17_21-17-39.jpg regarding IntelliFlo Pumps in “Power Relays” below), lights etc. Typically, users can select IntelliCenter Personality Kit models that support either 5, 8 or 10 Pump/Auxiliary type Power Circuits.​
In addition, up to 40 of these circuits can be configured with the use of up to three expansion enclosures (i10X) if necessary for pool/spa builds incorporating multiple filter/spa pumps and/or with multiple lighting and water features.​


Circuits, Feature: Feature/Individual Circuits are programmable “virtual” circuits that can control low voltage type items and features such as pump speeds/flows, spillway, valve actuators, 2020-02-17_21-26-01.jpgheater control functions, etc.​
Up to 32 of these feature circuits can be created and programmed from a pull-down selectable list or they can be customized.​
These “circuits” are not to be confused with auxiliary (“Aux”) power circuits that actually do control the On/Off features of line-voltage circuits such as pumps (see the NOTE regarding IntelliFlo Pumps in “Power Relays” below), blowers and 110 Vac lights or low voltage lighting transformers.​

Circuit Groups (macros): The Circuit Groups feature allows for multiple Auxiliary Power Circuits and Feature (virtual) Circuits to be grouped together and assigned to one On/Off button that is 2020-02-17_21-31-00.jpgdisplayed on the Home screens and Features screens. Circuit Group names are customizable. Circuits that are grouped together in these “macros” can be switched On/Off from one button in the Features (Circuits), Lights (circuits) or the Home screens.​
A maximum of 16 Circuit Groups (macros) can be programmed.​
However, if necessary, it is possible to create “Nested Groups” which is a group of circuits (macros) within another group of circuits, as long as they are from the same major grouping (Light or Circuit).​


Egg Timer: The “Egg Timer” feature allows for a specified time delay (hrs./mins.) for a circuit to function, once it is turned on manually. Typically a user will tap the Egg Timer button to display the Hours and Minutes button. Then tap the Hours and Minutes buttons to select a manual time-out from 0 to 23 hrs. 59 mins. for the circuit.​

Expansion Kit: A kit that includes additional FLTR/AUX power circuits and relays to an existing Personality Kit. Requires a Load Center or Power Center for each Expansion Kit. Models i5X (P/N 521033) and i10X (P/N 521034), offer five or ten additional circuits.​
Each IntelliCenter Control System Expansion Kit requires an additional Load (P/N521213) or Power Center (P/N 521214). Up to three Expansion Kits and Load or Power Centers may be added to a system, for control of up to 38 Auxiliary Circuits (40 auxiliary circuits’ i10x).​

Freeze Protection: A circuit with freeze protection “enabled”, circulates water to protect pipes from freezing if the outdoor air temperature sensor detects the temperature is nearing freezing (below 36° F).​
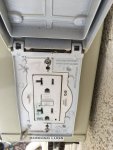
GFCI Convenience Receptacle (Optional): A standard “single-gang” “knockout” is provided on the right side of the IntelliCenter Load or Power Center. This knockout is provided for an approved 2020-02-10_19-09-22.jpgIMG_5508.JPGGFCI single-gang electrical​
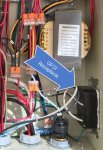
receptacle where a rainproof cover or rainproof receptacle cover is required. This GFCI receptacle can be used as a convenient temporary power source at the pool equipment pad.​
In my personal installation, I also use the “load-side” connectors on the back of the GFCI receptacle to provide GFI power to my pool equipment pad convenience light switch.​
The receptacle and receptacle cover are NOT included with the purchase of the Load/Power Center.​


High Voltage Compartment: The High-Voltage Compartment is the large lower-right compartment in the Load or Power Center designated for all line-voltage (240Vac and 120Vac) wiring to IMG_5495.JPGinclude line-voltage conduit knockouts, compression screw lugs for the incoming power leads, circuit breakers (Load Center only), neutral and ground bus bars, transformers, relays, and a GFCI convenience receptacle “knockout”.​
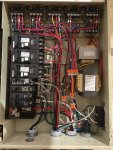
WARNING: Electrical power should always be removed (breaker switched off at the house main circuit breaker panel that feeds the IntelliCenter Load/Power Center), prior to any work being performed on any components within the high-voltage compartment of the IntelliCenter Load/Power Center. Consult with a licensed and qualified swimming pool electrician if you are not qualified in these procedures.​
EDIT: To see possible modifications that can be accomplished within the High Voltage Compartment of the IntelliCenter Load Center, please see the following thread -​
High Voltage Cover Panel: A High Voltage Cover Panel (also referred to as a “Dead Front” panel) is provided to ensure that the line-voltage circuits are protected from the possibility of short 2020-02-16_14-27-42.jpgcircuits and damage to components and more importantly, that users are protected from electrical shock when the Load/Power Center door is open for any reason.​
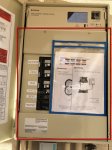
There are ten knockouts provided for circuit breakers on the cover panel (Load Center only). These knockouts are removed predicated on the amount of circuit breakers that are required for the IntelliCenter installation (not applicable for Power Centers).​
The High Voltage Cover Panel is secured at the bottom by three tabs and secured at the top by two ¼” retaining hex-screws.​
WARNING: Electrical power should always be removed (breaker switched off at the house main circuit breaker panel that feeds the IntelliCenter Load/Power Center), prior to removing the High Voltage Cover Panel for any reason. Consult with a licensed and qualified swimming pool electrician if you are not qualified in these procedures.​

Replacement cell for Jandy Aquapure 1400

TFPool Pals:

My 13 year old Jandy Aquapure system is throwing the 120, 121 error codes now. I suspect the cell needs to be replaced. Think I got around 5 years from this one, which is pretty good. I acid washed it, and that may have been the final death knell as I open for the season. I think it had been basically working, but probably not now. Anyway, I get tired of shelling out $700 buck for one of these, and wondered if anybody had any experience with this one, a replacement generic from SaltPoolStore. It runs $300. I searched the forums, but not much info. Could be worth a shot.
  • Like
Reactions: atstabler

Smorobot X10 review

First day with this, so far, like it! Seems to find the entire bottom. The X11 does walls and waterline, I didn't care about that. Took about 2 hours to charge, probably had some from store. So far it's been running 1.5 hours, supposed to make it 2.5 hours. I'll add picture following once I pull out. I had run my Aquabot 2 days ago, bottom looked fairly clean, will be interesting what this added.

Amazon here:

Short YT video:
Login to view embedded media

INEXPERIENCED OB Steel wall vinyl liner inground pool under construction in north texas

First things first….after all this weeks and questions I finally started my installation :):)…… I am sure I am going to have millions of questions, but my main ones right now are 2…….
1- foam on the walls….. if I remember correctly, I made a conscious decision not to order it when I order my kit a couple of months ago, but 1 guy that might be helping me out mentioned it (and also some kind of tape to seal the joints of the wall???)….. so, should I order it now????
2.- I have decided to switch out my inline chlorinator for an swg (as I realize that I didn’t get a pool equipment panel, and the 2 seem to go hand on hands…), so now which one do I get???? Of course I heard about the pentair and the Hayward (and their price tags 😳), but are there any others that you guys would recommend???

F7FDD653-9EEB-4787-96FE-993C2C193ED7.jpeg72E083E0-DEB5-4E8D-B625-0E36AA8D448C.jpeg1F50CFD4-F090-4611-A1A1-309962F85A47.jpeg
  • Like
Reactions: mcba2020

Another Mastertemp 400 cycling

Need help diagnosing.
Long story…
My mastertemp 400 sprung a leak in the exchanger about 2 years ago. I patched it with JBweld and it held until a week ago when my heater stopped working as the patch failed.

I bought a new heat exchanger, and when I went to replace it, noticed the combustion chamber was rusted out as well as the lid…. I ordered a new one and was informed they are 7 months backordered!!! Since i bought the 800 buck exchanger, i am in too deep and should have bought a new heater…. Anyway…. i repaired the combustion chamber and lid with steel sheet and high temp mortar to get through the season but now my heater short cycles. I bought all new sensors and it still short cycles. i believe i may have either a grounding issue, or flame sensor voltage

The heater does light, first time for 30 seconds, then 5 seconds several times before locking out…. I checked the flame sensor voltage and its barely below 1…. With my metal hack, im wondering how to test grounds or voltage? Im at the point of about to try buying a new fenwal.


Is there a way to bypass the fenwal to make sure its bad? How do you check ground? I pull the wire from the valve and it shuts off… flame sense voltage is around 1…

What do i try next?
  • Like
Reactions: Winterhater

Tips to keep your Dolphin Like New

Working on these cleaners for 7 years now I can safely say I’ve seen It all. From dog hair fur balls causing clogged impellers to tangled chords that could be used as a new technique of knot making and power supplies are loaded with water. I wanted to make this as I want to provide some accurate information on topics I’ve seen.

Topic 1: THE INFAMOUS TANGLING CORD. This issue is really a symptom of bigger issue. The biggest piece of advice I can give anyone is TAKE THE CLEANER OUT when its not being used. Now the famous argument I see constantly is well it made for a pool it meant to be in the pool. Yes, but is it made to sit in chlorine all the time? Chlorine eats at everything. The more your cleaner sits in the chlorinated pool (yes salt systems still have this effect) the higher the chance you will run into issues with the TANGLING cord and further possible issues. I asked Maytronics about the tangling cord and they said it from being left in the chlorinated pool and not ever being rolled up neatly. Some people have mentioned a weird sticky build up on their cords. That’s the cord literally breaking down from the chlorine. Take it out when its not used. For the people who need to have it in DAILY Use this happy medium of take it out for the day you shock the pool and the day after. That’s when the most damage is done. ONTO THE NEXT ISSUE


Topic 2: “My robot moves for 5 minutes and then stopes working” OR “My robot runs for 20 minutes and then stops working”! Here is some background. We get almost ALL of our warranty claim issues in APRIL / MAY (when people opening their pools up and often have dirty pools). And it’s usually this complaint. So, we have it shipped to our shop or the customer brings it in. I would say 80% of the time its from the impeller being so filled up with Crud that the motor will run for a few minutes and then stop. THIS IS MEANT TO HAPPEN so the motor doesn’t kill itself from pushing through all the clogged debris and burning out. Twice in one day I had two customers call me. I told them check the impeller They BOTH said “MY POOL IS SPOTLESS HOW CAN YOU SAY ITS FROM THE IMPELLAR BEING CLOGGED” BOTH customers checked. Turns out both have dogs that swim in the pool. Both customers said that the impeller was filled with hair. The one guy even said “there’s a whole other dog in here!” ……… So yes, your pool might be clean from leaves and dirt but if you have a furry friend or long hair. This is something you want to check monthly. There are tons of YouTube videos on how to do it. This is connected to topic 3 in a big way


Topic 3: Spring cleaning. Pool cleaners are made to clean your pool! That’s why people buy them. I would say they are more for weekly maintenance to KEEP your pool clean. Spring cleaning is often a big cause of problems like the clogged impeller mentioned above which is often fixable by you the owner or could lead to more severe Motor issues. There are people out their who will throw it in a SWAMP of a pool. LEAVES, TWIGS, DIRT. As well as putting it in the same time they do all the chemical work for the spring opening. For everyone I help I suggest this to avoid issues. If you’re looking at your pool and you see piles of leaves bunched up in the corners or on the bottom of the ramp in the deep end and you know you could easily get that with a few swings of the net on pole then DO THAT. Don’t think your cleaner with take all that at once. It won’t. They are not miracle workers. They won’t substitute a human being when it comes to the spring-cleaning aspect of owning a pool. Weekly maintenance? SURE. Spring cleaning? Not so much and if you do…. Expect a shorter lifespan of the robot. Also, I recommend brushing all your walls manually when you open up. Algae on the walls of your pool causes it to be quite slippery. This makes it hard for the cleaner to climb the walls.


Topic 4: Power supply care. Power supplies are not water proof. They might be water resistant but not water proof. So, when the heavens open up one day and its downpours no wonder why your power supply isn’t working……………… I suggest either cover it or you could get a big Ziplock bag and make a makeshift poncho for it.


Topic 5: Taking it out of the pool. BE GENTLE when you pull on the cord to fish the unit out. And I would also grab it as soon as you can while its in the water. You do not want all the robots weight straining that cord especially the detangler. The 2nd most popular issue we get from owners of dolphin is the detangler getting water in it, there for FRYING that electrical connection. If your symptom is of a robot not working while the power supply turns on and there are ABSOLUTELY no signs of life from the robot AT ALL. Then unscrew the detangler and check for water damage. This problem arises from yanking on the cord too much and also can be from being in the pool to much as once again chlorine eats at everything slowly. My suggestion is either be gentle or if you have a WIFI model then use the manual drive option and drive it up the wall so you can grab it.


I can’t thing of anything else off the top of my head I’ve seen cleaners that are a year old come back looking 10 years old and I’ve seen 10-year-old cleaners come back looking like 1 year old. Its really is about how you take care of them. If you do 5 to 7 years if not more is VERY possible.

Pool Tunes 2023

I'm reviving this thread from 2017 Gimme your pool jam list!

Tired of jammin' with Jimmy?
Tired of kickin' it with Kenny?
Is zippin' along with Zac gettin' a little old?
Too much sand in your old Beach Boys LPs grooves?
Here's a list of some lesser known bands with some pretty good summer pool side songs to peruse even though some may be old hat to a few of you here:
Yeah.........I got bored and cruised Spotify!
Eric Stone
Southern Drawl Band
The Detentions
Jesse Rice
Wheeland Brothers
Jimmy Parrish and the Ocean Waves Band
Howard Livingston & the Mile Marker 24 Band
Jake and the Half Conched Band
Feel free to add on!:rockon:

We Have a Winner! Pool of the Month (May 2023); Theme - Family Fun

1. On the first of each month, a contest "theme" will be announced (i.e. water clarity, family fun, decking, custom features, lighting, scenery, etc)
2. Members have 10 days to UPLOAD ONE image for consideration; Photo must be related to the thread titled theme for that month.
3. Per general TFP rules, nothing profane, political, or insulting.
4. The first 10 days is the submission period. Posts are limited to ONE image ONLY. No discussion posts yet. This will make viewing much easier for all.
5. Days 11 - 15 the thread will be locked and is for voting only. No more uploads. Viewers now have a final opportunity to vote (or modify their selection) for their favorite upload.
6. Members are encouraged to use an emotion icon ("Like" or "Love") to vote for their favorite upload; it will be tough, but select only one favorite.
7. On day 16, emotion Likes/Loves will be tallied for a winner. In the event of a tie, we will create a poll on the thread to make a final selection.
8. Once a winner is announced, the thread will be unlocked and comments/discussions are welcomed. Winner and nominees can tell us all about their pool/photo/event.
9. A member can only be selected as winner once per calendar year.
10. Winner will receive a $50 gift certificate from tstestkits.net! Oh, and maybe some bragging rights. :poke:

This should be fun. Let's see your pics of family fun in action. We know they are out there. Have fun and good luck to those who apply!

  • Locked
Coleman 26' Liner hangers causing skin irritations.

I have a 26' Coleman entering it's 3rd season. (probably last). The loops on top that the horizontal pipes go through (dont know what to call them) are now causing everyone skin irritation if you lean against them. It is like fiberglass and gets under your skin and itches for hours even a day or longer. Has anyone else experienced this? We are trying to come up with an idea to cover it, because who doesn't lean on the edge of the pool.

We talked about splitting a pool noodle but because the pipes are oval and not round it would be difficult to get anything to stay...

Any Ideas??

Suction Leak - Do You Have One? Try a Big Straw!

DISCLAIMER: Safety First! Our pool is still CLOSED. The water is too cold so there are no swimmers, no risk to life or limb due to exposed suction pipe in the water. This was my own personal test conducted in a fenced/controlled environment for less than a 24 hr period. This was a temporary test only. If you attempt such a test, take necessary precautions. Safety is always a priority.

So over time we all inevitably wonder, "Do I have a leak, and if so, where?" Several years ago when I was TFP newbie, I created such a thread HERE. I came to the realization all was fine and I simply had a bit of OCD believing I should see a pump pot with absolutely zero air bubbles in it. Over the past few months however, the water level in my pump pot would fall by about 1-2 inches over the course of a couple days, then it would stay there. This was much different than years past. I never completely lost prime or went dry, but there was more air in the pot than back in 2015 when my system was new.

Last season I was trying to find a pressure side leak which you can read about HERE. During that adventure, it seemed as though my skimmer may have tilted with our horrible shifting/clay soil in the San Antonio area. You can see why I thought about the skimmer tilting by the angle of that pole sticking out of my skimmer in the pic below. That made me wonder if my skimmer line/connection may have cracked a tiny bit. I have a check valve and a 3-way valve ahead of the pump. I had already disassembled each, cleaned them up, and replaced all the O-rings. Last season I also disassembled my pump, replaced the shaft seal, and lubed all volute seals. The only thing left was the PVC suction line itself.

This brings me to the purpose of this thread. What other option do you have before getting out the pick & shovel? How about creating a new suction line? By bypassing your existing suction line, you can see if a new (temporary) line will result in an air-free pump pot, or if it stays the same. Basically a big straw. Yeah, it costs a few bucks for PVC and some fittings, but better than digging for hours only to find the line is fine right? So that's exactly what I did. Below are some pics of my test yesterday.

This pic shows the test suction pipe down in the water serving as a big straw. That PVC sticking out of the skimmer (tilted) was something I created last year to do a water pressure test on the line. Its angle is what gave me alarm to worry about sinking/shifting soil.
full


Nothing fancy here. Just 40' of pipe going back to the pad. A big straw.
full


Got myself a new union to connect to the pump. Loosened the fittings so that I could turn my pump a bit and connect the test line.
full


A final view looking back towards the pool.
full


So what were the results? Did the new test line result in an air-free pump pot confirming my original (ground) suction line was cracked, or did air still get in the pump? The result - no change! Air was still getting in the pump pot. This was good & bad. The good was now I see no need to dig-up the ground to get to my skimmer connections which would've been an exhausting job to say the least. The bad part is I still seem to get air in the pump pot. A bit more than I would like perhaps, but I'm not losing prime. My pump is going on 9 years now, so perhaps something warped a tiny bit over time that an O-ring or pool lube can't seal. Regardless, I go out to the pad at least once a day anyways to purge air, so it's no big deal.

Best part about this test project is that it kept me from chasing something that wasn't there. So if you have doubt about a suction side air leak and have ruled-out everything but the line itself, you might create a test line ....... basically a big straw. Good luck.

Thanks ALOT tfp !!!!!

We got considerable rain last night and the water level was above the skimmer opening, so I started draining. It was still pouring so I went inside and flopped on the couch to see what y'all were doing. 10 to 15 mins later I went back out to find the pump running dry.

20230429_125945.jpg


I always babysit it but this *one* time I didn't and got burned. And when i watch it, it takes 45 minutes to drain a little. :ROFLMAO:

I've found these new square Hayward skimmers to be much less forgiving and pretty much want to be 2/3 full with very little room for error. This time obviously was too low, but they don't skim well below 1/2 of the way up the faceplate. The older rectangle ones had a larger tolerance for water level.

They decreased the size if the weir opening and increased the throat width on the new ones.

Screenshot_20230429_131052_Gallery.jpg

Screenshot_20230429_131221_Gallery.jpg
  • Like
Reactions: Decoy205

New owner, salt. Water is crystal clear! But K-2006-SALT kit indicates ZERO CYA

Man, this new pool is beautiful with crystal clear water! Installed early February, pool company cleaned it all out after concrete deck poured, etc. They had 3 chlorine tabs in a bobber which is long gone, put the proper amount of salt in about a month ago and fired up the SWG. All looks great! I've been vacuuming and skimming as needed. Seriously, this pool looks amazing and crystal clear right now.

I got the Taylor K-2006-SALT kit and ran my first tests about a week ago. All looks OK except pH and FC looks high and the CYA test never got cloudy meaning I think there's ZERO cyanuric acid present. This all makes sense other than those three tablets should have provided some, no?

I guess I'm not too worried but I really want to understand.

Here are my levels from last week and I plan to test again this weekend:

FC: 5.6
pH: 7.9 (hard to tell it may have been higher)
TA: 110
CH: 70
CYA: 0 (!!!)
SALT: 3400
TEMP: Sample temperature was 68 when I took it although probably raised throughout my testing.

Thanks y'all!
  • Like
Reactions: Cbradham14

Please share how you collect water for testing....I'm curious how everyone else does this...

My first ideal technique was a 3d printed water collector I bought on amazon for $11 in 2018. This actually worked very well for a few years, then the shape and bottles got more difficult to align and the device finally broke. One of the best $11 I spent on my pool.

Fast forward to this year, my $3 water collection system (LOL) using part of an old pool pole. I can easily test many different depths of the pool and spots, most importantly not getting my arm wet or breaking my back. Not sure how long this setup will last, but maybe provide ideas to others?

Please note regarding my pool, I recently opened the pool and middle of SLAM....at least now it looks tropical instead of the green marsh :)

Attachments

  • idea2.jpg
    idea2.jpg
    15.6 KB · Views: 86
  • IMG-0752.jpg
    IMG-0752.jpg
    419.8 KB · Views: 88
  • Like
Reactions: Mdragger88

IntelliTouch and EasyTouch Officially Obsolete

The time has come. Pentair released a statement to all distributors and warranty stations that the IntelliTouch and EasyTouch/EasyTouch Lite systems are officially obsolete by the end of this year. Warranty will continue to be available per normal terms on equipment purchased this year, but the equipment will cease to be available for purchase on specific dates. This could end up being a bonus for folks with newer soon-to-be-legacy equipment that still has years of warranty remaining IF the replacement parts are unavailable at the time of the warranty call. This isn't entirely unprecedented - for example, we have been upgrading heaters to the connected PCB for awhile now for warranty. But Pentair giving us the blessing to upgrade a client from ET to IC would be neat to see.

Key quotes from the official statement are below:

Pentair is discontinuing the IntelliTouch, EasyTouch, and EasyTouch PL4/PSL4 Pool Control Systems. These products will no longer be available to order starting:
  • July 31, 2023 for all IntelliTouch Systems
  • September 29, 2023 for all EasyTouch Systems
We recognize these products have been in high demand for many years. However, given advancements in Pentair innovation and evolving industry demands, we are transitioning focus to the latest technology standards included with the IntelliCenter Pool Control System.

FAQ:

What control system should I order?

The recently updated IntelliCenter and IntelliCenter Lite Control Systems are the flagship automation products at Pentair, with both systems offering best-in-class technology and the most versatile control for most pool types.

Will warranties still be honored for my customers’ existing control system?
Warranty and replacement parts will be honored as available per our standard warranty policy. For more information, please review the EasyTouch and IntelliTouch FAQs.

Will obsolete products continue to be supported?
Products moved to obsolete status will continue to be supported under warranty. Pentair will replace legacy systems under warranty with comparable equipment while parts are available. If replacement parts are unavailable for existing systems under warranty, the IntelliCenter Upgrade Kit for EasyTouch, EasyTouch PL4/PSL4, and IntelliTouch systems may be required.

Filter