Main Drain to Skimmer Valve Ratio

M,

Did you just change the labels on the pipes???

Assuming your above pic is correct, you want to do the following...

1. Set the handle of the West skimmer to straight down. This will turn the skimmer on at 100%
2. Set the handle of the East skimmer to the 2:30 position.. This will close off most of the main drain and open the East skimmer as much as you can with this valve set up.

The above is all you really need to do.. but... If you want to get picky...

The skimmer nearest to the equipment pad will always get the most suction.. The skimmer farthest away will get less suction... You can try to make the suction to each skimmer the same by reducing the suction to the near skimmer and opening the far skimmer as much as possible.. You can do this by taking out the skimmer baskets and just by feeling the amount of suction at easy skimmer and then try to balance them as much as possible.. Not at all required, just something that can be done.

Thanks,

Jim R.
Yes. I did what you earlier suggested and you were correct so I relabeled the pipes. Now I can adjust. Thanks
  • Like
Reactions: Jimrahbe

Hello from Toronto

It's not clear whether "upsize our home" means moving to another house with pool, or building one for your current home. If the latter, this new thread will be of interest:


I should have been a bit clearer in my post. We are planning on buying a home with an existing pool. Hoping to have an inspection completed by a local pool company before committing.
  • Like
Reactions: Dirk

Hello from Toronto

Hey Brock and Weclome !!!

Somebody mentioned us being talked about on Reddit a while back and I went rabbit hole-ing and was prettty proud to see alot of it. Don't get me wrong, it was still Reddit and there were plenty of haters, but you could kinda tell most of them were just angry at life and we were their random target that day.


Funny you should mention that:
Click ---> Pool Care Basics
Definitely, there were some “interesting” comments from people that were not in agreement with the recommendations (for eg. Test Kits vs test strips). I guess it just comes with the territory. Thank you for including the link for Pool basics. I have some weekend reading to do :).
  • Like
Reactions: Newdude

MasterTemp 400 water in the tub

I have the MasterTemp 400 heater, and, after failure to ignite, I found the tub full of water. I know the general answer to this is that the heat exchanger is shot, but the problem is that I replaced this one brand new 5 years ago. Is it possible for this to fail after 5 years? Or, is there a chance that the gaskets on the manifold could be causing the leak? I'm not certain if the gaskets would let water into the tub. If it's absolutely the heat exchanger, then I'll just replace it, but I wanted to ask if there were other possibilities just in case. Thanks for the help!

Not getting power to Mastertemp400

I checked and J19 is not closing. All other relays seem to be working fine, water feature, cleaner, jets all turn on/off fine.

Thanks,
Mike
Replace the relay driver chips and see if it fixes the problem. The chips are inexpensive.

Otherwise the relay itself is bad and needs to be replaced. @ogdento has repaired EasyTouch boards.

Not getting power to Mastertemp400

I suspect you have a blown relay driver chip. Read Pentair Automation Systems - Further Reading

Are all of your high voltage relays and actuators working properly?

Check if J19 is closing using your multimeter as described in post #10.
I checked and J19 is not closing. All other relays seem to be working fine, water feature, cleaner, jets all turn on/off fine.

Thanks,
Mike

Not getting power to Mastertemp400

The problem is the J19 on the EasyTouch.

Either it is not being commanded to close or it is not closing due to a bad part on the EasyTouch board.

Check for continuity from pin to pin on J19 when the heater is commanded on (Call for Heat).
I checked continuity between the pins on J19 by measuring the resistance across the two screws used to secure the wires. It was 24 Mega Ohm when the spa was on. The same when the spa was off.

Solar cover questions

Get the thinnest and cheapest you can find.

The flimsy bubbles are the same on all the covers and the typical fail point. A thicker cover may last longer with less rips, but you may also snag it more often being so akward and heavy. Or if it costs 30% more and lasts the same....... yeah. Lol.

I did not like the hideous opaque white color. Blue would have looked like it was still a pool at a glance.
  • Like
Reactions: 1poolman1

DIY PH measurement and CO2 Injection System- Project Summary

Folks,

I've spent a lot of time trouble-shooting my CO2 system and the pH probe. This was all done using an ESP32 chip and can easily be done on others like RPi. Here's some updated cost info:
  • Total cost for the electronics is about $50 including the probe.
  • The CO2 setup was ~$45 plus the CO2 tank. You can get them for $100-400.
  • A CO2 fill is about $45.
I Learned a lot in the process that might be useful to pool owners especially as it relates to DIY pH systems. So I'm going to document it here. First let me discuss findings around pH measurement:
  • There are a lot of pretty cheap probes and they all have a probe that easily fits into a standard 1/2" push to connect fitting. You will find a lot of online articles and videos that claim it fits in a 3/8" fitting. That's incorrect.
  • You have to drill out the thin tube stop flange for this to work and best way to do this is in a vice. Drill carefully so you don't damage the o-ring. I have had the probe in pipe with max pressure in the range of 30 psi with no leaks or failures but I would use an additional way to secure it since it's only friction with a single o-ring that holds it in place. The best longer-term solution is a proper pH probe gland fitting. But they're not as readily available and definitely cost a lot.
  • I found a lot of probes from less than $20 to $100+. They all look the same but they are not. There are little details of construction that matter like the kind of interface junction, quality of the glass bulb and thickness and probably other things I haven't discovered yet. I think it's a good idea to go with at least probes in the $30 range as they seem to all have a ceramic junction and have better ratings. Apera is a reliable brand I've used in the past for portable pH meters so I went with theirs.
  • I don't know why but for some reason the reading jumps around a lot. Could be mine has bubbles in the water flow but it seems that even in a still beaker the reading wanders. I've overcome this by displaying a running average of at least the last 25 readings in my software.
  • Calibration is much simpler than I thought it would be based on my previous experience with portable pH testers. You start out by shorting the center pin to the ground and adjust to mid-point voltage. So what in the world does this mean? The board or module the probe plugs into has a supply value that's usually ~5v but you have to check it. In my case that's only 4.83 v. I'll adjust that later and calibrate again but that's where I am now. There's a great video on YouTube that shows how to do this. After this crude adjustment I've found only a little offset is needed.
  • You can also do a more thorough 2 point calibration using a pH buffer. I use 7.01 and 10 since that captures the readings I use. The software I created has ability to do 2 point calibration and then calculates software calibration slope and offset if you want to do it that way.
  • Here's a printout of a screen that displays pH with my home made software:

1740848905881.png

As far as the CO2 injection goes here are some of the learning's so far:
  • Further back in this thread there are some extremely useful posts from @JamesW regarding solubility, saturation, pH/TA/Borate levels that helped a lot for my initial settings. Net, net after a lot of experimentation and learning a few things the hard way I've settled in on targeting pH around 8.0 since this allows me to stay in a slightly negative CSI range to be kind to my swg cell.
  • It's very clear I need to bubble in CO2 slowly so I don't lose it to atmosphere. Right now I'm using a 1/4" tube with about 25 psi above pipe pressure to make sure I have choke flow. Next step will be to make a diffuser that has a much smaller opening. They're hard to find at a decent price so I'm converting a readily available Stenner pump quill but sealing the end tight and drilling a couple 1/16" holes in it.
  • I've set up my software to do this by controlling on-off pulses on a solenoid valve connected to a 20# CO2 cylinder. I control pulse time, time interval between pulses, number of pulses. The software allows me to schedule a pulse series or to manually start a series anytime at press of a button on the web page. Here's the complete display of the current software:


1740850071509.png

1740850116244.png

I hope this is helpful and please let me know if there's anything you need to know about this that I left out. Thanks to the experts here that have weighed in on this topic. Also thanks to ChatGPT and Claude ai environments to help we get the code written.

Chris

PS I'll get some photos later today and add them in then.
  • Like
Reactions: JamesW

Intellicenter not following Pool schedule, when Spa is being used during schedule end time

I have this same issue with my intellicenter (i'm on 3.002). my old intellitouch did not have this sillyness. i re arranged the timings of the schedule for spillway and spa only (if im in the spa, and the "spa only" schedule comes on (which calls for no heat), it will leave the heat off when its done after 10 minutes).

New Hot Tub Owner - Taylor Test Kit

I don't like pictures for something so subjective. Your light was different than the moment of the pic, and looks different, but isn't.

Switch to bleach.
Sounds good. As long as I have my visual in mind as a 'baseline' for 30. The guide says to add 10 to that, do I have that part right? So we'd be at 40 ppm for CYA?
Cheers.

Skimmer Diverter Type needed for older pool

1740855360739.png

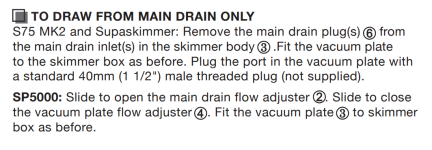
S75 MK2 and Supaskimmer:

Remove the main drain plug(s) from the main drain inlet(s) in the skimmer body .

Fit the vacuum plate to the skimmer box as before.

Plug the port in the vacuum plate with a standard 40mm (1 1/2") male threaded plug (not supplied).

SP5000: Slide to open the main drain flow adjuster .

Slide to close the vacuum plate flow adjuster .

Fit the vacuum plate to skimmer box as before.

1740855360739.png

Skimmer Diverter Type needed for older pool

1740854967549.png
1740854899514.png
1740854870520.png

1740854820560.png

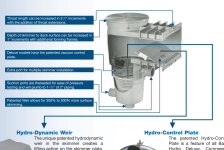
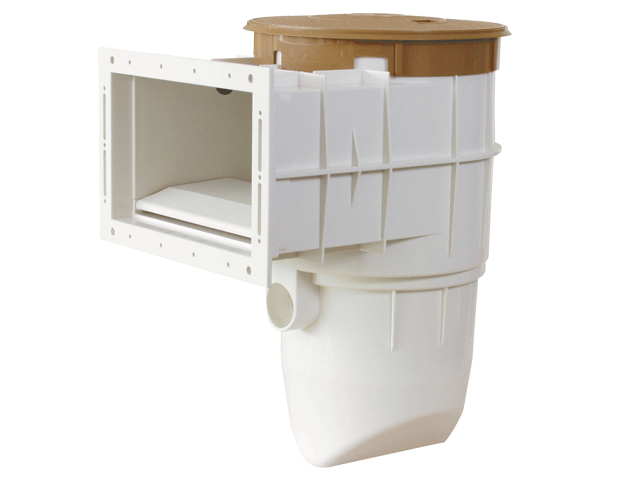
The patented Hydro-Control Plate is a feature of all Baker Hydro Deluxe, Commercial and Hydro-Pak skimmer systems and is designed to easily regulate the ratio of flow between the main drain and surface skimming to provide a convenient connection point for a vacuum cleaner hose.


OFFICE - USA Waterco (USA) Inc
Augusta, Georgia, USA Tel: +1 706 793 7291


Attachments

  • Baker Hydro Skimmer.pdf
    269.6 KB · Views: 1
  • skimmer-boxes-instleaflet_w99144.pdf
    301.8 KB · Views: 0

1740854967549.png

1740854899514.png

1740854870520.png

Filter