Hello TFP! I just finished a DYI install of a Glacier Pool Cooler and thought I’d share my experience; had done some research on these initially and while it seems they’re fairly popular, I couldn’t find a lot of information on self-installation. Hope this helps anyone else looking to do their own.
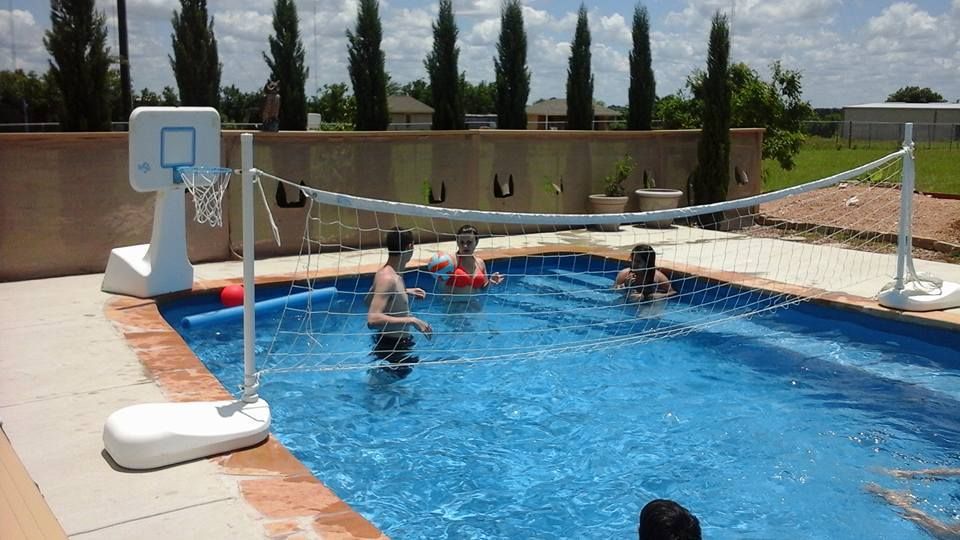
Overview: Glacier GPC-25 Pool Cooler, Hayward OmniPL controller, 13k gallon gunnite inground pool.
I’m in south Louisiana and it’s hot! My pool is in full sun most of the day. It’s early summer and the pool is consistently 92-95 degrees, and I’ve even seen it as high as 98 over the past few weeks; basically an un-swimmable, expensive bathtub. I researched both heat pumps and the Glacier, but opted for the latter as it costs basically nothing to run; a heat pump would be fairly expensive at today’s fuel prices. I originally received quotes from both of my local PB’s on the Glacier, and they each quoted about $5k to 5.2k installed, with a delivery in late Fall; while that may be reasonable by today’s pricing, I didn’t want to wait and went forward with a self-install.
The pool is just under two years old, and I’d fortunately designed for a chiller in the event it were ever needed: space on the pad, dedicated return line to the middle-sidewall of the deep end, and T in the plumbing. I opted for the GPC-25, good up to 20k gallons, as the open space on my pad is 2’x2’ and the only gain from a larger chiller is quicker cooling, though not lower temps.

TC Pool Equipment in California had three in stock for $2.3k plus shipping; bought on Monday and delivery on Thursday. First, this thing is big. Thankfully I didn’t go with the 30k gallon GPC-210; the pad I have was barely enough for the 25. The build quality was a little surprising: it looks almost hand-made; lots of small scratches and imperfections in the fiberglass, grating, mesh, etc., though the unit functionally has no issues so far. So, after getting the unit to the pad, it was on to electrical, automation, plumbing and programming.

Electrical: The GPC-25 is a 120VAC/8A single phase unit, comprised of one sump pump and a fan. It has a weather-proof light-switch box on the side, but note that the unit arrived with nothing wired; just a stock on/off switch. I wired both motors to the electrical box, to the ON contact of the switch. From there, I ran 14AWG wiring from the OFF contact through flexible nonmetallic liquid-tight conduit to the OmniPL controller. This will allow me to control on/off from the controller, and use the manual switch on the Glacier as a disconnect if I ever need to force the unit off locally.
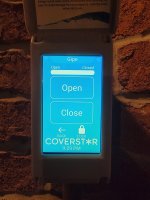
Automation: The OmniPL controller has 4 stock high voltage relays (HVR1-4), with room for two more internal (HVR9 and HVR10), plus an external bank of four (HVR5-8). All onboard were already in use, so I ordered an extra HLRELAY and installed as HVR9, and wired to a new Eaton BR10 20A breaker that I installed in a spare slot dedicated to the Chiller. The OmniPL also has room for four temperature sensors; I have two open, so ordered another sensor to plump into the Chiller’s return line to monitor temperature of the cold water return going into the pool. Not sure if the Omni will allow easy monitoring of this not tied to a named heat pump or solar array, but it was worth the try for $20. The last part of the automation was a new 3-way diverter valve and a Hayward GVA-24 actuator to handle water flow connected to a spare valve channel.
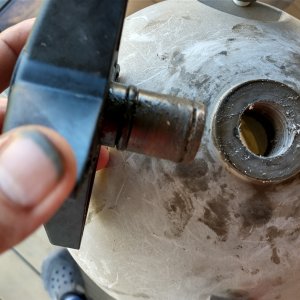
Plumbing: This was definitely the hardest part; plumbing is not fun. While I had asked my PB to pre-plumb for a future chiller, I have multiple issues with my plumbing. Specifically in this case, they installed the diverter valve for the chiller upstream of the filter; you can’t run unfiltered water to ANYTHING, so no idea why they did this. I abandoned that valve, and cut my own diverter connection into the piping downstream of the filter, before the heater. This valve and actuator are typically closed to the chiller, but open when set to run and divert some of the water off to the chiller for cooling.

From there, the input is plumbed to a Jandy ball valve, then into the inlet on the chiller. The return to the pool then runs through a new union to the PVC in the pad, and out to the pool return.

The Glacier manual states for new installs that the return line should be in the bottom center of the pool, but I’m glad my PB located it on the lower sidewall; the cooled water will get picked up by both the skimmer and main drain, then easily spread through the plumbing and off to the entire pool.
Each Glacier also has a drain plug that needs a small ball valve on it for quick draining and winterization; the manual states this is 1”, but on the GPC-25 apparently it’s only 3/4”! That cost me one of my 4 Home Depot runs. In addition to the cost of the Glacier, I spent probably another $400 altogether on the electrical, relay, valves, actuator, PVC, glue, sandpaper and other odds and ends.
Programming: Once everything was installed and running, I ran through a bit of programming on the OmniPL to attempt to automate as much as possible. I setup the Chiller as a new Water Feature, tied to the high voltage relay and the actuator. While the Omni doesn’t allow conditional logic, you can do some things within Interlocks. The downside of the Interlocks is that they force states, so you don’t want to force the Chiller to run: you wouldn’t be able to turn it off. Instead, I setup schedules to run the Chiller essentially full-time though outside of the hour or so that I run my VSP on a higher speed to skim. I then configured a bunch of interlocks: do not run the chiller when the heater is running, don’t run the chiller when in Spa mode, don’t run the chiller when the cleaner booster pump is running, don’t run the heater if the chiller is running, don’t run the chiller if the main VSP isn’t running, etc etc.
The key interlocks I then added are to stop the chiller if the water temp drops below 82 degrees, and to stop the chiller if ambient temperature drops below 78 degrees. Still tweaking those setpoints, but the thought is that if either of these cases occur, the pool is already going to be cool enough naturally and I don’t need to bring the temp any further down! Have more to experiment on this front, but hope that this will essentially allow me to set and forget it, though I’ll still have to consider runtime on the VSP.

From there, startup was very straightforward. Open the inlet ball valve all the way, start the pump and chiller, then pinch back on the ball valve and attempt to time the spray bars to meet a 7-12 RPM speed. Very small movements on the valve make a big difference in speed, so it takes some tweaking to tune it. As others have said on TFP with these, pump speed also matters; I attempted to start on a low speed of 1,300 RPMs, but this wasn’t pushing enough water to run both the chiller and feed my three pool returns, nor to effectively circulate the chilled pool water. I stepped this up to 1,800 RPMs which seemed plenty, which also moved enough water throughout the pool.

From an operational cost standpoint, my first full day cost only $0.51 to run the chiller, and an additional $0.32 to run the VSP; that’s less than a dollar a day adder. The pool temp dropped from 95 degrees to 86, from 3pm when I finished the install and finally turned it on, to 7am the next morning. This was in 97 degree weather with a heat index of 106 and humidity as high as 88. Pretty impressive, as my pool hasn’t seen below 92 in weeks. We jumped in the pool after having the chiller on for maybe 15 minutes, and the water coming out of the return felt ice cold next to the heat of the surrounding water. Running the chiller the entire next day also held temp to a maximum of 88, well within my desired temperature range, and the change was incredible.

Total installed cost was about $3.1k, saving about two thousand from having it professionally installed. My next steps are to install the temperature sensor and continue to tweak the programming setpoints, pump speed, ball valve setting, etc. and try to find an optimal setup. The rain finally came out and this heat wave seems to have finally passed, so I’m halfway disappointed that I won’t need to run the chiller for at least the next week after all that work!
Hope this was a fun read and provided some information for anyone looking to do the same, and I’d be happy to answer any further specifics if interested.
Cheers!
07/03/2022 Automation Update:
Spent quite a bit of time over the last week trying to find the ideal way to configure the Chiller within the OmniPL. Originally I had it configured as a water feature as described above, but wanted to be able to monitor the return temperature as well. The temp sensor is available and can be read while in service mode, but unfortunately the controller does not expose additional sensors outside of equipment. I tried the chiller as a Solar cooler, but the sensor then acts as a lockout when the cooler is off and the temp is at or above the pool temp. I also considered configuring it as another body of water, but it would have to function as a pump and there are limitations on being able to activate the valve and configure needed interlocks.
I gave up on being able to see return temp outside of service mode (for now until Hayward adds this capability
")
, and ultimately configured it as a chiller within the heat/cool setup alongside my gas heater. This functionality was added to the Omni in a recent firmware, v4.3.x.

This works very well and is much simpler, allowing temperature control to set point without having to rely on interlocks, and I can essentially leave the chiller enabled through the summer and it will automatically run as needed.


 In fact, there are only a few Active 30i’s left in stock at Marina.


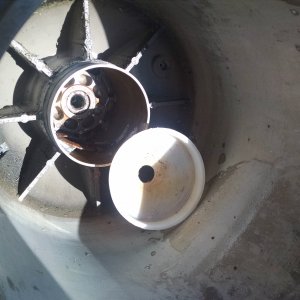
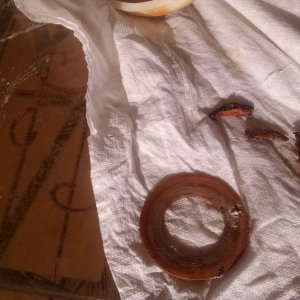
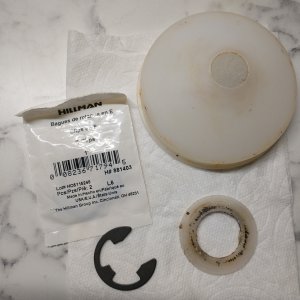
 My pool looks great and feels great. I did run into a small issue when my just-over-one-year-old Hayward pump started leaking at the shaft.
  I don’t know if that had anything to do with the conversion but regardless, it’s fine now. I found out pretty quickly that getting someone to replace the seals was going to be difficult and expensive so I bought a repair kit and did it myself!
  (proud of me). No more leaking.
 . PS. We replaced all of our Hayward equipment with Pentair a few months ago and our old Hayward pump water level would lower with it turned off, unlike this new one, so everything would drop to the bottom of the basket.