
Latest activity
You are using an out of date browser. It may not display this or other websites correctly.
You should upgrade or use an alternative browser.
You should upgrade or use an alternative browser.
Filters
Show only:


First look at Pentair's new IntelliChlor Plus30
- By Homebrewale
- Salt Water Chlorine Generators (SWG)
- 110 Replies
Here are the full FAQ's I found posted on their site from scanning the QR code on the unit... https://www.pentair.com/content/dam...lliChlor-Plus-LT-Salt-Chlorine-Generators.pdf
I see the minimum flow is now 25GPM. This stinks because according to my Intelliflo pump, I am currently running 21 GPM at 1200RPM. Hopefully this is not correct and I can still run at 1200 RPM to get the necessary flow.
They also upped the low salt warning to come on at 3000ppm, instead of 2800. Still works down to 2600 though.
Looks nice. Glad to see it has the voltage and current values displayed as well. That will help with troubleshooting. Wish they would give us the ability to adjust the salinity to a tested value.
--Jeff
My Intellichlor 40 lists the minimum flow rate as 25 GPM in the manual which is no different than this new series of SWG.

First look at Pentair's new IntelliChlor Plus30
- By wireform
- Salt Water Chlorine Generators (SWG)
- 110 Replies
Lets see if the display will show reversal mode with a negative "-" when it cycles.
First look at Pentair's new IntelliChlor Plus30
- By wireform
- Salt Water Chlorine Generators (SWG)
- 110 Replies
Guaranteed repeat business.Check out that new acid washing kit. Pretty fancy.
First look at Pentair's new IntelliChlor Plus30
- By Skenn81
- Salt Water Chlorine Generators (SWG)
- 110 Replies


The display updates every couple of seconds when its operating, it wasn't just a static point in time when on this screen.
Also the unit was able to detect flow (as can be seen by the green lights) with the pump running at 1750rpms, which is what I had to have it for the old unit.


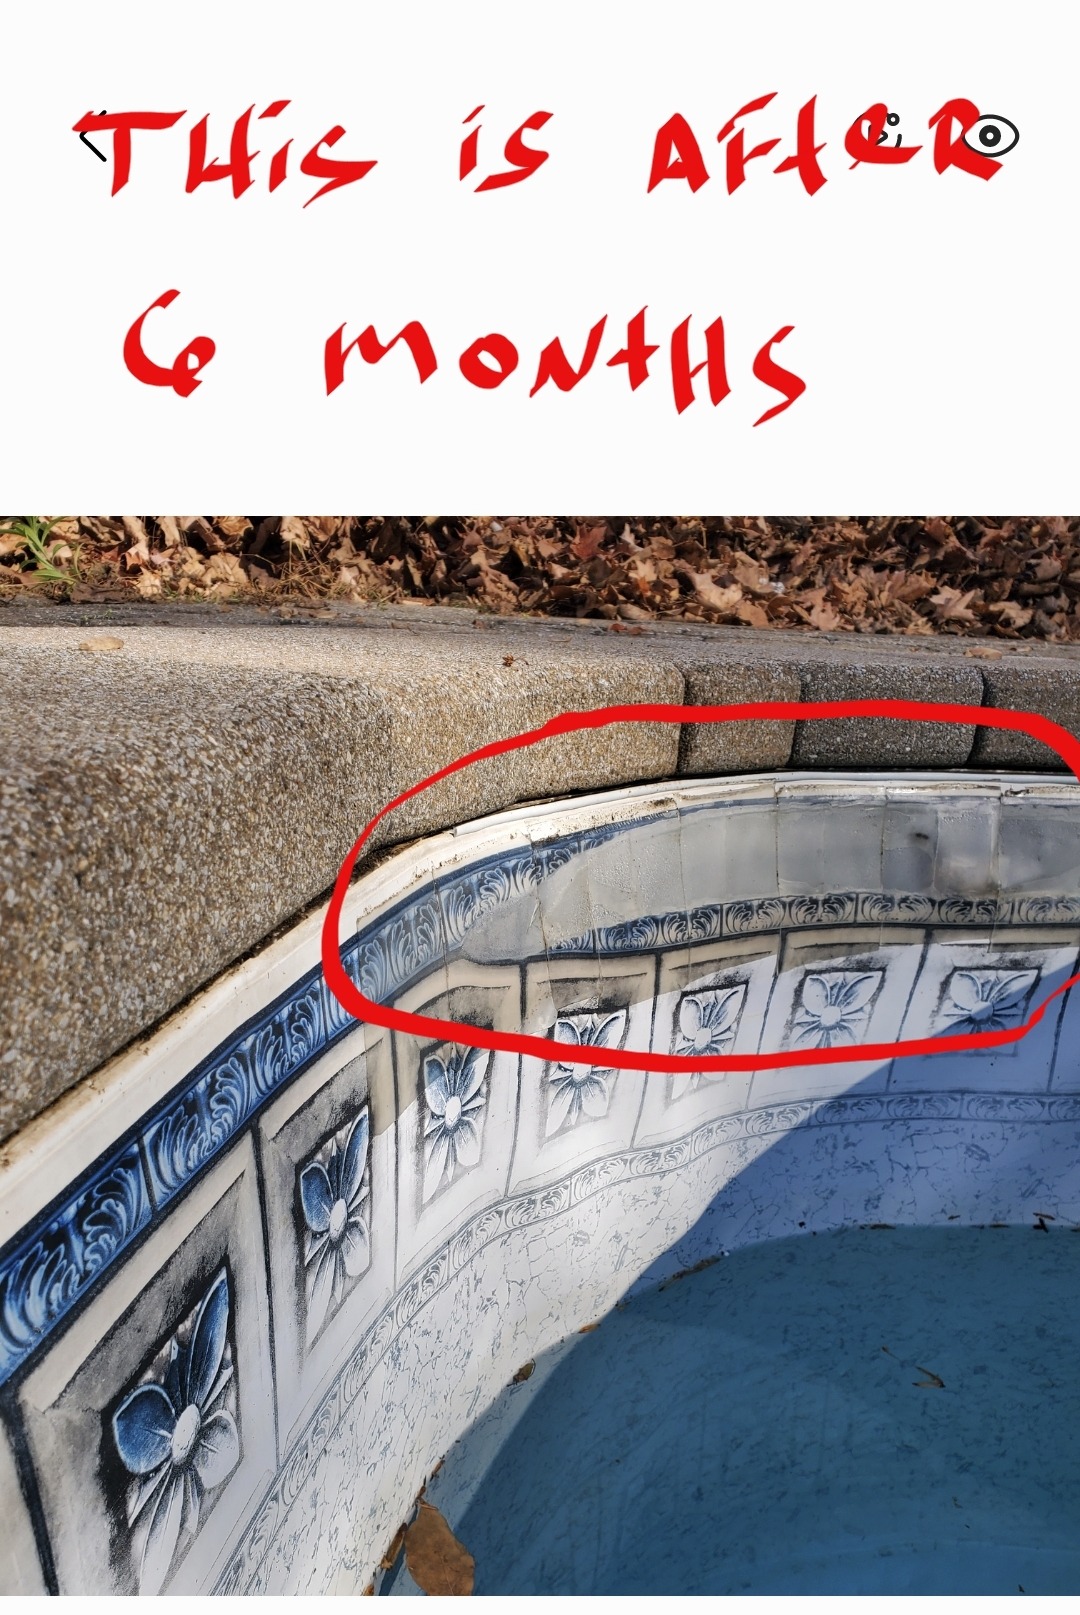
New Vinyl Liner, Lumps and Undulations
- By ATbrO1865
- Under Construction
- 3 Replies
We are currently having our vinyl liner replaced. I went outside to check on the progress after the crew put the liner in and noticed a lot of bumps on the floor. I thought maybe they were air pockets or something of the like but, after further inspection, realized they were lumps underneath the liner.
The crew had to remove some of the old sand material underneath that had moss growing in it and patched it with new material. We never had these lumps before. When I spoke to the install manager, he told me that this was normal and to be expected with a sand bottom. If we wanted something smooth, it would have to be replaced with concrete or they would need to add a "skim coat" to it which means we would be paying for additional materials.
Is this normal? Do these bumps flatten over time or should we expect the installers to grade the bottom and smooth the patches that they made? Pictures for reference.
Attachments


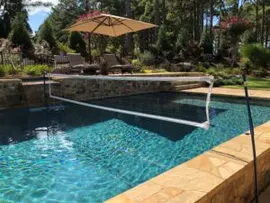
Volleyball setup for L Shaped pool
- By PoolStored
- Under Construction
- 3 Replies
Here are a few ideas for you:
Sleeve in the bottom of the pool:
 www.troublefreepool.com
Maker is no longer in business, but they made an S shaped post anchored in the deck:

Cobra may have a solution for you, might reach out to them...they may have already solved the issue:
 cobravolleyball.com
Sleeve in the bottom of the pool:
Volley Ball for my L shaped pool
We are in the builder selection and design phase of our poll. Attached is an example of the pool that we want to build but not the final design. It is an L shaped pool with a play are and diving area. The issue one of the prospective pool builders brought up yesterday was where to put the...
www.troublefreepool.com
Maker is no longer in business, but they made an S shaped post anchored in the deck:
Cobra may have a solution for you, might reach out to them...they may have already solved the issue:
Custom Pool Volleyball Net System | Cobra Net Systems
Looking for the best custom pool volleyball net system? Our Custom Anaconda Pool Volleyball Net System is just what you need. Visit our website to buy it today!
cobravolleyball.com

Need Help with Liner Repair
- By wireform
- Everything Else
- 7 Replies
What you can't see in my patch is that I reinforced the back side of it with vertical strips of the tape but made sure the seam of the front layer comes out to the center of the back layer. The back was also cleaned properly only to reduce the stretch factor of one layer on a very large patchwork which essentially is missing the middle of the liner since the liner was torn for a few years the lower part pulled way down with no return possible. The purpose was to curtail the tear going sideways which I think worked well here.
Raypak Heat Pump flow issue
- By PoolStored
- Everything Else
- 4 Replies
JCC...
Is it just the restriction, or are you trying to automate?
Restriction goes with the territory. I normally run 1400 RPM when heater is off. To get 35GPM flow required by the heater, I need to run 2200RPM.
Is it just the restriction, or are you trying to automate?
Restriction goes with the territory. I normally run 1400 RPM when heater is off. To get 35GPM flow required by the heater, I need to run 2200RPM.
Hayward Power Flo Matrix pump/motor
- By mpapworth
- Pumps, Filters, and Plumbing
- 14 Replies
Thanks...
I don't get it.
The image attached to my post is unreadable but the one in your reply looks fine.
I don't get it.
The image attached to my post is unreadable but the one in your reply looks fine.
Aqualink 2.0 Antenna - what to use
- By msmith33557
- Pool Automation
- 7 Replies
@jmdaniel
How did you connect the antenna, in the Amazon picture it looked like a female connector on the antenna and the IAquaLink need a male connector antenna. Trying to solve the same issue.
How did you connect the antenna, in the Amazon picture it looked like a female connector on the antenna and the IAquaLink need a male connector antenna. Trying to solve the same issue.
Need Help with Liner Repair
- By Newdude
- Everything Else
- 7 Replies
I'm torn (too soon for a pun ?)
If the liner has some springyness to it, I'd go with the tape, probably reinforcing it with thin vertical strips on either side of the tape patch like below. Then I'd make the call if I wanted to leave it or patch over it.

But if the liner is real brittle with no play to it, I'd worry that the tape held mint but the liner cracked at the edges of all the tape. So then I'd go with the vinly patch that was more likey to give at the edges when when flexed from waves or if somebody hit it.
If the liner has some springyness to it, I'd go with the tape, probably reinforcing it with thin vertical strips on either side of the tape patch like below. Then I'd make the call if I wanted to leave it or patch over it.
But if the liner is real brittle with no play to it, I'd worry that the tape held mint but the liner cracked at the edges of all the tape. So then I'd go with the vinly patch that was more likey to give at the edges when when flexed from waves or if somebody hit it.

Hayward Power Flo Matrix pump/motor
- By ajw22
- Pumps, Filters, and Plumbing
- 14 Replies
I can read the data plate fine….The image I uploaded is unreadable. The original is fine.
TFP must compress the files.


Need Help with Liner Repair
- By wireform
- Everything Else
- 7 Replies
Use the Gorilla clear tape which is made for under water too. Don't worry about trimming the patch and use it full width as this liner is begging to break more. Don't do a patch over a patch with this product as they clearly state NOT to. Make sure to have nicely rounded corners as square corners will pull up after a bit of time. Don't try stretching or pulling and just get the tape on it sooner then later. Prep is your best friend here for a good outcome. I used a damp rag with undiluted mr clean by holding the damp rag against the bottle and inverting it for a second. That small amount on the rag several times around the damaged area cleaning past all sides the tape will reach. Then rinse a few times with another rag so absolutely no residue remains. You only have one shot at it so once the patching tape hits the liner there's no pulling it back as it's very strong. Below is a patch with the before and after with the Gorilla product.


Raypak Heat Pump flow issue
- By jccvar
- Everything Else
- 4 Replies
Hello @hotpool2468.
I just installed the same configuration as yours (Raypak 140K and the Intelliflo V3), and I am having the exact same issue. When I close the bypass so the water flows only through the heater, the water flow is restricted by 50%. If I normally get 60 GPM at 50% speed, when the water goes through the heater at the same speed, the flow drops to 24 GPM. In order to get around 40 GPM, I have to set the pump to 80%. Did you find any solution for this huge water restriction?
I just installed the same configuration as yours (Raypak 140K and the Intelliflo V3), and I am having the exact same issue. When I close the bypass so the water flows only through the heater, the water flow is restricted by 50%. If I normally get 60 GPM at 50% speed, when the water goes through the heater at the same speed, the flow drops to 24 GPM. In order to get around 40 GPM, I have to set the pump to 80%. Did you find any solution for this huge water restriction?
Load more