TFP has spoiled my family

My family is currently staying at a hotel with an indoor pool and outdoor Jacuzzi. My kids keep complaining about how painful the water is on their eyes. Even my husband talked about how the water isn't as nice as ours. I'm feeling pretty pleased with how well our pool did during its first summer. Thanks so much to this community!!!

Once again, TFP +SWG + Automation (plus fall) for the win!

So, I did a full set of tests almost 3 weeks ago. We haven't used the pool or spa much. Between knee pain, surgery, and recovery, I tested for the first time today. Chlorine is just north of ideal range, pH is in the ok range (7.8), and all I have to do is get the spa to the right temp and wait for the weather to clear to jump (ok, step carefully) in for some at-home therapy.
I am not recommending this kind of span between tests, but it's nice to know that when life happens a little benign neglect won't turn the pool green overnight, as long as you're following TFP practices, know your pool, and have the SWG and automation dialed in.

Fiberglass - The build in New Jersey

Today the dig has begun for the Leisure Ultimate 40 FG pool. NJ location. Never thought we would have a pool so we are going backwards. Fence was in, sprinklers were in so sprinklers will need to be redone and one of the main lines was cut (murphy's law). No bedrock was hit or so far any major dig obstacle. Just the underground downspout main line will need to be relocated. Dig started and needed to stop as rain was moving in. Been dry as a bone for weeks but day we start down comes the rain. How it goes and have to take it as it comes.

D207518D-A314-4B31-9F0A-553F04269CDC_1_105_c.jpegDB49CE11-68A2-4F15-93A1-2C4F2749166E_1_105_c.jpeg848CF86F-7C30-4B30-9AC7-7A18ABEEBD39_1_105_c.jpeg

Pebble done!

Just got pebble done this morning, acid wash tomorrow than pool fill!

It looks like they left quite a mess on the glass tiles, does that get cleaned off as part of acid wash or should I be concerned about that now?

Tested my tap water last night, gonna run over to Leslie's today or tomorrow to buy some chemicals. I already have chlorine, but thinking I need some muriatic acid, calcium chloride and CYA to start?

According to the start up instructions, for day 1 after fill it looks like I need to bring my TA down to 80. I think everything else looks good for now until I put chlorine in after 48 hours?

Cl: .5
pH: 7.6
Ch: 150ppm
TA: 90

IMG_3281.jpegIMG_3282.jpegIMG_3283.jpeg

Pentair IntelliCenter Review and Information

So, it’s been almost about a month now, since I received the Pentair IntelliCenter Control System automation equipment and “let the fun begin”. I thought that I might share my experiences and my opinions up to this point, in case others may be considering the purchase and use of this particular automation system in the future. I realize that a month is not very long, but with the amount of time that I have spent “holding-hands” with the IntelliCenter during that month (and the time I spent with my nose buried in the various user and installation guides), I feel I have become somewhat of an SME on the subject.

I have attempted to comply with the TFP Guidelines for Posting Reviews, while drafting this particular review and I am not promoting nor am I advising against, the use of the Pentair IntelliCenter Control System, or any other automation system for that matter. I have attempted to be fair and honest in my assessments of this particular automation system, based upon my own personal experiences up to this point.

I will update this thread as time goes on, as I work with Pentair on some “bug” issues and if I discover new and relevant information regarding the installation and use of the Pentair IntelliCenter Control System.

Background:

Earlier in the year, I had decided to completely renovate and update my pool equipment pad. I spent many hours on the computer (especially here on TFP) doing lots of research on advanced plumbing techniques, equipment specifications, automation integration, etc.

IntelliCenter still had not been released at the time I decided to get started (July). After some online research and contacting one of the local Pentair reps, it was determined that if I installed a Pentair IntelliTouch/EasyTouch Load Center, that I could then convert it to IntelliCenter later, once the newer automation system was released. Great! I could at least get a head start and get the electrical laid in, and then I could decide later on whether to go with the IntelliCenter Control System or one of the other Pentair automation systems.

So I ordered ONLY the IntelliTouch/EasyTouch Load Center at that time and started digging. I retrenched (ouch - 18” deep) from the equipment pad location about 120 feet to the house electrical service entrance. I laid in new 60 amp service to the new Pentair Load Center (good thing my neighbor is a commercial electrical contractor). He gave me all the advice I needed and then helped me with the “pull” through the conduit). But he sure didn't help me dig

I was now ready for the automation. I had been advised by some, to maybe think twice about the IntelliCenter and possibly consider opting with the tried and true ScreenLogic type systems (IntelliTouch or EasyTouch), since the IntelliCenter was still so new and not much was known about it at that time. This advice was certainly sound, based on information available at the time and based on their past experiences, but after some exhaustive research and willing to "jump-in" and take a chance, I was determined to move ahead with the IntelliCenter integration anyway.

My decision towards IntelliCenter versus the ScreenLogic type automation systems was based on many factors, some of which I have outlined below, others that I have chosen to keep to myself due to the fact that I respect everyone’s decision to choose their own type of automation system based on their own personal preferences and their particular needs and requirements.

1. Newer technology and the capacity for further enhancements in the future.

2. Web Based (no need for configurator type utilities and programs).

3. Since I greatly prefer wired connectivity (when available) versus wireless (for a myriad of reasons), I could “lay-in” Cat5E to the equipment pad and just “plug and play”, due to the onboard ethernet port (built-in connectivity) located on the IntelliCenter Control System Main Circuit Board. (I ran a 1” conduit using grey electrical pvc, from the side of the house (attic) to a low voltage raceway “knockout” and pulled in the Cat-5E).

4. Automatic software and firmware update “pushes” versus the “flash-upgrade” style updates that I understand requires an expensive Pentair Automation Flash Programming Kit.

5. Future expandability, flexibility and upgradeability (i.e. future RS-485 support for IntelliValve and possibly IntellipH as well).

6. USB port which allows for saving the latest system configuration file. (i.e. If experimenting with a new System Configuration, Schedules, Features, Feature Groups (macros), etc. and I goof something up, I can always revert back to the last saved config file and start over).

7. No real cost difference from other similar systems due to several factors that I will not elaborate on here.

8. Built-in integration support for the new Pentair IntelliFlo VSF pump (011056) (which I had opted for and installed) or the Pentair IntelliFloXF VSF pump (022056).

9. Built-in integration support for the new Pentair IntelliValve (two come bundled with the personality kits).

10. Larger Capacitive type screen which is touch sensitive, and which would allow me better access to ALL functionality at the equipment pad (when preferred or required).

11. 32 “Feature Circuits” capability.

12. 16 “Feature Groups” (“macros”) capability.

13. A whopping 100 available "Schedules".

I was told by Pentair Tech Support and authorized Pentair dealers that were offering the IntelliCenter, that I would need the Pentair IntelliCenter upgrade/retrofit kit, and that it would not be released until the March 2019 time frame. But I forged ahead anyway and continued conducting my own research on IntelliCenter, in order learn as much as I could about the newer automation system.

I contacted the local Pentair rep again. After some research on their part, I was told that I DID NOT in fact, have to wait for the upgrade kit. I was told that what I needed was just the i5PS personality kit (521912), the IntelliCenter System Transformer kit (522102Z) and because I was going to incorporate six valve actuators with the automation (the personality kit will only allow for four), that I needed the Valve Expansion module (522038Z) (I already knew about this one). All of this made sense to me but I was a little nervous about the whole affair, since it appeared that I was now being the “guinea pig” with all of this, since it was so “new”

Okay, so I took a deep breath, grabbed the VISA card and called PolyTec pools and proceeded to place my order. By this time, I had decided on the IntellipH versus the IntelliChem, due to my research and the good and sound advice I believe, that I received from other members here on TFP. So I also ordered that (the ipH) as well, along with four additional Pentair IntelliValves. (again, the personality kit includes two IntelliValves).

Converting the IntelliTouch/EasyTouch Load or Power Center for IntelliCenter: (The following is NOT applicable for those future IntelliCenter users that do not already have an IntelliTouch or EasyTouch Load/Power Center that they are converting to IntelliCenter!


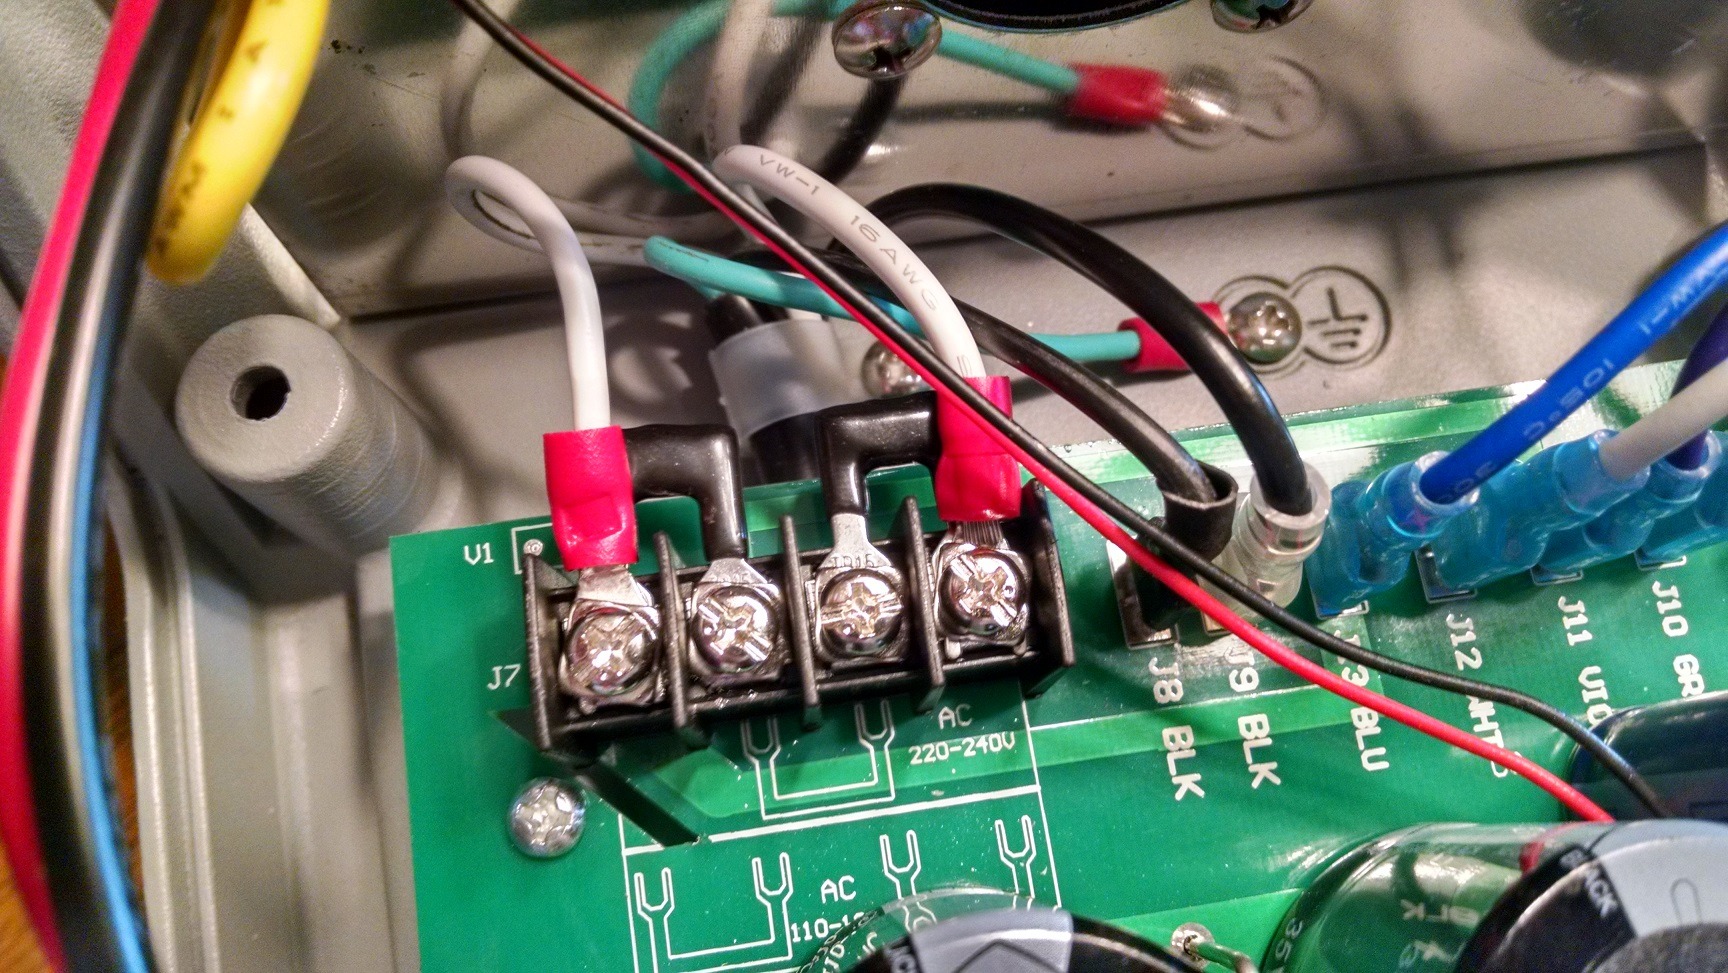
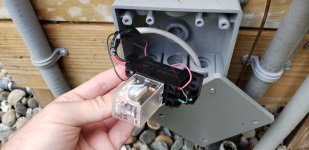
The first thing I needed to do was to convert my IntelliTouch Load Center to accept the IntelliCenter. That meant the removal and replacement (r&r) of the system transformer and some of the low voltage circuit breakers.

The only difference that I can tell between the IntelliTouch/EasyTouch system transformer and the new IntelliCenter system transformer is that the low voltage circuit breaker wiring harness is different (the voltage and amperage specifications are the same as far as I can tell), however it does look different and feels heavier.

Note: When purchasing the IntelliCenter System Transformer kit (522102Z), the kit will include the transformer, mounting hardware and the two new 18V-5A and 24V-4A low voltage circuit breakers that are required to replace the older low voltage circuit breakers.

The IntelliTouch/EasyTouch Load/Power Centers utilize three (3), 3-amp system low voltage circuit breakers (along with the optional grey SWCG 24Vac, 12A breaker). These are for the following:
Electronics: 12V, 3A
Valves: 24V, 3A
Relays: 18V, 3A

The IntelliCenter utilizes only two (2) low voltage circuit breakers (also along with the optional grey SWCG 24Vac, 12A breaker).
These are for the following:
Electronics: 18V, 5A
Valves 24V, 4A
Relays: NONE (different type of circuitry I assume)

Removing and replacing the system transformer and the low voltage circuit breakers, was not too bad of a chore but it was a bit time consuming, as I was taking my time with it, so as to not “break” anything, and since no instructions were included in the kit.

WARNING: You should always remove power from the Load/Power Center at the main circuit breaker panel/service entrance circuit breaker that feeds power to the Load/Power Center, before removing the high voltage cover panel (dead front). If you are not completely comfortable or confident in your abilities to do this type of work, I highly suggest that you consult with and hire a licensed and experienced professional who is.

1. Once you have removed power from the Load Center/Power Center, remove the Load/Power Center high voltage cover panel (dead front). Can you figure out why it’s nicknamed a “dead front”? :)

2. Disconnect the appropriate line power leads from the system transformer to the breaker.

3. Unplug the connector that is connected to the older system board that is attached to the system transformer (I did not have to do this, since I only had the load center and no other system board yet) and unplug the connectors at the back of the low voltage circuit breakers (insure that you note what color of wires you are unplugging from which circuit breakers so you know what goes where, when you replace these connections with the newer circuit breakers).

4. Remove the four transformer mounting screws and remove the system transformer.

5. You will then have to completely remove the low voltage circuit breaker housing mount (a bit of a pain but do-able).

6. Remove the three (3) old low voltage circuit breakers from the mount and replace with the two (2) new low voltage circuit breakers in the low voltage circuit breaker housing mount.

7. Install the new IntelliCenter System Transformer in the Load/Power Center.

8. Install the low voltage circuit breaker housing mount in the Load/Power Center.

9. Re-connect the appropriate line power leads from the system transformer to the applicable circuit breaker (120Vac or 240Vac).

10. Replace the Load/Power Center high voltage cover panel (dead front).

11. Return power back to the Load/Power Center at the main service entrance HOWEVER, ensure that the breaker that supplies power to the system transformer is in the OFF position for the moment before proceeding.

You are now ready to mount the IntelliCenter System Board in the Load Center. However, in my case, I had to attach the optional Valve Expansion module (522038Z) to the System Board first. It’s very easy, but a word of warning here. You are handling circuit boards which are very receptive to damage from static electricity. Ensure that you take the necessary precautions recommended to eliminate the possibility of static electricity damage to the circuit boards.

Attach the connector from the Control System Transformer cable to the Circuit board/Touch screen assembly.
Energize the circuit by placing the applicable circuit breaker back to the ON position.

Initial Power-up and Setup Wizard:
Once power is applied to the IntelliCenter Control System, the system will perform an initial power-up sequence and you will be presented with a Pentair End User License Agreement, which you have to scroll down through and then tap the I Accept button to proceed. This will occur only once, at the initial power-up.

I highly recommend that the Setup Wizard be utilized in order to get started. To start the Setup Wizard from the home screen, tap Settings > Advanced System Configuration > Wizard. I found using the wizard easy and it basically walks you through all the steps in order to configure all of the basic setup items to include the Network and WiFi (if applicable) setups. You can skip items that you want to come back to later.

Once the network configurations are completed, all other General, Advanced System Configurations, Circuit, Feature Circuit, Circuit Groups, Chemistry Control, Other Equipment (Valves, Heaters & Covers), Pumps and Remote(s) (If applicable) configurations and settings can be completed using one of several user interfaces.

User Interfaces:
There are several user interfaces available to control and/or configure IntelliCenter.

1. The IntelliCenter Control System Outdoor Control Panel (obviously).

2. The IntelliCenter Control System Web-Client where you utilize a PC, MAC or tablet to access your IntelliCenter through the web interface :grrrr: (More on that later).

3. The IntelliCenter iOS app which can be accessed through the applicable iPhone, iPad, iPad Touch device or Apple Watch.

4. The IntelliCenter Android app through the applicable android device.

5. IntelliCenter accessibility can also be accessed (for the most common pool/spa control commands only) through the Alexa app available for free through Amazon, if you have one of the various Amazon Echo’s, Fire TV cube, etc.

6. The optional IntelliCenter Control System Wireless Controller or Indoor Control Panels.

To be fair here, I have only used the Outdoor Control Panel, iOS device/app and the Web-Client (PC) to access, control and configure IntelliCenter. I have also used Alexa/Echo to give some of the common commands to IntelliCenter. I cannot comment on the Android app, Apple Watch, or the Wireless or Indoor Control Panels, since I have not used those devices.

Below, I have attempted to provide my assessments on the use of the IntelliCenter Control System, based on my own personal experiences so far. Some of my opinions may change over time if I find certain “work-arounds” and/or (hopefully) software and firmware upgrades are applied that change various functionality, etc.

The Good: Here is what I really like about IntelliCenter so far.

1. Onboard Ethernet port. Using the onboard Ethernet Port for direct connectivity to my router worked out really great. Right after initial power on, It immediately went out and grabbed an available DHCP IP address from my router (I later changed it to a static address).

2. Recognition and integration of the additional capabilities (flow rate and pump speed) of the newer Pentair IntelliFlo VSF pump (011056) or the Pentair IntelliFloXF VSF pump (022056).

3. The Setup Wizard. I thought Pentair did a good job with this.

4. The Additional Feature Circuits and Circuit Groups (Macro Circuits) available. Not that I have come close to utilizing them all “yet”, (13 out of 32 Feature Circuits (not counting the 5 main Circuits that I show as “feature”) and (8 out of 16 Circuit Groups), but I can certainly see how I can come close, especially as I continue to find “new ways” to automate various functions and certainly when RS-485 support for the IntelliValve and possibly the IntellipH as well, become available in the future.

5. The touchscreen is pretty cool and I find it fairly easy to navigate with all in all, as far as touchscreens go.

6. Automatic update “pushes”. I just received a firmware update a few days ago. Once an update is received, the next time you access the touch screen, it will advise you of this and ask you to ACCEPT the update and then it will list the update release notes. Here is an example below. (I will have to put this in another post, as I have reached the "10 images limit" I guess)

NOTE
: This update alone, fixed two of my “beefs” that I was going to place on my "punch" list, so hopefully there will more updates soon and I will have no further “beefs”.
NOTE: You can always access ALL of the release notes from the previous updates, from the control panel touchscreen at any time.

The Bad: Certainly the IntelliCenter is not the panacea for every pool issue or configuration (no automation system is), but here are a couple of things that I believe Pentair could do a better job with, as it relates to the IntelliCenter automation.

1. TouchScreen readability in the sun. As predicted in another earlier thread, the Capacitive Touch Screen is a bit hard to see in the bright Arizona sunlight. I turned up the brightness to 100 but there is no contrast control to adjust. It’s not super-bad and you can shield with one hand which helps a bit, but it is still a little annoying when the sun is shining bright, especially if you're wearing “shades" On the other hand, it rocks on a cloudy day or at night! If your Load/Power Center is “under cover” or shielded from the sun in any way (shade sail, etc.), this will not be an issue.

2. Water and Air Temperature Sensor Calibration. I am placing this particular issue in the “bad” column and not “ugly” (although it’s driving me nuts), due to the fact that I am of the understanding that this may not be an IntelliCenter issue but instead, may be due to sensor or user malfunctions. I have insulated the Water Sensor from the sun and the Air Sensor is mounted in the normal location at the bottom of the Load Center, so it is also shielded from the sun. Every time I adjust the calibrated value, it does not take long for both values to get “out-of-wack”. Like right now, on a December evening (actual Air Temp is 54), IntelliCenter is reporting the Air Temp “True Readout” at 77 and Water Temp True Readout” at 74 (no way). I have been chasing these two values for weeks now and cannot get them to “settle-in”. Again, I don’t know if this is an IntelliCenter issue, a “two bad sensors” issue or a “user” malfunction (likely I may have to address this issue in a separate thread in order to attempt to resolve it.
UPDATE: (3/8/19) I think this issue has been improved by adding the 0.1uF Microfarad capacitors as discussed in thread #30. I don't think this was an IntelliCenter issue now. I just think the sensors are just not that accurate!


1. IntelliCenter Control System Web-Client. This has to be numero uno for me!!! I would consider myself fairly “IT” savvy and I have worked with a lot of various web and touchscreen applications over the years, so I am no “rookie” in these matters. Okay, I’m trying to be nice here, but who wrote the code for this web application and why hasn’t Pentair done a better job at making it do what it is supposed to do, correctly, the first time out. I've listed some examples below. (Just to note, upon discovering these deficiencies, I attempted to use other major web browsers, just to be sure it wasn’t just a Firefox compatibility issue).
a) Saving. Just about every time I attempt to create or modify a Feature Circuit, Circuit Group (macro) or sometimes a schedule and click SAVE, in the Web-Client, it does not always “take” the first time. I have to then redo it. If I do not give it enough time to “take”, then it will create a duplicate on the second go-around and it seems to get “confused”. Many times, you have to exit the SYSTEM CONFIGURATION page first by clicking on the HOME button and then navigate back to the SYSTEM CONFIGURATION page to see what happened. What? C’mon Man!
b) Character Length Limitations. The Web-Client has some really short character limitations when creating Feature Circuit Names, Circuit Group Names and Valve Names. Sometimes, so much so, that you (the one that is actually creating the names) have to think about what that Feature Circuit, Circuit Group Name and Valve name is really for! Really? There is probably a reason for this but I would vote, probably not a very good one and probably just not a lot of effort given to writing the code. C’mon Man!
c) Sorting. Are you telling me that a web designer did not consider the fact that a user just might want to sort things like Aux Circuits, Feature Circuits, Circuit Groups, Pumps, Circuits listed on the Pump Page, Lights, etc. to their own liking? Like maybe alphabetically, or by common use, or by time-of-day, or by any other criteria the user might want to define. C’mon Man!
d) Schedule Time Configurations. Schedules have to be at the half hour ONLY when creating or modifying schedules in both the Web-Client and the iOS app. It will let you type in something else (such as 10:15), but when you click SAVE, the scheduled time always defaults to the closest half hour. Also, if you want to have a schedule that goes past midnight, it cannot be a continuation of a particular schedule (i.e. 11:00pm to 2:00 am). You have to create two schedules (i.e. 11:00pm to 12:00pm and then 12:00am to 2:00 am). HOWEVER, YOU CAN set schedules that are NOT restricted to the half hour, when programming from the Control Panel. ??? C’mon Man!
e) No “FEATURES GROUPS” on the “HOME” or “FEATURES” tab. When you click the HOME tab or the FEATURES tab from the HOME PAGE, it only lists the individual FEATURES and not the FEATURES GROUPS (macros). Hence, you cannot activate a FEATURES GROUP from the web application. NO, instead you have to click each and every individual FEATURE that you want activated “separately” if you want to activate them from the Web Application. HOWEVER, if you go to the FEATURES tab in the iOS app or use the Outdoor Control Panel, you CAN select or activate a FEATURES GROUP from the FEATURES tab. Yikes!! C’mon Man!
UPDATE: (3/8/19) This issue has been corrected in Web Client Version 1.023b4

2. Currently, as far as I can ascertain, if you setup a FEATURES GROUP, that involves the pump (as least the VSF for sure), all the FEATURES listed in the FEATURES GROUP will activate (as indicated by the applicable icons), but the pump (motor) will not actually spin, WHEN EMBEDDED AND ACTIVATED FROM A SCHEDULE. The pump has power and there are indications on the control panel, that it is ON, but the motor will not be running. I have devised a work-around for this "bug", by utilizing (scheduling) multiple individual FEATURES in the scheduling page. Pentair is looking into this “glitch”
UPDATE: This issue was corrected by Pentair.

3. Local Access. The ability to access my IntelliCenter Control Panel “locally” when using the Web-Client I have attempted to access my IntelliCenter Control panel locally utilizing both its IP address and using a program that will utilize its mac address from my desktop. I have tried both http: and https: At this time, this capability is a big fat NO GO!

Maybe, there is a work-around but I have yet to find it. And I can access just about every other device I own, that utilizes user-defined configurations, locally (by IP address). And get this. All the while, I CAN access my IntelliCenter control panel locally through the iOS app, (which uses the IP address assigned to the IntelliCenter Control Panel) ??? The iOS app will actually give you the option of accessing it locally or though the Pentair portal. REALLY? Keep in mind that this “local access” capability only exists from the iOS app if you are connected through your local network (WiFi) or if you are utilizing a VPN capability outside of your local network. Pentair, I really think you can do better. Maybe hire an Apple Web Consultant and let them show you how it’s done. C’mon Man!

4. IntelliCenter Web-Client User’s Guide
. This user’s guide is very lacking and does not answer many questions, it is not very specific and does not contain enough detail to be useful. It appears that it was just “thrown” together without much forethought or planning. Looks as if it was not written by an experienced Technical Writer.

Hayward ecostar on generator

Trying to test run our pump on a generator if needed during a freeze. It’s a Hayward eco star variable speed. The display goes blank when plugged into the generator but the buttons are lit up. Does anyone know a solution to this or why it’s happening,

Attachments

  • 44A0F8EF-D1BB-4AE1-8149-C2BD49BEB4A8.jpeg
    44A0F8EF-D1BB-4AE1-8149-C2BD49BEB4A8.jpeg
    419.1 KB · Views: 52
  • CE38BA39-7548-40E4-A0D7-857059680AF7.jpeg
    CE38BA39-7548-40E4-A0D7-857059680AF7.jpeg
    294 KB · Views: 51
  • 7469FAE0-1DFE-4D17-9847-04E7CF096550.jpeg
    7469FAE0-1DFE-4D17-9847-04E7CF096550.jpeg
    293.5 KB · Views: 55
  • Like
Reactions: Leebo

  • Locked
Official 2021 BBQ, Smoking, Grilling, Baking and Beer thread

Well what a year 2020 has been for the world. Starting off the new year with great food and friends. Our usual New Year's Eve dinner. Crab cakes for appertizer, Filet Mignon with Shrimp and Scallop De Jonghe. For dessert Champagne Blondies, Fancy Brownies made toffee chips and Rolo chocolates and mini cherry Cheescakes. Let's all cook some Great food. Happy New year to all :cheers:

A79C373A-2BFF-4A3C-BFF2-30E9D4ED2E3D.jpeg2313855E-74D3-4272-AD5B-09C23D668187.jpeg8FE997B3-63E3-4712-BD6D-8BD91698D87F.jpeg

Pool Finish and Color Viewing Room...PICTURES & details only please

This is our attempt at having one place that we can view the finished product of various Plaster/Pebble/Quartz/Vinyl/FG/etc. pool finishes. Simply attach a good pic looking down at the steps and another one looking at the deep end to share how it looks at different depths. Make sure to share the Brand and type of your pool finish along with color and any extras you had added.
For specific questions please use the TFP direct message feature to the poster and not here... thanks

This will help all of our new users with potentially the hardest decision of the process. As well as show off our TFP pools.

Added by MOD:
** You need go look at a real pool, in different light, at different times of the day, to make a real decision. Morning, noon, afternoon, night, cloudy, bright, etc. Color really changes throughout the day. Maybe more so for a darker pool. So see if you can find a showroom, or if your finisher can get you in to see some of his customers' pools.

Depth is also an issue. Plaster/pebble color will look different at different depths. So your bottom step will look bluer than your top step. And your deep end will not match your sun deck! Just keep that in mind when looking at others' pools.

Circupool RJ-45 Plus Install

This weekend I finally installed my RJ-45. I've been stalling on this for a long time, but the 2020 COVID-19 pandemic and resulting chlorine shortage finally pushed me over the edge. Plus, it was simply time. The Circupool Installation and Operation Guide is quite good, but here are some notes and images of my own experience.

Here is mt BEFORE shot. My pad is very simple. All power is currently 120V, with an option to change to 220V later if I need to. In this pic you see an outlet at the lower right (for the SWG and pool lights) and my LED light transformer at the top.
full


I will be replacing this inline chlorinator that I haven't used in some 6 years. My biggest challenge was positioning everything on that single straight run where the old chlorinator is since I don't have enough room elsewhere. The line out of the filter is too short for anything. The Circupool Installation and Operation Guide show various install options based on your set-up (check valves, spa, etc). The flow switch is required to have at least 6-12 inches of straight pipe before it, so in my case I put the flow switch after the cell because the cell is then considered part of that straight line measurement of 12 inches.
full


This is what you get in the package. I point-out the O-ring and union groove to let you know that the O-ring barely stays in place. In fact, it actually sticks-out of the groove a bit and kept wanting to fall-out (when installed horizontally) which made my last bit of assembly a bit challenging. The yellow plug on the control module power cord is something I installed since I had already planned to simply plug my unit to an outlet without a timer. Not shown in this picture is one black "jumper" included with the contents that is used to convert the factory-configured unit from 240V to 120V. You'll see it below. I had already installed mine.
full


The Circupool manual is quite clear, but here's a pic of my jumpers installed and configured for 120V. It's a little tight for fingers, but take your time.
full


Ideally, it would be nice to have enough PVC (movement) on each end of the SWG to move/manipulate the pipes a bit. In my case I did not have that luxury - no flex at all. So with little room for error, and after removing the old chlorinator, I installed the adapter on the right with blue collar first, then installed the flow switch to the far left. This would then leave me with the final pieces to glue - the small 5-inch piece of pipe and left adapter to the cell. The arrows point to the edge of the cell itself (see next image) which is what meets-up with the face of the adapter and O-ring.
full


Here is the cell itself without the blue threaded collars. When you measure and cut your PVC for this to fit, these will come very close to the face of the gray adapters and O-rings.
full


Here is my AFTER shot with install completed. Hanging the control module on the wall was easy. It's about 22 lbs, so make sure the supporting bracket goes into some solid wood or studs. Of course your #8 copper ground needs to go the pool's bonding system. I used a "Split Bolt" from the local hardware store to connect the control module's #8 ground to the exiting pool ground near the pump. Since I converted my computer module to 120V, and already installed a plug on the end of the power cord, all I had to do was plug it in. My pump runs 24/7 (on low) because we live in the country with lots of junk in the air settling, so I need that constant surface skimming. So for now, I didn't need to use a timer. I'll just set my SWG to a very low output % setting.
full


Here is the split-bolt:


And for my final trick, I made this tiny piece to go over the SWG. My equipment pad is on the west end of the shed - full Texas sun. The lean-to and lattice help eliminate most sun & UV light, but for about 3-4 hours early each day, some light enters from the side, so I put this in to shade the SWG. Because my equipment pad area is a bit small with limited space, this also reminds us to be careful when stepping over the SWG and flow switch to pick-up our feet and not accidentally kick the unit or pull a wire by mistake.
full


Hope this helps anyone else about to do a similar install. If you have any questions, let me know.

Hydrochloric acid in pH feeder system definitely losing strength

Hi All,

I have a TRi pH unit, I like it.

Anyway after 8 years, in the winter, the peristaltic pump gave up the ghost, it was a while before I noticed, probably quite a few months, the pool had started to go green.

So I go to fix thing up and I remove the 20L acid (32% strength) bottle, its nearly full, its not airtight when plumbed in. Also I noticed some brittleness/cracking in the rubber seal on the special acid bottle lid that the acid delivery hose goes through.

It's been winter here and we haven't been swimming and so the acid has probably been slowly off-gassing for over 6 months, this added to the fact that the acid pump was broken, perfect storm really.

The acid was basically water, I poured some on concrete, nothing, no vapour coming out of the bottle at all. After that I got really confident and put a tiny amount of acid on the back of my hand, nothing.

So I started searching and sure enough the shelf life is amazing when the bottle is airtight but HCI, the acid part is hydrogen chloride, it's a gas, so if the container ain't airtight, the gas escapes, eventually leaving just water.

No doubt my all the acid I've ever plumbed into the system has been gradually losing its potency but the system is measuring pH and so would compensate for weaker acid by adding more.

Just posting here in case this bites someone else. I saw this (I know its a bit old) and the consensus seemed to be it doesn't really lose its strength much, I'm saying that's not right but I didn't want to necro a 12yo thread.

Anyway hope this helps someone.

Cheers
Richard
  • Like
Reactions: kimkats

My FPH is installed and working!

I just wanted to share the news, and to offer a note of thanks to @drglanton for sharing so much helpful info, and to @JamesW for coming up with the "solar impersonation" method.

After many false starts, the installation of my Hotspot "Free Pool Heater" (FPH) was finally finished yesterday. The HVAC guy was able to fit the specialty valves into the body of the condenser unit so it looks very clean. It wasn't an especially warm day but still, we cranked the AC in the house down low and watched it fire up. We pretty quickly had warm water flowing into the pool.

Even the guy was amazed that it worked on the first try. The installation is pretty complex and he said that he expected to get it working "eventually" after some amount of troubleshooting. But as soon as I set the thermostat down, the FPH kicked in and everything just started working.

Attached are a few pictures that show the finished installation. The relay is a 24VAC DPDT relay that switches between a 5kΩ resistor (106°F) and a 20kΩ resistor (50°F) feeding my controller's solar input sensor. There's an actuated valve which opens when the FPH is calling for water, and it kicks my pump up to high speed as well.

We're now at the end of the typical AC season here and will be closing the pool any day, but I'm looking forward to an early opening in the spring. Of course I don't yet have any experience using the thing, but if you're considering getting one and have questions about the installation process, I can do my best to answer them!

Attachments

  • fph1.jpg
    fph1.jpg
    552.3 KB · Views: 235
  • fph2.jpg
    fph2.jpg
    506 KB · Views: 215
  • condenser.jpg
    condenser.jpg
    300 KB · Views: 223
  • relay.jpg
    relay.jpg
    258.6 KB · Views: 225

Steps to Closing Pool/Help Me Verify

There's a statement from one of our members that I find very useful (Catanzaro).

As you can see from the image attached, this is my pool equipment set up.
Pool Equipment.jpg
I will be closing my pool for the first time this year. I have to. No choice. Here are the steps I've created to close my pool. I know...I know... it's a lot to read, but I'm just trying to make sure I hit all the spots here. My pool equipment is very unique and I can't seem to find anyone else that has similar set ups. Questions I have are in bold letters. Please help me.

Steps to Closing Pool:
  • Pool should be below 60 degrees.
  • SLAM pool 4 days before closing and do an overnight test. Link here:
  • Perform the Overnight FC Loss Test (OCLT)
  • If OCLT passes, then let FC drift half way down normal range depending on your CYA. For instance, if your CYA is 30 (4-6 normal target), then let your FC drift down to 8. Again, you SLAM your pool at 12. Normal is 4. What is halfway between 12 and 4? Ans = 8.
  • Once OCLT passes, skim, brush, vacuum and clean filter.
  • Let pool mix for 30min after cleaning it.
  • Test Pool (FC, CC, CYA, TA, CH, pH). Note: pH should between 7.4-7.6 before closing and other testings should be within range (make sure your FC has drifted down half way your normal level (additional FC and pH testing may be necessary).
  • Once everything is clean and pool chemicals are within range, add Polyquat to the pool water and let your pool mix for 2 hours. You’ll only be adding this one time before closing. The amount you add is dependent on your pool. For instance, add 1 quart (32oz) to a 20,000 gallon pool, and so forth. Note: you want to add PQ no later than 5pm (I would start earlier if you can).
  • In the mean time, lay out backwash hose. After 2 hours of mixing, it is time to drain your pool.
  • IT’S TIME TO DRAIN YOUR POOL
  • After 2 hours of adding PQ, turn off pump and set the multivalve to “backwash”
  • Remember to set valve to “main drain”.
  • Turn on pump and watch site glass until it’s clear (approx. 2min or until clear).
  • Turn off pump and set multivalve to rinse (approx. 2min or until water at end of hose is clear)
  • Turn off pump and set multivalve to waste to drain the pool.
  • Turn on pump and drain the pool right below the return jets (4”). Again, make sure lever for skimmer/drain is set on main drain only. That way the water is drained from the main drain and not the skimmer.
  • After draining below return jets, turn off pump and place multivalve on recirculate (this will bypass the sand filter while blowing out your pipelines.
REMOVE PLUGS
  • Take plugs out from the sand filter, pump filter, heater, chlorinator and also remove site glass, pressure gauge and hose fittings from the multivalve section.
AIR COMPRESSOR....
  • Plug air compressor to the pressure gauge site. Note: there is a 1/4 pressure gauge opening.
Pressure Gauge Site.jpg
  • Verify that your lever is set on main drain
S & MD.jpg
  • Turn on air compressor. This will blow air into the main drain pipeline until the water bubbles are at the surface of the pool. Blow air (using an air compressor) for at least 1 minute (depending on how powerful the blower is) and the quickly close the main drain valve. You might hear the "air lock" when you do this. Q. when I close the main drain, should I leave the air compressor on while I close the main drain? That way, water does not go into the pipeline of the main drain?
  • While the air compressor is still on, set lever to skimmer and blow out pipelines for the skimmer (again, you’ll see a mist of water to indicate that you’ve blown out the skimmer pipelines). Remove excess water from the skimmer with cup if neccessary. Note: as the compressor is blowing all the water out of the skimmer, it should also be blowing air into the return jet pipe lines as well? [not sure, but I think so 'cause that's how the pool store has been doing it for 4 years]
  • Once water is out of skimmer and return jet (misty or air coming out of both), start plugging the return jets (all three of them).
  • Turn off air compressor.
  • Install Gizmo in the skimmer.
  • Move multivalve to “winter”
  • Remove stoppers from timer
  • Turn off pool breaker
ADDING ANTI-FREEZE (WHERE AND HOW)???
  • Like
Reactions: Leebo

IntelliCenter Gateway and Control Apps

Since we hijacked the thread located here (IntelliCenter Webclient and Possible Alternatives)(credit: @MyAZPool), I decided to open a new thread for the IntelliCenter Gateway and Control Apps.

IntelliCenter Gateway Repo is located here: IntelliCenter Gateway
Credit: @guinness

IntelliCenter Control Repo is located here: IntelliCenter Control Repo
(If you want to contribute, let me know)

IntelliCenter Control Google Play Listing is located here: IntelliCenter Control Google Play

This is a work in progress currently, but the releases should be stable enough for daily use. Android only at the moment (desktop can be done through BlueStacks emulator). I have been using this app daily and it is much faster connect/response than supplier provided apps.

Gateway setup is explained in the above IntelliCenter Gateway link.

To connect using the Control app, click the sprocket icon in the upper right corner of the Controller tab. Enter the ip address of the Gateway as explained in it's setup, or you can connect directly to the IntelliCenter Panel when at home using ws://ipaddressofpanel:6680/

To sign up for internal test, PM me your email address and visit this site IntelliCenter Control Internal Test

Releasing to an open Beta in Google Play soon, but want to get a few more things cleaned up. Some items we are working on in the background:
Authentication through Gateway - this will allow you to run the Gateway on a home computer or Raspberry PI and authenticate communications to allow use when at or away from home.
Control App authentication entry for Gateway
Control App IP address setup and selection improvements
Better error handling in Control App and user notifications.
Additional features as requested
iOS version (once I can get a viable Mac in hand)
Possible desktop version but BlueStacks can be used as a alternative for now.
Working on Raspberry PI downloadable image for Gateway

Some screenshots:
Screenshot_1595265431.png
Screenshot_1595265446.png

Appreciate any feedback! Thanks!

Ryan

Vinyl Liner PICTURE Pattern Roundup - PICTURES AND NAME OF LINER ONLY PLEASE

Calling all in-ground vinyl liner peeps! Whether its old or new, if you know the name of your liner pattern, please post a pic of your pool with water in it, with mfg and pattern name.

Editor: We welcome pics of your liner (liner name and manufacturer, if known), but no comments please. If you have questions or comments please send them to the OP via DM. Thanks!

Closing - SLAM Level with Autocover?

Hi all - I asked a similar question before but want to get more clarification. I am using my auto cover as my winter cover - should I still bring the FC up to full SLAM level when closing? Reason I ask is I know a lot of people drain some water after doing this, I won't be draining any water as I need it to support the cover, so my FC won't drop quite as much since I won't be draining anything. Just wondering if I should still use the same recommendation of bringing to SLAM level 2-3 days before closing or bring it to a different level, like 1/2 of SLAM.

Thanks for the help!
  • Like
Reactions: Leebo

Closed. Thank you.

Thank for all the help from this site, I got up the nerve to close my pool on my own this year. Took me a few days getting the chlorine up and hand vacuuming the bottom and waiting for the temp to hit 60, but yesterday was go time. All I have is a skimmer and three outlets. I repeated what the pool builder did last year closing and pushed the air through the skimmer and closed off the outlets after they were clear. All seemed to work well. I did pour some antifreeze in through the skimmer opening. Of course I’m a little nervous that I got the water all out and will have no leaks, but at some point, I guess you just have to trust the process. Took the plugs out of the heater and the pump, shut off the gas and electric, put the cover on and called it a day.

Thanks for a great site with good information and very helpful members!

until next year . . .


A8A9E169-0DEC-477B-A4B6-386BADAB9543.jpeg

Running out of options to restore plaster color

So, long story short, I had my new pool plastered in May. After months of stressing over the color, I opted for a DiamondBrite Quartz Manzanita. The color turned out perfect. (see first picture). Jump ahead to August. Pool service guy screwed up and poured too much muriatic acid in water. Left a black stain on the front shelf right under the water jet. Got supervisor out and he was able to "fix" the problem, however, I gradually began to notice that lovely blue was turning into a blah grey. (see middle picture). Deep end of pool was now more of a greenish color and water was very cloudy. (Best way to judge color difference is compare the blue tile over the rear shelf - it matches blue on shelf in first picture but stands out in the middle picture). I needed to leave home shortly after supervisor arrived but could notice a little difference had occurred. Once I came home water was much clearer but the plaster is still overly grey. Unfortunately, these pictures make the pool look great, in real life the grey is much more prevalent. Supervisor probably knows what he's doing, says higher pH (along with some other factor) is key to trying to reduce the effect escaping calcium is having on the plaster. Plaster guy says acid was responsible for drawing out the blue pigment. Anyway, I'm done with trying to convince myself to be satisfied with this "new" color. I have tried some sanding and even using a pumice stone to see if sanding the plaster can reveal the original color. All it does is just get darker, but at least it's a dark blue. Replastering will cost me more than the original coat, around $5000. I think the pool service company needs to cover this so I let the supervisor know I wanted him to come by again and I'll see what his reaction is. Is there anything mechanical that might work to reveal the original plaster color? I'm leaning towards using some "diamond sanding blocks", like hand-held sanding sponges, or purchasing a pool plaster polishing/sanding pad and going at it with an angle grinder.

pool.JPG

Bleach

Good morning, I continue to have challenges finding regular liquid chlorine at any locations but I came across this regular bleach at a market. Has anyone else use this particular product? The container doesn’t say anything about the strength of The sodium Hydro chlorine. I even checked the safety data sheets and it doesn’t indicate the percentage of strength just wondering thanks

Attachments

  • E85BE615-B322-4751-AA48-7D827CA11905.jpeg
    E85BE615-B322-4751-AA48-7D827CA11905.jpeg
    383.5 KB · Views: 18
  • Like
Reactions: Leebo

New SoCal IG shotcrete pool build - equipment set, Final Inspection Passed, Pebble Done! Salt added. Back deck in process

We built our home just prior to the last real estate market collapse and while we had plans for a pool it never happened. Fast forward to today and like others we have found ourselves at home staring at our undone yard much more often. As such we started doing landscaping trees etc this year and have reached the decision to have a pool built. We tried for months to get several quotes for a pool but they are all crazy busy and only two actually showed up :(

We chose our pb and signed the contract 08-09-21 and where quoted a 3 month build time (ya, not so much, we are now 5 11 months in lol). We are doing a 15x35 freeform with raised 8' spa, baja ledge, cave/grotto and slide. Equipment is currently specified as :
2 - 11056 pentair intelliflo vsf pumps
Pentair clean and clear plus 420 filter
Intellichlor ic40
Mastertemp 400 lpg
Intellitouch control system i10ps intellicenter
5 intellibrite microbrite led lights (1 spa, 3 pool, 1 grotto)
Auto fill - with secondary sprinkler valve controlled by intellicenter
10x 4x12.5 SwimJoy pool solar panels on superstrut ground rack
Auto heater bypass
Auto solar bypass

We are planning on a pebble finish with quartscapes reflections series in Barbados blue, stonescape tahoe blue puerto rico blend, grey flagstone coping and are still working thru tile and bond beam finishes.
PB started excavation the monday following contract and that took them about a week. They are currently working on steel. In reading it appears in maybe should be asking them about adding a second skimmer as there is only one. This is in the deep end on the end of the pool that , with the exception of santa ana's, should be where the wind pushes everything.

org_3ffcd9a349ae3a00_1627430676000.jpg
org_c42833f3cd806fb3_1628793086000.jpgorg_1c4e44943152ef80_1629316658000.jpgorg_95d7bfa416b06e80_1629316948000.jpg

New Build Fiberglass Pool in MEMPHIS, TN

What’s up ya’ll! My girlfriend and I are underway with construction for our IG fiberglass pool.

- 14’x30’ Latham Majesty Ocean Blue G2
- Jandy CL460 Filter
- Jandy 1.65HP VS Pump
- 2 PAL LED lights
- 1 shelf bubbler

Going for a very simple clean/modern build and look. So far we have taken deliver of the pool and the backfill is complete up to return jets. Waiting on plumbing to come through and do their thing.
Our backyard is pretty small so it has been fascinating to watch the crews navigate the tight working space!

I’ll do my best to post updates as they happen!

Thanks y’all!

Attachments

  • 3DD106E4-5020-424F-9705-3DE843214338.jpeg
    3DD106E4-5020-424F-9705-3DE843214338.jpeg
    849.7 KB · Views: 245
  • DC4037A8-D2C4-4DEE-BF1F-9147C2EFCBD3.jpeg
    DC4037A8-D2C4-4DEE-BF1F-9147C2EFCBD3.jpeg
    328.3 KB · Views: 239
  • 50D32D53-4B9F-4B69-9A51-97BDD4FD5260.jpeg
    50D32D53-4B9F-4B69-9A51-97BDD4FD5260.jpeg
    887 KB · Views: 243
  • 935F3E65-FFAC-43FF-BD0D-8C45439E71B3.jpeg
    935F3E65-FFAC-43FF-BD0D-8C45439E71B3.jpeg
    338.9 KB · Views: 239
  • 2787C229-FB43-44CF-A32D-46B55A584896.jpeg
    2787C229-FB43-44CF-A32D-46B55A584896.jpeg
    576 KB · Views: 251
  • FC7A63A1-A7DC-4C1B-A7B7-39A13DC941A1.jpeg
    FC7A63A1-A7DC-4C1B-A7B7-39A13DC941A1.jpeg
    847.8 KB · Views: 292
  • C9AFB8D5-7A6C-434A-94B9-333EC6BA69B9.jpeg
    C9AFB8D5-7A6C-434A-94B9-333EC6BA69B9.jpeg
    760 KB · Views: 299
  • AC61F9AB-8BCC-442E-9CCE-C9B28B14ACE8.jpeg
    AC61F9AB-8BCC-442E-9CCE-C9B28B14ACE8.jpeg
    188.9 KB · Views: 297

Huge shout out to @MyAZpool!!

I want to give a huge THANK YOU to @MyAZPool for taking the time out of his busy day today. This guy went out of his way to help me learn the Intellicenter, made a diagram to rewire my system and then called today, to walk me through some different ideas that he had, to make my system run better. I went from not knowing a thing about our pool to actually understanding whats going on now. Its hard to find people these days that still go out of their way to help others but @MyAZPool did just that and took it to another level for me. He is a huge benefit to me and TFP!!

Thank you so much and I owe you a couple...LOL

Missing Stabilizer Second time stabilizer has gone to zero..

Greetings all,

Been a long time follower here and have not needed to post as I usually can find the answers on here with a quick search. This one seems to be a little more tricky and all of the previous posts on this controversial topic point to bad testing or water loss. I have put 35-40lbs of CYA in my pool this year and its keeps disappearing!

I tested my CH yesterday around 4pm and found that my CL was at 2-4ppm with a Taylor quick test (k-1000). This seemed off to me as it was just at 6ppm a couple days prior as I was having issues with my SWG and constantly checking to make sure it was working. I checked it again to confirm my results and also tested the water directly out of the return to confirm the SWG was making chlorine. Results where the same and I confirmed that the SWG was working. Based on the results I decided that the stabilizer had to be off.

I tested and confirmed low CYA. I had a CYA of maybe 10, as I filled the viewing tube I could still clearly see the black dot but it was a little hazy. Last test a month ago (yes I have been lazy not testing) my CYA was at 70. Now ruling out any type of water loss my CH tested at 425, the last test a month ago was 375. This is a new plaster pool 5 months old now.

Now let me rule out the typical answers.

Its not added water or loss of water. We have had quite a bit a rain but if it was because of that my CH would also go down and it went up. I have not had to add water to the pool and do not have an auto fill.

Let me rule out testing. I have registered good CYA levels with my test kit before and when this happened the first time I thought I was going crazy so i took a sample to PP and they returned the same results. I checked this last time twice to confirm results the same.

I have never had algae in the pool and the CH has never dropped below 2. I always keep 10gal of chlorine on had for manual dosing when needed.
I have done the SLAM process multiple times trying to figure this out as well as overnight chlorine loss test.

Last tests with TF-100 (24 Jun 2021 830PM)
CL 2ppm
PH 7.68 (with meter)
CH 425ppm
AK 50ppm
CYA 10ppm

This is driving me NUTS what could possibly be causing my CYA to disappear?

Too Much Yellow Algae?

Just wondering if you can have too much yellow algae to treat or not! We had a bloom earlier this year and performed a SLAM. Well we went out of town recently and loaded the pool with liquid chlorine while we were gone. Looked ok when we got back but this week it is loaded with yellow algae! We need to close our pool but wondered if you can have too much algae to treat and if its best to start over next season if thats the case. Thanks for your help.

How to Maintain a Bromine Pool

Can anyone give me the "skinny" on maintaining proper water chemistry with bromine? I am starting to help with an indoor condo pool that uses bromine and have never mainatined a bromine pool. What are the bromine levels I want to maintain? Do I do all the same tests that I would do on a chlorine pool with the exception of CYA.... and aim to maintain the same target levels as a chlorine pool? Can you do the FAS-DPD test with bromine? Do you shock regularly or not necessarily if proper bromine levels are consistently maintained? Any available overview that I can read on maintaining a bromine pool? Thanks.

Not able to lower phosphates and not sure why

Water is balanced and has been for some time now because I keep a watchful eye on it.
BUT phosphates are around 3200ppm on fresh water 8700 gallon pool. Free CL is 3.7, PH 7.6, TA 110, CH 225, CYA 100.
DE filter was just cleaned as well.
Water looks good, nice and clear with occasional alge growth due to not brushing on a daily basis.

Using the prescribed dose of Natural Chemistry PRO SERIES Phos Remove of 4 oz.

Check water next day and phosphates read the same (~3200ppm).

Testing with test strips and got checked for verification at Leslie's as well.

I am baffled. I have always been able to knock down the phosphates before using PRO SERIES Phos Remove but not this time.

What in the world is going on???

Algae. How to attack?

Having the same issue now for nearly 2 months. FC doesn’t stay above 3 unless I shock it. CYA is nearly 0. I don’t know how it dropped, I didn’t swap out the water. I even changed out the CYA chems. I hear that some algae eats it. I need to shock it likely to try to get CYA up. Here’s a video of my ‘algae powder’.

Login to view embedded media

Pardon the pic, I haven’t linked my TFP data.

Attachments

  • 5808AFF6-55BF-4E16-8940-77731DF77A67.jpeg
    5808AFF6-55BF-4E16-8940-77731DF77A67.jpeg
    125.9 KB · Views: 29

Filter