Easytouch 8 Relay Wiring

While working inside my high voltage box today I noticed one relay which had 3 wires tenuously attached to each of the line spots. I was going to go ahead and pigtail it but in the process of disconnecting it the plastic broke apart and rendered the relay unusable. After looking at it more carefully he had 3 wires connected to Line 1 and 3 wires connected to Line 2 with nothing connected to either load spots. The relay also corresponds with the waterfall circuit which is a VS Intelliflo pump wired straight to a breaker.

Unless I'm thinking about this wrong is there any reason line voltage even needs to be connected to this relay since there's no load? Or am I safe to just wire nut each line set together and disconnect the bad relay from the board?

Thanks
Brian

Attachments

  • PXL_20231022_223226144.jpg
    PXL_20231022_223226144.jpg
    319.1 KB · Views: 36
  • Like
Reactions: .ben

CYA testing....Taylor's response.

I have been reading much discussion on here regarding the accuracy of the CYA testing. It's definitely a tough one. That being said..I watched the Taylor "How to" video again yesterday on their website. I was surprised that no mention of doing the test outside..sun at back..etc was mentioned as video shows it being done at what looks like inside at a lab table. I grabbed the book out of the K 2006 kit...also no mention of where to do the test...

So I emailed customer support at Taylor and said...Hey..What's up with this??..I mentioned following TFP and the recommendation...

Here is the response...I didn't ask if I could post it...so I will leave the contact's name off...but this is from Taylor Customer support dept.....


"Hi Ed:

Your email was forwarded to me as I handle all the tech calls and emails into Taylor.

The CYA test is a turbidimetric test and, honestly, the lease "accurate" of any of the tests in your kit because everyone will interpret "when the black dot just disappears" differently--regardless of techniques and even using the same sample water! That's why there's no need to be specific when trying to get an answer. You don't need to see if you have 42 ppm CYA in a sample--you just need to make sure it's between 30-50 ppm (the industry-recommended ideal range).

With that all being said, how you do the test is dependent on the user. I've found that doing it outside with the sun on my back and the tube waist high versus "cloudy" days makes no difference. The only recommendation we make is to not face the sun directly (and that's for any test)."


From my limited experience trying to do it...and from you folks who have done what seems like bazillions of tests...IMHO...your recommended method is in fact the best...for me...and I will continue to use it in order to stay as consistent as I can. I have noticed a difference in the values I get when NOT done as you recommend. I'm not trying to stir up any debate...You folks have been amazingly helpful and knowledgeable to me these last few weeks as I get going on the TFP methods. I just was curious in trying to learn more as to why there was no mention of it in their guidelines. I just thought I would share their response.

Thanks,

Ed
  • Like
Reactions: Cowgirl47

Compool to Easytouch Upgrade do I need the transformer

Hello,

After nursing my old compool controller along for decades, it is now down to one working circuit which I have connected to the main pump. So it looks like I will need do the Compool to Easytouch Upgrade to get my Polaris working again. The question is, do I need to get the one with a transformer? I have been unable to identify my system other than LX10 and I sure don't want to damage the new board is my old transformer is not compatible.

Also, is there any chance my indoor controls will still work? I was used to this ancient system that did everything I wanted, I sure wish I could have just repaired what I have. Thank you for your help.

Attachments

  • 0.jpg
    0.jpg
    83.6 KB · Views: 88
  • IMG_2437 (2).jpg
    IMG_2437 (2).jpg
    90.8 KB · Views: 85
  • IMG_2441.jpg
    IMG_2441.jpg
    119.1 KB · Views: 17
  • Like
Reactions: midmodonhillwood

Trouble Blowing Out Main Drain - necessary or...?

Hey All - Closed the pool for the first time this year (few days ago). Blew out all lines, antifreezed skimmer lines, etc.. but I haven't been able to blow out the main drain line with any of the shop vacs I've tried (all the way up to a 6.5 HP shop vac). I've come across a few viewpoints on the topic that seem to contrast each other. One viewpoint which is, it's very important to blow out the main drain (and close valve once air is visible coming from main drain to create the airlock) in order to properly winterize the line and several pool companies I've spoken to locally (in Upstate NY) say they don't blow out the line but simply pour pool antifreeze down it and call it a day (and have never run into an issue). Sitting here wondering is it simply enough to put some pool antifreeze down the line or do I really need to make the investment in something like a cyclone that can blow out the line?

Thanks to you all in advance! Awesome forum.
  • Like
Reactions: Mike120

TFP Confidence and Competence - My SWG broke and now I'm SLAMing

I've not posted here in a long time but the last few days have given me something to write about so here I am again!

I think the thing that i'm most grateful to this website for is that it's taught me essential life skills as it relates to pool maintenance. And those skills might be succinctly summarized as Confidence and Competence. I think those are really important life qualities for almost everything, and I have TFP to thank for its part in getting me there when looking after my pool.

I'll be honest, I got a bit lazy this past summer. Since I have a salt water chlorine generator, everything just works. Every couple of weeks I add acid to maintain the pH but otherwise, after three years of owning this pool, I've reached the point where it largely is running itself and I have been checking it less often.

In the last couple of weeks, the weather has started to turn cooler, and swim season is all but over. So, when I started hearing the characteristic warning beeps from the pool controller flashing up voltage warnings for the SWG indicating it was starting to fail I did what i did last time around. I turned it up to a higher % and assumed that it would limp through the autumn and winter and I'd be able to replace it in the spring.

Apparently i was wrong. I tested the water for the first time in probably two weeks yesterday and when I dropped the powder into the beaker and it didn't even go slightly pink but remained completely clear I knew immediately what i was dealing with.
And that's where confidence and competence comes in. In that moment I didn't panic. I didn't feel worried, and I certainly didn't feel the need to call 'a pool guy' or run to the nearest pool store to have them sell me a bunch of quackery. No, I just shrugged my shoulders, found the cheapest chlorine I could nearby and started a SLAM.

A few hours later when my FC read as 5 instead of the 12ppm I'd just added (calculated via app) a couple of hours earlier, I didn't need to second guess whether the chlorine was bad, or whether my test results were wrong (because I did my own) and I didn't second guess the size of my pool. No, all of those are known things to me. And so i trust the process. I dose it back to 12. Come next morning it tests as 8, so I dose back to 12.

I should mention that I thought this was a preventative SLAM - it's certainly not TFP clear but it's only mildly cloudy and certainly not at all green. So I thought I'd just get it up to SLAM and we'd be good. Indeed I think most pool owners would probably just think they needed to 'shock' the pool and they'd be done.

But no - I know how a SLAM works - and so I know that regardless of whatever my eyes are telling me, for as long as the pool is gobbling up chlorine, I'm not done until I pass an overnight loss test.

And that's totally fine. It will take what it will take! I just hope that the warranty claim on the salt cell doesn't take too long because i'd really like to get back to my lazy maintenance mode as soon as possible!

So, once again, thanks to the TFP site and resources and forum for giving me those two important words. Confidence and competence. The confidence to know that what you're doing will work and is the right thing to do based on the science. And the competence to have that knowledge accessible or stored in your brain ready to go whenever the need might arise so you can handle the situation independently.

Thanks!

Trichlor+water exchange cost cheaper than bleach exclusively?

I'm posting this topic in the Agree to Disagree area because I know all the TFP veterans hate trichlor. I have followed the TFP process of liquid bleach but I can't turn completely away from the convenience of my trichlor feeder. This certainly would only apply to pool owners living somewhere with very cheap water for CYA purposes. I'm just doing the math to compare the cost per ppm of free chlorine using the trichlor pucks compared to liquid bleach at 10% and the cost per FC is about half the cost with trichlor. I'm using PoolMath to get my number below.

Cost of only FC: I can get a 40 lb bucket of trichlor from Costco for $70 and PoolMath says I can get 4.2 FC per lb so this comes to $0.42 per ppm of FC. Buying chlorinating liquid 10% from Home Depot comes to be $2.99 per gallon if I purchase 12 gallons at a time. PoolMath says I get 3.8 FC per gal which comes to be $0.79 per ppm FC, which is roughly double.

CYA math: PoolMath says 1 lb of trichlor yields 2.6 of CYA. I estimate I need 10-12 ppm FC of chlorine per week based on current usage of bleach so over 5 months time, this would mean I would increase my CYA by 150 for the season. Since water in Memphis is so cheap, it would cost be about $60-70 to drain half my water to cut CYA in half. Doing a half drain twice per year to control CYA would cost me about $130 for water.

End cost comparison: If I used exclusively bleach, this would add at least $100-150 of cost for inconvenience due to having to purchase quantities of 12 gallons at a time making multiple trips per season to HD, add bleach daily with specific measurements, and store 10-15 gallons of bleach in a air conditioned closet in my house with two young kids.

Anyway, if I use only trichlor, it will cost me approx. $100 + 130 (water) = $230 per season. Using exclusively bleach 10%, it will cost me approx $200 + 125 (inconvenience) = $325 per season. Taking out negative opinions about trichlor, does anyone see any holes in my math? I'm not saying I will abandon bleach for exclusively using trichlor and I still plan to use a combo of 2 gallons of bleach and 2-3 trichlor pucks per week. I'm just trying to do the math on the best combo strategy because I like the convenience of only having to add a gal of bleach twice per week without measuring vs. daily dosage and I don't like having 10-15 gallons of bleach on hand.

Feel free to pick this apart since I'm a pool novice but I'm an analytical person who likes to figure out strategies on my own.

In the Industry Folks

The only time you generally need to change it is when you use floc or clarifiers that gum up the sand.
True, those will wreak havoc on a sand filter. I find that the use of suntan lotion, or any lotion or oil, and products such as hair conditioner, fabric softener, makeup, etc... can have a similar effect. It is a much bigger concern for public pools due to bather load, but can become an issue even in a residential pool over time. Sand grains coated in oily substances do not wash off very well and clump together just as those covered in clarifiers do. Even a "deep clean" will not remove it.

Pool stores and maintenance companies want you to think it goes bad, but it doesn't. They want to sell you the sand and maybe the service of changing it.
The profit margin on a few bags of sand is so minimal as to be non-existent, and the charge for the service, if you choose not to do it yourself, is no more than for any other service provided. Nobody works for free, not even you. You can villainize the pool guy if you like, but be fair and villainize the HVAC, plumber, electrician, carpenter, roofer, and auto-mechanic as well. We provide a service, you do not have to utilize that service if you do not want to. But making out like we are just trying to cheat you out of your hard-earned money is ridiculous. The labor (the expensive part) for deep cleaning a filter is roughly the same as for a sand change, so why not change it and start fresh if you are paying for it anyway?
  • Like
Reactions: Arizonarob

Pool Rx

i've been using PoolRx since last spring with no problems. I did need to clean my filter once because the product clung heavily to the filter so, after a quick cleaning (it needed to be cleaned anyway) the Chemistry is fine. no discoloration of the pool walls, AND NO ALGAE. NONE! all you naeh sayers, if you ain't using it, you've no skin in the game and no experience other than anecdotal. I say, It works!
  • Like
Reactions: KatNEvan

Started a new pool "Passed Final Inspection, Questions on Pool Startup”

After receiving a quote on a new pool and spa I decided to possibly designing and building my own as a OB. Seems like PB are still in the Pandemic pricing mindset. I have drawn a perliminary CAD drawing. I would like to get some feedback on possible issues or design suggestions. I updated plan. I moved spa into pool to save space and changed width. One question about bond beam for pool and spa. Is my design going to be an issue with bond beam and spa beam inline in the corner?
  • Like
Reactions: StuartBound

Southeast Texas - First Time Pool Owner - Need MAJOR Schooling

So the wife of 20+ years talked me into purchasing Ultra XTR® Frame Above Ground Pool w/ Sand Filter Pump - 18' x 52" <--- this 'wonderful' beast of a pool (don't be jealous!) for the family (3 children). We've gone through floods, lots of ups and lots of downs.. and probably have argued over this gift from God (pool) than anything else in our marriage. And no, I'm not being sarcastic. I was extremely ignorant to all of the prep work and the upkeep and that is my fault. But down to the nitty gritty.

I was in on the initial setting up of the pool and for the most part, she took it from there. We had a BEAUTIFUL pool.. until we didn't. I've done some research since, but in a nutshell the water now currently looks the exact opposite of what somebody would want it to look like! But the problem is I'm not sure how to A) best go about bringing it back to clear and B) what would cause it to turn dark green so quickly.

I know the pH was bad when she tested it one day and it was as if the next day or two it went from a teal to a dark green. I honestly don't know how fast it turned and unfortunately I don't know the exact levels as far as pH and Cl to really know what issue caused it. We have a friend who has an above ground pool who lives about 90 miles away (very close to Houston) who swears she basically does very little after she opens the pool for the season. My wife and her talk about the issues and everything seems to point towards a purchase of a larger pump. But after talking to an ex co-worker (who now literally owns a pool cleaning company) he swears that it's the chemicals not being kept up more than a circulation problem. (he ran calculations, etc and with it being out of the box - felt comfortable going with about 85% of what they say the pump does)

So that is when the arguments begin. After lurking on here for a few weeks, I definitely realize I need to invest in a better testing kit, as well as a few other things.

Can some of you experts PLEASE PLEASE help us out.. this has been a long few months.
  • Like
Reactions: LSU

Dumping A Cup of Baking Soda In Your Pool Every Other Day Just Doesn't Seem Right

I know a lot of folks use baking soda instead of pre-packaged alkalinity increases but there's a controversial pool care hack that touts baking soda as some sort of magic cure all. The advice has been shared a million times and recently went viral. This tip just doesn't seem to jibe with what I know about pool chemistry. It would seem to me that if you're routinely needing to add bicarb to your pool every other day, there is probably something else going on that needs to be addressed. Nothing about this video seems based on best practices or professional advice but got picked up by mainstream media outlets all the same. Thought I would open it up for debate here.

Attachments

  • pool-care-hack.jpg
    pool-care-hack.jpg
    142.6 KB · Views: 34

Please help identify stains

Hello everyone. I have an older 16,000 gallon in ground plaster pool. This year these stains popped up. I thought they were from the neighbors leaves etc from their trees. I super shocked the pool and brushed my heart out. They are still there. Any idea of what I can try next. The appear to be a rust brownish color. Thank you for any insight.

Attachments

  • IMG_9679.jpeg
    IMG_9679.jpeg
    179.8 KB · Views: 20
  • IMG_9678.jpeg
    IMG_9678.jpeg
    298.7 KB · Views: 20
  • IMG_9677.jpeg
    IMG_9677.jpeg
    254.6 KB · Views: 22
  • Like
Reactions: millspap

Tile Backerboard Under Legs? End of 2nd Season Update

Has anyone tired using cement tile backerboard under the legs (instead of pavers)? 1/2" or 1/4"?

I seems to me that this might be the ideal solution. It's a fraction of the thickness, waterproof and a $10 3'x5' board can be easily scored'n'snapped to size. As long as the soil underneath is very flat there should be mostly compressive stresses which cement excels at handling. Any sinking or irregularities in the ground might cause some lateral tensile stresses but the fiberglass should help counter that. (Pavers don't have any fiberglass so in extreme conditions, they'll crack.) I'm thinking that given that, maybe even 1/4" thick board will be enough.

And the best part is that you're only elevating the leg 1/2" at most vs 1" or more for pavers or a lot of extra digging and leveling.

Did I mention it can be cut-to-size?
  • Like
Reactions: Hollywood20659

Chlorine Level before draining pool for winter closing

Hi. I've read the closing an inground pool process. It says to SLAM a few days before, and let it come down to normal as long as the Overnight test holds.
1. However, if I consistently do not have any CC showing, do I need to SLAM at all before closing?
2. I do add polyquat 60 before draining and chlorine after draining the water. If adding polyquat 60, shouldn't I add it after draining so as not to lose some in the drain? Maybe stir up the water after draining to mix it in?

Thanks
Rich
  • Like
Reactions: jmb

How to test pH with a high chlorine level?

I read somewhere on this forum that if your chlorine level is high, your pH reading tends to be the same purplish color (appears to be 7.7 to me). My chlorine level on my pool is currently 17 (CYA is 160... been slowly trying to lower it). I added muriatic acid according to the pool calculator to lower the pH to 7.4, and the next day, still the same purplish color.

So I'm guessing the high chlorine level is affecting it. How can I test the pH accurately with a high chlorine level like mine? I've been using the TFTestKit.
  • Like
Reactions: ClarkW.Griswold

How I blow the lines with a small compressor.

This is what I have always done and it works fine. It's easy and one person can do this in 20min. or less.

When the water gets to 50 degrees I shock the pool the night before closing and let it mix well.

Next day I lower the water just below the returns.

I hook up my pancake compressor to an air fitting that's screwed into the drain hole of my pump.

Turn on the compressor and since the hose is attached to the air nipple in the pump it will start pumping air into the lines.

The water will be pushed out of skimmer 1 first. When it bubbles and spits. Plug it.
Next will be the 2nd skimmer. Just like above. Plug it.
Next will be the 1st return. Plug it.
Next will be the 2nd return. Plug it.

Now all that's left is the main drain and the air is now pushing that water out as your walking back to the pump. When you see air bubbles come up from the main drain. Turn the main drain valve to off. And turn off the compressor. You just created an air lock on the MD.

I then go back to the skimmers, remove the plug and pour a gallon of antifreeze in each skimmer and put the plug back in.

I then pour 1/2 gal antifreeze in each skimmer box. Last , I put a half filled antifreeze jug in each skimmer box to prevent ice expansion from cracking the plastic boxes.

I then take some wire and wire the main drain Handel so no one can turn it and break my air lock. Remove and store pump where it does not freeze.

Does my little compressor blow out all the water? No But the water that's in there is way below frost line.

Do I need a special blower that I only use once a year? No

Also, I will keep an eye on my water level until freeze up. Due to rain and the water level rising my goal is to always keep it a few inches below the bottom of the skimmer opening.
I will use the Garden hose siphon method to keep my water level in check.
Hope this helps.
  • Like
Reactions: thomhoss and JaySav

The Great Zelle Pool Scam

A commentary about bank fraud and the sketchiness of Pool Builders…

All I wanted was a status symbol. What I got was a $31,000 lesson in the downside of payment apps.

AOP, Tab Feeder and Pool Tiger are out! New SWCG is in!

About a year ago, I found TFP and everyone started making fun of my AOP system and tab feeder and telling me how one day I'd get an SWCG (tagging @Dirk here as he was one of the first to tell me this). Well, that day has finally arrived. Since this forum is pretty much entirely responsible for this journey, I thought I needed to post an update with some pics.

Before and after pics are below. And here's an overview of what changed:

REMOVED:
  • Del AOP-S system (branded as Blue Haven SmartPure OxiPro 15) and all of its many associated tiny pipes, tubes and check valves.
  • CMP Tab Feeder
  • Pool Tiger (branded as Blue Haven Smartguard Soft and Clear)
  • Weird diverter valve that had no purpose but made it possible to dead head the pump (as noted early on by @Dirk )
ADDED
  • Hayward AquaRite 900 with TCELL940 (ACR940)
  • Replumbed from filter to heater and heater to return manifold

So far, the best part about this change is that there's no more air bubbles from the AOP constantly coming out of the returns and making noise. Much quieter! I had heard that SWCGs also create bubbles but if they do they are much quieter than what we had with the AOP.

Now the fun begins and we'll see how it works. But I just want to thank everyone for their advice and thoughts all along the way.

BEFORE
before1.jpeg

AFTER
after1.jpeg

How to Upload Pictures and Create Albums in TFP

THIS SUBJECT AREA IS STILL IN-WORKS. THANK YOU FOR YOUR PATIENCE.

DID YOU KNOW …….. you have the ability to upload images and create albums for future use here in TFP? This is a great option for a few reasons:
- Organize your photos by category to meet your needs.
- Eliminates the need for third-party providers who charge subscriptions or have annoying adds.
- Images saved to TFP remain on TFP servers without interruption from other sites.
- Provides various choices of how to link and display your image(s) to a post (full view, thumbnail, etc).

ADDING AN IMAGE DIRECTLY INTO A POST:
1. If all you want to do is quickly add a photo to a post, simply click on the INSERT IMAGE icon in the toolbar. Once posted, this may add the image to your overall media group of uploaded images without placing it into any album.
2. If you already have a photo saved to an album or your media gallery, you can click the CAMERA icon to select that photo.

Capture Image.jpg

UPLOAD IMAGES AND/OR CREATE ALBUMS AS FOLLOWS:
1. Click on FORUM from the TFP main page.
2. Click on CREATE (green button at right)
3. Select UPLOAD NEW MEDIA
4. Next you have the option to upload your image to any of the existing TFP categories listed or CREATE PERSONAL ALBUM of your own.

NOTE: You can also get to the CREATE (green button) from the MEDIA tab listed at the top of the Forum page.

VIEWING & USING YOUR SAVED IMAGES:
You can see all of your images/albums by clicking on your PROFILE from the main menu. From your profile, you should see an ALBUMS tab to view all albums and photos. You can also get to your pictures by clicking on the Media (Number) located just under your profile banner photo. When you click on the “number” of photos, it will take you to a page that displays all of your images. There is a Navigation menu to the left that will allow you to sort/find images.

ORGANIZING & MOVING YOUR SAVED IMAGES:
Once in your album, you should be able to select one (or multiple) images by clicking the check box in each pic. Then you should see a pop-up from below that will give you options of things to do, one of them being "Move Media Items". Then you just follow the prompts as needed.

USING A PHOTO:
Once you upload an image, you should see a thumbnail for each of your images in your album. If you click on the thumbnail, it simply shows the picture as a pop-up view. But if you hold the mouse curser over the image, a shaded area containing the photo details will pop-up for that image (name, author, date, etc). Click on the image title itself (i.e. pool party.jpg), and that will take you to a details page where (on the right) you have a section called “Share this Media”. You can copy the image link of your choice (four different link methods) that meets your needs, then paste that link into a thread/post.

Salt Cell Post Mortem #2

Five years ago I hacked apart my dead Hayward T-15 for "science". This week my Chlorinator Pro CP-15 gave up the ghost. Once again, I disassembled it and here are the pictures...

Notes:
- The electrodes were not corroded. They broke during violent disassembly.
- The sealant was not tar like. It felt and smelled like epoxy.
- Plate erosion was minimal.
- The coatings were mostly deep black and paper thin.
- Cell took 2-3 hits with a 3# hammer before breaking. NUMEROUS hard strikes to separate and open.

Plate Erosion

#3 - Free floating plate

Broken plate-electrode weld

Floating plate wire brushed

Three electrodes broken away from plates

Drilling into sealing epoxy

First 5 plates
Middle three plates
Right 5 plates

Temperature sensor?

Plate Carrier

Plate and broken electrode, in carrier

  • Poll
We Have a Winner! TFP Pool of the Month (October 2023); Theme - Landscaping

Please vote for your favorite landscaping pic. Either post 5, 6 or 7.

  • Post 5

    Votes: 2 14.3%
  • Post 6

    Votes: 6 42.9%
  • Post 7

    Votes: 6 42.9%

1. On the first of each month, a contest "theme" will be announced (i.e. water clarity, family fun, decking, custom features, lighting, scenery, etc)
2. Members have 10 days to UPLOAD ONE image for consideration; Photo must be related to the thread titled theme for that month.
3. Per general TFP rules, nothing profane, political, or insulting.
4. The first 10 days is the submission period. Posts are limited to ONE image ONLY. No discussion posts yet. This will make viewing much easier for all.
5. Days 11 - 15 the thread will be locked and is for voting only. No more uploads. Viewers now have a final opportunity to vote (or modify their selection) for their favorite upload.
6. Members are encouraged to use an emotion icon ("Like" or "Love") to vote for their favorite upload; it will be tough, but select only one favorite.
7. On day 16, emotion Likes/Loves will be tallied for a winner. In the event of a tie, we will create a poll on the thread to make a final selection.
8. Once a winner is announced, the thread will be unlocked and comments/discussions are welcomed. Winner and nominees can tell us all about their pool/photo/event.
9. A member can only be selected as winner once per calendar year.
10. Winner will receive a $50 gift certificate from tstestkits.net! Oh, and maybe some bragging rights. :poke:

Let's see those landscaping pics. Have fun and good luck to those who apply!

BLACK+DECKER Pool Heat Pump

Seems like Black and Decker released a pool heat pump.
Anybody can say anything about it?

  • Like
Reactions: tradewinds

Cya

So, received my Taylor k2006 5 min ago. Tested cya first thing as I have been partially draining and refilling for almost 2 weeks. According to the kit I’m wellll over 100 . The only way I can explain it to you is … down the side of the cya test “tube” there are numbers
9, 4.5 and 1.8 . The dot disappears just a touch above the 1.8 well below the letters CYA.

I dumped sample and tried again same results . I think I know the answer but double checking …. Just continue to drain and fill? I can only take out about 6 inches at a time without flooding my neighbors yard but today is my 9th time in 11 days to do so


Thanks

Attachments

  • image.jpg
    image.jpg
    268.1 KB · Views: 67
  • Like
Reactions: Neverwinter

Appreciate feedback on a new pool

Hello. Glad I found this site and value all the info people are sharing.

This is the first pool I'm building but had a pool at a previous home for a couple years. I have talked with 4 builders in the Phoenix area here's the latest plan we are considering. I had installed a Pentair VS pump and salt cell at my old house and really liked it but 3 out the 4 builders I'm talking to are using Hayward. The pb who gave the bid below said that Hayward is more efficient and the Paramount infloor cleaning has lifetime warranty so I'm considering being open to switching. He also recommended just starting with chlorine and if I don't like it add the salt cell later. I was ok with this because then I could get whatever I want.

The dogs are probably going to be using the pool the most so wanted a large shelf and bench to stand on. I had wanted the first step to go all the way across the pool but the pb advised against it. We thought about having a gas heater and spa but at about $25K for the quotes we received I don't think we would use enough to get the value. Would getting an electric heat pump add many more swimming days in AZ?

Appreciate any suggestions on this build or recommendations in the Phx area.

Thanks!
Screenshot 2023-09-23 135149.jpgScreenshot 2023-09-23 135108.jpgScreenshot 2023-09-23 135037.jpgScreenshot 2023-09-23 134317.jpgScreenshot 2023-09-23 134406.jpg
  • Like
Reactions: pcollins22

Gray Mottling Plaster Discoloration

Gray (also spelled “grey”) or darkened blotchy or streaky discoloration of pool plaster (cement flatwork) is known to be caused by several improper plastering practices, including the addition of calcium chloride to the mix (even less than 2%), late hard or dry troweling, and sometimes a cement material issue can lead to this problem. Trowel “burn” is another cause of extreme dark discolorations of white plaster. It is also called “pinto concrete” in the cement industry. (Concrete Slab Surface Defects: Causes, Prevention, Repair Portland Cement Association 2001).

Although some discolorations are the result of metals precipitating and depositing various color residues onto the plaster surface, these are referred to as surface staining. Usually, this type of staining can be easily and safely removed from the surface by acid washing, sanding, using sequestering or chelating chemicals, or other stain removal products.

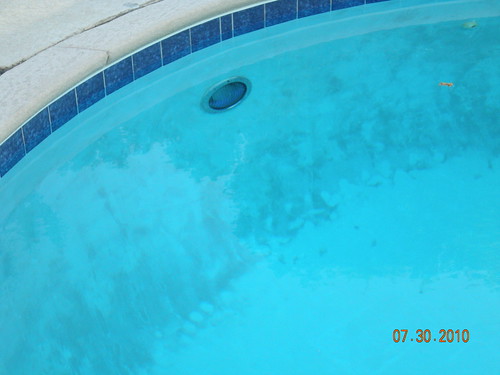
For this article, we are discussing a blotchy or streaky, and very smooth gray discoloration that sometimes develops during the first few months after plastering and being filled with water. This graying discoloration is difficult to remove, and is often termed as a “hydration problem” or “entrapped moisture.” This type of dark discoloration should not be confused with metal or calcium scale staining.

11486879635_f4a99a7a02.jpg


Late hard troweling can cause a darkening of the color of white cement because it decreases the water-to-cement ratio of the plaster surface. A very low water-to-cement ratio almost always leaves a darker finish color. The addition of calcium chloride to a plaster mix is also known to cause graying of cement, in addition to making the plaster less durable over time.

Gray mottling of new plaster pools is sometimes accompanied with “white soft spots” or streaking (also incorrectly called “spot etching” or “etching deterioration” by plasterers). Research by independent cement laboratories have documented that white spotting and streaking is not the result of an aggressive water (etched caused) condition, but is caused by improper workmanship practices and troweling techniques (such as adding lots of water while troweling) which results in localize areas of greater porosity (lighter soft areas or spots) on the plaster surface.

Some plastering people incorrectly claim that aggressive water, high cyanuric acid levels, or improper water chemistry startups causes the graying discoloration. There is no research study that supports their theory. Sadly, these incorrect claims enable some pool plasterers to avoid responsibility for improper practices, and place blame onto innocent pool owners or service techs.

In an attempt to remove the smooth gray discoloration, it is sometimes suggested to perform a “zero alkalinity process” or an acid treatment on the plaster. That is the wrong thing to do. Acidic water treatments are an undesirable and improper suggestion for the service tech or pool owner to perform on a new plaster job. While this treatment may occasionally lighten gray discolorations, it often doesn’t work, or the gray color returns within weeks afterwards. But the most unfortunate issue is that the plaster surface WILL BE ETCHED after the acid treatment process is performed, which ages the plaster surface and allows for staining to occur much easier and sooner.

If an acid treatment is used to lighten gray mottling, how is it that slightly aggressive water caused white plaster to darken and turn gray, and in a blotchy, streaky, or spotting fashion in the first place? If the gray discoloration isn’t removed by the acidic process; it will then become difficult proving that it wasn’t aggressive water that caused the gray discoloration in the first place and the pool plasterer may be able to avoid being held responsible.

Sometimes, “torching” (heating) the gray area with a propane torch device is performed in an attempt to remove the gray color. It is unclear whether the torching process affects the long-term durability of a plaster surface, but there are studies that indicate some damage is done to cement products. It is known that the plaster surface may “pop” when heated to such high temperatures, so protective goggles should be used. Be aware that the above remedies may only be temporary as the gray discoloration may return after the pool is filled again with water.

There is also normal mottling of plaster where the white plaster surface has very slight shade differences from one white area to another. Again, this slight difference still has to do with the fact that plaster is made of a mixture of water, cement, and aggregate, and is a hand-crafted product. At its best, there will still be a slight variation.

As one can see, all of the above discussions regarding dark discolorations of white plaster has to do with workmanship, additives, hydration problems, and/or curing issues, not about water chemistry and whether the water is aggressive or not. Aggressive pool water does not cause a darkening of white cement, nor does it detrimentally affect the hydration rate of the cement compounds.

See also these posts: How White Pool Plaster Can Turn Gray
How White Pool Plaster Turns Blotchy
ten-guidelines-for-quality-pool-plaster-t42957.html
  • Like
Reactions: Jaffles

IntelliCenter Wireless Link Freezing

An observation to try and crowdsource experiences and pinpoint where the IC bug is.

My house occasionally has the electric power blip off and on. It is an immediate power drop and right back on. I am right between two or more grid feeds and when the utility switches feeds or a storm hits one feed I get the power blip on the grid switchover. I have UPS batteries on equipment I don't want to reboot during the power drop.

When the power blips the IC wireless link freezes and to get it back I need to power the IC down, wait a minute, and power it up.

I had the Engenus WiFi bridge that Pentair was shipping with the early IC. And the thought was the Engenus box was the problem to losing the wireless link. So I replaced the Engenus Wifi link with the 900MHZ wireless link.

The 900MHZ link freezes the same with a quick power blip. And I have tried disconnecting both sides of the 900MZ link to power it down and reset them. That does not bring the link back operational.

It takes a power down of the IC and a reboot and then wireless is restored.

I now believe IC is not fully rebooting after the quick power blip and its embedded wireless server crashes while the rest of the system operates after the power blip.

I am now thinking about how I can force a reboot of the IC without the wireless link or put the IC power on a UPS battery.

Anyone else seeing this behavior after a power blip?

Filter