Pre-Rust Protection: Intex Prism Rectangular Frame Pool

Will be receiving and setting up my Intex Prism Frame Pool next week. Will be an all-around-year setup. Plan is to build a high-deck around it.

Not knowing much about pools, I ordered a Saltwater system, but then found out that Intex Frame pools can have problems with rust, some only after 1-2 years. I would really hate to have to take down the pool and replace it after a short while, especially since I will be building the deck around it.

So was thinking about solutions/ideas to pre-protect it before adding the salt. It seems most rust cases I have read about have problems with the corners, not so much the legs. But overall the problem seems to be related to all the metal parts, that are free/visible and not covered with the lining (Which of course make kind of sense)

28316a.jpg

I was thinking about first covering those parts (legs and corner frames) with some kind of rust-protector before assembly, But also finding something plastic, like e.g. pump hose that could fit around the frame like a cover to protect that further. I know would not look good, but does not matter in my case, as I would have a wooden deck to the top of the pool, so legs etc would not be visible.

Have anyone tried to do something like this pre-setup? and if so, do you have any better ideas? I have read a lot of posts about rust, but they seem to be mostly about action needed after the problem has happened.
  • Like
Reactions: Sarah2

Black spots on ladder steps and green on liner

I believe I’m getting algae in the pool. This is because I have black dots on the steps . When I rub them they turn greenish. And a hint of green algae on the downslope of the liner above the skimmer . Otherwise the water is crystal clear. See attached pictures of the two algae areas mentioned above.

my water test results have been right on target for a long period of time. I keep my fc at the high end of the target range. Please see my pool math test results- I post nearly every day.

I am baffled as to why I am getting algae. I will do an oclt test tonight. My cya has crept up to 90. So if I have to SLAM I need to lower my CYA ALOT which means I have to replace 40 to 50% of my water.

Any suggestions? And any ideas as to why I have developed algae with my fc staying in the 9.0 to 12.0 range for weeks?

Attachments

  • IMG_6628.jpeg
    IMG_6628.jpeg
    681.7 KB · Views: 32
  • IMG_6627.jpeg
    IMG_6627.jpeg
    383.2 KB · Views: 33
  • Like
Reactions: canoeusa

Yellow Treat / No Mor Problems: The Bromine Dilemma

Hello all, I have been taking care of my pool for about 2 years now and for the most part its been fine. I deal with some scaling and algae blooms here and there but nothing has gotten out of hand. This year the blooms were starting out pesky so I took some water in to test at Leslie's. My CYA level was 140 and last year it was 100. I made the mistake of continuing to use trichlor tabs in my in-line chlorinator. I have since learned I can simply stop using that method and just use liquid chlorine or cal hypo until my CYA levels come down. I know dilution is the best solution for this issue but I would have to drain half of my pool so wanted another option. I first used yellow treat in July of 2021. I bought a single 2lb container and used around 2/3 of it a on a couple treatments probably within that year. All of 2022 I do not believe I used any. This week I used the rest which was around 10oz or so which was the rest of it. I then decided to implement the No Mor Problems into the mix of which I did a total of 17oz after the initial treatment and then a single maintenance dose. All of that being said, I have read a lot in the forums about the sodium bromide issue turning into bromine. My first question is based on how much I just added, what would my current PPM be for bromide/bromine in the pool (17,300 gallons)? Also, although sodium bromide is not recommended, I have a big CYA problem and my FC demand is pretty high. At this point is it either dumping tons of chlorine in my pool or risk building a bromine load that will never dissipate aside from a total drain? The blooms are gone for the moment and im sure the sodium bromide did the job. However, I don't want to cause more problems. It seems clear to me that the initial reason for my algae blooms not going away was my CYA level was so high that my normal amount of cal hypo I was using was not getting me to super chlorination. Anyways, I am looking for some good alpha on if my pool water is toast or if I can simply wait it out for the CYA levels to drop and the bromine to dissipate. Thank you!

The journey begins, pool dig starting after Labor day, posting photos of the process.

After Labor day we start the dig for 13x31 fiberglass pool. 5' flat depth with tanning ledge, salt water, Rheem heat pump heater, auto cover, Jandy pump & cartridge filter, Polaris auto cleaner
It will look like this one
pof_FreedomSplashPad_31_StormGrey_US_2.jpg
Marking out the location
IMG_0706.jpg
Removing the existing slate patio, going to reuse it who knows where.
IMG_0735.jpg
will post pics of the hole next week along with placing the fiberglass pool

It's Pool Repair Weekend!

I'd like to use this as a "working thread" for myself and any other pour soul who has the pleasure of facing the feat we will this (long) weekend.

Can a pool 40x20 concrete "vintage" (ha!) pool be repaired in a long weekend? Or I guess more appropriately worded would be how well can such a pool be refinished in a long weekend?

Background - purchased a house in Fayetteville, NC (Ft. Bragg) from a "flipper." Soon thereafter, courtesy of the U.S. Army, we were forced to move to the DC area. House became a rental (that we lose money on every month and can't sell due to housing market).

Had maintenance performed by professional year around until winter of 2014 when our pool man retired (after 30 years) due to health issues, and we let it go. We traveled to NC a few weekends ago and dumped a bunch of chlorine and algaecide into pool. Cleared up reasonably well, but may be green again by now.

Pool Specifics;
From what neighbors have told us, the pool is at least 30 years old. There is no main drain, no hydrostatic hole. No tile around edge. Nothing but concrete.

Had pool pressured tested last year looking for leak that's not horrible, but drives up water bill about $10/m. Suspect leak is behind light (which was removed 2 years ago to fix, but never got done). Pool is plastered and was painted - who knows how long ago - and per the test done this week, it's plaster and an epoxy paint.

Before buying house the pool cracks (minor) on floor were "repaired" by a flighty-handy man. Within a week of closing paint started chipping from plaster/mortar of these repairs. Other than that, pool was pretty and certainly swimmable so we lived with it.

Fast forward 4 years and here we are. Plaster has started pulling away from walls at top edge and paint is chipping throughout, as well as chalking.

Pictures to come.

We realize the pool needs to be completely resurfaced, but quotes have come in for $10k and that's just not in the budget. We could likely venture a DIY replaster, but due to time constraints (living in DC) this isn't a viable option either.

So we will venture down this weekend (Friday morning) to do whatever we are able to make the pool reasonable for our tenants within a few days, a budget of around $1,000, and the weather - starts raining this afternoon and stops early Friday afternoon, but doesn't appear to be a lot of rain. We are not looking for a 20 or 30 year fix. We hope to get perhaps 3 years from this weekend's fix to keep our tenant happy and our chemical expenses down.

Before I start into questions about products to use, step 1 is to drain the (40k(?) gallon) monstrosity. I have someone local that can pick up a (rented?) sup pump for us and start the draining process. My immediate question is what specifications does the sump pump need to be? Besides being submersible, anything in particular we need to make sure the pump has/can do?

We can buy this one from Harbor Freight for $40 (with coupon). Any reason this one won't suffice? http://m.harborfreight.com/16-hp-submersible-utility-pump-1350-gph-68422.html

Or we could rent this one from HD for $42/day (or likely somewhere else for less). http://www6.homedepot.com/tool-truck-rental/mobile/Submersible_Pump_2/0009112/index.html


We would be so incredibly grateful if some of you will help us along in our journey this weekend for the "temporary fix" for our pool which we have affectionaly named "Pita" (for PAIN In The *****). As I intend to provide pictures along the way, there's likely someone else in the future who will also benefit greatly.

Cheers!
  • Like
Reactions: mhk.kohler

  • Locked
Closing an in ground pool

There are many ways to winterize a pool, varying both by how far North/South you are and by personal preference. This is what I do for my in ground vinyl liner pool in Maryland.

Prep - Double check that the winter cover is still in good shape and that I still have enough water bags that don't leak to go all the way around the edge of the pool plus a few for spares. In the fall I let the water level drift down a little so it is closer to the bottom of the skimmer, instead of near the top where I keep it during the summer, this will save a little time latter.

Wait - I wait to close until the water temperature is solidly below 60 degrees. Below 60 degrees algae is fairly unlikely to grow and when it does it grows very slowly.

Balance - I bring PH to between 7.4 and 7.6 and make sure TA and CH are not too far out of line. This is generally easy as everything pretty much remains balanced all the time.

Shock - Two or three days before closing, I bring the pool up to shock level and hold it there until FC holds overnight (which it generally does right off on the first night). Then I let the chlorine level fall about half way back to normal levels, typically another day and a half.

Time to close - Everything from here on is done in a single day. With two helpers it normally only takes an hour of work over two or three hours of time (draining takes a while).

PolyQuat - Add the startup (maximum) dose of PolyQuat according to package directions. I give it half an hour to mix with the pump running before starting to drain. While I am waiting for that I proceed with the next three steps.

Clean - Clean up any leaves, dirt, etc. I like to close as neat and clean as possible. Some leaves always fall in while I am closing, which I don't worry about, but other than that the pool is generally cleaner than it is after my usual weekly cleaning.

Store equipment - Remove the ladders and any other removable equipment, toys, patio furniture, etc, and store it all for the winter. The ladders can be difficult sometimes. Be sure any clamps or locks are fully released. Generally a few minutes of pulling and wiggling around, alternating with a helper, and they will come out.

Closing supplies - Get out the winter cover. Fill the water bags one half to two thirds full and place them out of the way around the pool.

Drain - Pump the water down till it is about four inches below the bottom of the returns. Usually I can do this with the regular pool pump, if the vacuum hose will allow the pump to stay primed. It usually works to setup a vacuum hose as if vacuuming so the pump can still draw water below the skimmer level. Some times too much air gets in and I lose prime, so I have to switch to the cover pump. If you have a main drain you can usually just use that and everything will go more easily.

Remove fittings - Remove the skimmer basket(s) and return eyeball(s).

Blow out the lines - Using a large shop vacuum I blow out the plumbing. If you have more than one skimmer/return this should be done one at a time. I only have one of each so it is fairly easy. I use the shop vac blower outlet to blow air into the skimmer pipe and keep going until nothing but a very fine mist is coming out of the return. Then I let it run some extra time to get as much out as I possibly can.

Drain plugs - Remove the drain plugs on the pump, filter, and heater. I also remove the SWG cell assembly and various other parts of the Total Control system (sensors, acid tank, etc). The drain plugs get stored in the pump strainer basket, the Total Control parts go in the basement. Any drain plug hole exposed to the weather gets a layer of non-hardening joint compound on the threads to protect from rust.

Anti-freeze - I add pool/RV anti-freeze (not automotive!) to the pipes at the rate of one gallon per ten feet or fifteen feet of pipe. It is a great help to have a curved funnel to get the anti-freeze into the return line.

Seal the pipes - I use expandable rubber plugs to seal the skimmer pipe, return pipe, and the unions the SWG attaches to. The skimmer also gets most of a gallon of anti-freeze on top of the plug and some torn up pool noodle foam to protect the skimmer (which will also be covered by the main cover). Some people use a gizzmo in the skimmer but I prefer the rubber plug and pool noodle material as I feel more confident that the rubber plug won't come out.

Cover - Center the cover over the pool. This is actually a fair bit of work and takes at least two people. Then I press the edges down so it lies more or less flat on the water, runs up the wall, and the remainder lies flat on the deck. Water bags are then put on the cover around the entire edge of the pool. Fold any excess cover under the water bags so there is nothing to blow around. Some people add a little water on top of the cover to keep it from blowing around, but I have found that I don't need to.

Cover pump - I leave an automatic cover pump on the cover for as long as it is above freezing overnight in the fall and spring.

Leaves - After all of the leaves have fallen I watch for a period with several dry sunny days in a row when the leaves have dried out fairly well and use a leaf blower to get most of them off the cover. Then I rake the remainder off with a rake with a handle extension (an extra broom handle connected with hose clamps).

Maintenance - Over the winter I keep an eye on things occasionally. Sometimes a water bag will spring a leak and need to be replaced. Sometimes in a big storm a water bag will get blown onto the cover and need to be rescued.
  • Like
Reactions: Burtonjeeplj

Salt volume / Pool volume

Made a rookie mistake this last weekend, and thought I'd share in case it helps someone in the future. My pool builder "estimated" the gallons of my pool at ~ 22,000. I never bothered to verify in detail, but I read how to do a quick and dirty estimate. The pool is irregular shaped, but at it's longest and widest, it is 41' x 17'. The depth varies from 4' in places to 6' in places. Since there are some curves that go in from the widest places and also on the corners, I used 40 x 15 x 5 x 7.5 (length x width x avg depth x 7.5) to come up with ~ 22,500. Since that was close to the pool builder's estimate...I decided it had to be good. Had to be good....right?

Well...I've waited the 30 days for the new plaster to cure...and time comes last weekend to put in the salt. I'm super excited about this, because I've already spent way too much in chlorine. The plaster guy's advice was to NOT put it all in at once...because "it's a lot easier to put more in than to take it out". I chuckled..and agreed.

So I did the math. I checked it twice. I'm gonna find out who's naughty...er...wait. Sorry. Got distracted there. I figured somewhere around 15 or 16 bags was going to be the right amount. Cuz I'm great at math. Easy peasy. So I put in 13 of my 16 bags, assuming I would check it after a day and then add the rest. To my surprise...was reading more than 3,600 ppm. What? Either I had somehow purchased "super potent" salt....or my math had gone wrong somewhere. After some reflection...I decided that maybe I'm not as great at math as I thought.

You see...the pool volume turned out to be no where close to 22,000 gallons. I have this gigantic tanning ledge that is included in the 41' x 17' shape, and it is only 9 inches deep. About 10' x 15' feet of my pool is only 9 inches deep. Plus...I've got two different sets of in-pool plaster stairs, and some bar seats in the pool. In short...I really screwed the pooch by assuming the pool builder's estimate was good and also messed up my initial quick verification of his number. I decided to get a little more accurate. I setup an Excel sheet and made all the rows and columns the same height/width, so that they were squares. Basically made a grid on the spreadsheet, and then I drew the pool. I dropped in water depths in each cell, which let me get more precision for the tanning ledge area, the depth gradation, and the stairs, etc. Then summed all the cells, multiplied by 7.5, and I get my number. Even threw some conditional formatting on it as a quick check for depth variations. Looks like this....

AIL4fc-02sSuSZqhdK-OG-XT-JmVvFWc2kOguQSMenHlfqRUfdC4pykaOe8ToI6nY8JUdS0-yDMRU_IFOtElVY0qZQ9zXYbmvuXRXaL_ZOzjqFVT8WnH7FX_F0ylpBgtfIMgK-7nx_ws37UwHCYpiuhst63aOYnlZCktzJyJdjj40AgYnoioteG3FiUTdA9bfUfaNIyjex8SNh_O2PLdWaF2qPwxLTW5fv6-IhMRYffgnZKmEYj-Z5fmD84U8_DfCpbhmOopRruV2B21dl2QvgK8o679QIa5Dv_YrBvxA6el9TfTbl32rpc2XreExd0QlNnkD76pPPXx5IMSJMKuSgYqjSejYOSq0bMfDKkM6UY_glzSzHWvECZTqGwhBsfz0QOs8sYlOXJCip0wM5Flqiqa0WfBcwRefJ2V2_cSKeKDnR5vjhqF95a2hCBsLqQeBSqxPJaixUqNjJI8tCkTqvgyrPqoim36feldY0I6Ehk9kX5-o9pWDgD-AkFkScWaqlPSP2Effr4GNsYT3KJzj2IWu62swcnlfzmtMcgBkaINuiFpiOFbAAIv8wVjnqSGtgdivEirFNhaEV-9H2H_ZM3wzxkorZYzmT9caZZhQNZlGRQETSyZw96Mes7su92CqKsmCZ5648mYEolfQBtvsEYqJT30ZMc89DTz4FjFG37KTWPrBxkVKdyDpap_dn-da1_LHJcxrgWYTEhLE_V1YPs2B_QtTA1CcF04oTxYFa-cqoM2xQMdvs4ol0TaPliGQSiGStMhdfndlmKsOtglvWbv4hAMdWLQWSqmzqAfuuHz67ftf05ruQZ92BYtNd2tCsxWZjjID0bLRnaY9DrkN_-px8yxDBYGK8N0rYIguEM2cMqLCmHVlC4TY0ULlou9urw8X38siZRXvA29bGOjHA=w1708-h1281-s-no


The bottom line....is that my approximate 22,000 gallon pool, was really only about 16,500. Yikes. So yes...I put in too much salt. I spent the next day filling the pool up past the overflow so that it was shedding water. Took me about 13 hours to knock it back down to 3,000 ppm, which is where I want to start my SWG journey. Will adjust up or down based on SWG production, but I figured that would be a good place to start. This should make my acid additions a little more accurate, as I've been using 22,000 as my pool volume. Yikes again.

Anyway...hope that helps someone. Now I get to start tinkering with chlorine production. Should be a fun week!

TFpro / CYA test hack

Happy Weekend folks !!!

I was today years old when I learned the caps on the CYA bottle and squirter bottle are interchangeable.

20230904_123505.jpg

The pointy tip made it much easier to add the appropriate 50% of R-0013 instead of pouring too many glugs. Then, the cap meant I didn't have to put my finger over the hole on the squirter tip to shake the sample bottle.

You're still going to be trolled by the googley eye, but the first parts just got better at least.

Bought a 10 year old pool. Wish me luck.

Neighbor didn't want his anymore, so I've drug it to my house, sand and all. 10 year old liner only had a couple of small holes, but I realize it's probably not long for this world.

Put foam between the sand and liner because my sand isn't as clean as new.

It's reassembled on flat earth, liner is in. I've got to pipe it up and fill it this weekend.

Here's hoping it all goes well. Kids are anxious.

Never had a pool before. TF test kit ordered. Ladder on the way. Going to pick up some bleach and conditioner this week.

Figure I'll get to lay it up for winter in a few weeks.

If we like it, I'll build a deck, etc. in the spring. If not, I suppose it'll have to go down the road.
  • Like
Reactions: Newdude

Guts of QuadDE Filter

I thought it might be useful to start a thread for all of us Pentair QuadDE filter owners to share some "best practices" when its comes to cleaning out a QuadDE filter. Jblizzle has a great sticky thread on how to clean a standard grid type DE filter. This isn't meant to replace anything he has written but to add some pictures and highlight some differences between a grid style and a cartridge style DE filter. Since my filter was due for its annual deep clean, I thought I show some pictures of the process. What's listed below is what I do for cleaning the filter, others may have different tricks and tips to share...if so, please do respond!!

How To Start

The first step is to always gather the tools you need for the job. This is what I need based on my filter and the location that it's in. Your list may vary.

7/8" deep pocket socket wrench (I use a 1/2" ratchet handle)
Large flat-head screwdriver
Rubber, wooden or plastic mallet (mine is a plastic mallet used for tent spikes)
Water-proof Silicone lube (I do NOT use teflon based or teflon-added lubes)
WD-40 White Lithium spray grease (only used on the saddle clamp nut & bolt, never anywhere inside the filter)
Large plastic tarp (I use this to direct the flow of water and waste from the drain hole as water causes a lot of erosion around my equipment pad)
Lots of rags (I find old dishcloths work the best)
Garden hose with good pressure!!
Bar-Keepers Friend liquid cleanser (more about this later)

Process:

1.Since my filter always has water in it (a check valve keeps it from draining), I always start by backwashing the filter. This gets rid of a good portion of the DE from inside the filter and makes cleaning out the filter body a little easier.

2. After backwash, I cut the power to all pumps. I leave the backwash valve in backwash position and open the high flow bypass valve (HFB). This will cause all of the water in the filter above the level of the output coupling to drain out through the backwash line. This way, most of the water in the filter flows out of the backwash line and leaves only a small amount in the bottom of the filter.

3. After the filter drains, I remove the saddle clamp by undoing the tension bolt assembly (7/8" socket wrench required). I sometimes spray some of the lithium grease on the threads to help the bolt move smoothly.

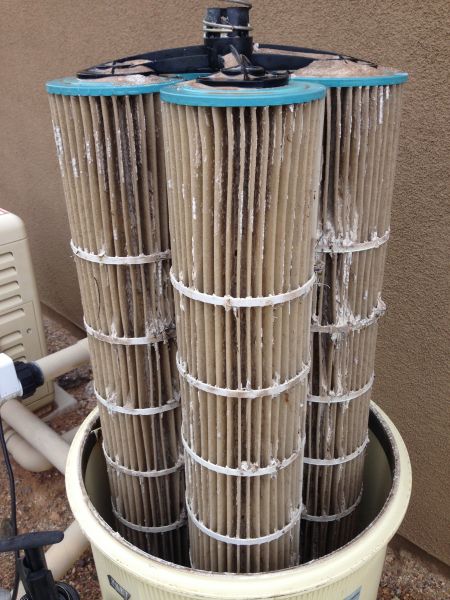
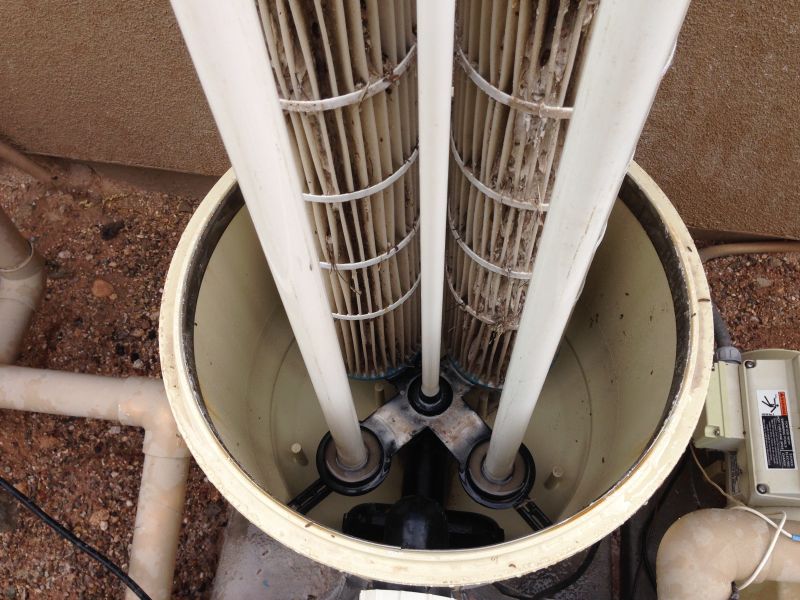
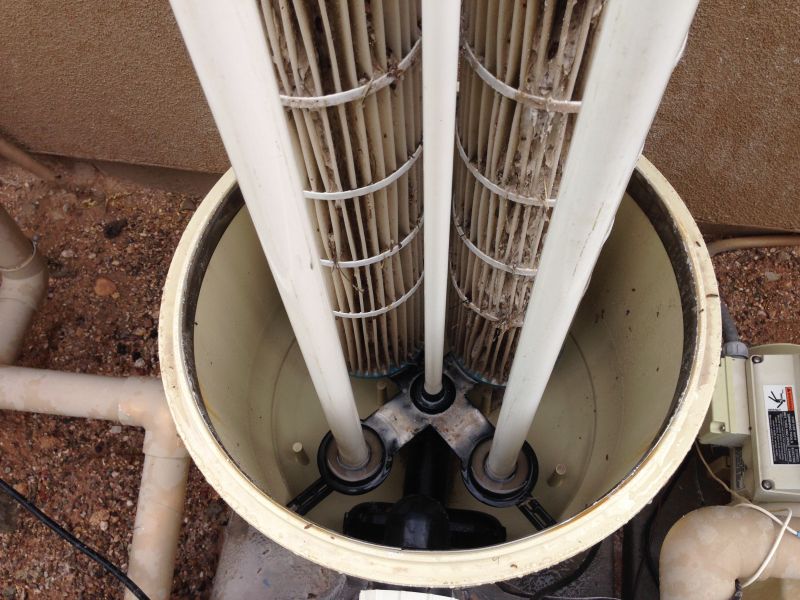
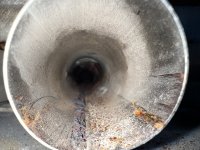
4. With the saddle clamp removed, I lift off the top lid and put it aside (this is heavy and, if you can't lift more than 50lbs, you should get help). Once the lid is removed, this is what I find -

full


dbtgallery.php


full


dbtgallery.php


5. I then open up the drain plug on the bottom of the filter and let the remaining water (and some spent DE) drain out. I lay out the tarp so that the flow from the drain plug is directed down the rip-rap embankment so as to not cause soil erosion (my equipment pad is in a lousy location :( some day I will need to build a very big and very expensive block retaining wall and buy A LOT of fill sand to replace what erodes away). Another trick I have used is to get some 1-1/2" DWV pipe and fittings with a 90-deg elbow - there just enough room to shove the pipe fitting and pipe under the filter and capture most of the water...it's not great, but it works.

6. With my garden hose, I rinse as much of the muck off of the cartridges as possible allowing all the muck and spent DE to drain down the tarp. I remove each cartridge one at a time and continue to rinse out the filter body.

full


dbtgallery.php


full


dbtgallery.php


7. Pentair uses an internal, stainless steel ring inside the filter body to aide in the saddle clamp having a stronger circumference to seal against. You can see a small amount of corrosion-

dbtgallery.php


I use the BKF cleanser and a soft sponge to clean away the rust stains. Why BKF you ask? Because it's just silica grit polishing compound with oxalic acid in it. The oxalic acid is very good at chelating and removing rust stains. This will all be rinsed away as I continue to clean and remove cartridges.

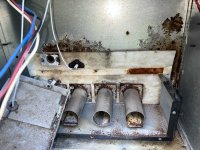
8. At this point, the filter body and bottom flange assemble are clean -

dbtgallery.php


dbtgallery.php


I'd like to take this time to point out that Mark (mas985) was right about the fact that the input of water into the filter under normal operation is actually diverted downwards and towards the lower wall of the filter body to create lots of turbulence so that any DE that settles at the bottom is easily stirred up. The Pentair Owner's manual does not show it that way (it shows it pointing upwards) so it's nice to see that they designed the filter input with turbulence in mind.

9. Now the "fun" part, cleaning off the cartridges :( At this point, I go to the back wall of my property with my garden hose and a bucket or pail turned upside down so that the filter can be held upright on it at a level that means I don't have to bend too much. Cleaning takes A LONG TIME as the DE is all entrained on the filter cartridge surface with every form of organic and biological nastiness. It's basically a goopy muck of human bather waste, leaf litter, hair, bugs, decomposing and oxidized organic compounds forming a zombie-like flesh on the cartridge surface.

Pro-tip #1: Wear long pants, and a long sleeve shirt, preferably clothes you don't like too much...and then be sure to WASH THEM right away after you are done....

Pro-tip #2: KEEP YOUR MOUTH CLOSED! (don't ask how I know that :pukel:)

One down, three to go -

dbtgallery.php


Almost there.....

dbtgallery.php


Now those are some nice-looking cartridges -

dbtgallery.php


Just a note on removing and replacing the cartridges -

>>The top black flange fits snuggly into the holes in the top of the cartridges. Sometimes it helps to take a large, flat head screwdriver and VERY VERY VERY GENTLY pry it up a little bit....did I mention being GENTLE!!! Also, in the middle of the top flange assembly is the spring that the cover pushes down on and the air-bleed tube with the metal mesh top cover. If the mesh looks bent and flattened down, that is TOTALLY NORMAL. The mesh gets coated with DE and is only there to be an air bleed for the filter to keep large air pockets from forming in the top of the filter. Be careful with all of those parts, clean and replace them.

>>When putting the black top flange back on, I find that I need to use my mallet to VERY, VERY, VERY GENTLY tap the flange back onto the cartridges so that they seal up nicely....did I mention being GENTLE??

10. Clean up the filter body o-ring using water and rags. Re-apply a necessary amount of silicone lube (all that is needed is a thin layer) and re-install the o-ring.

11. Remove the High-Flow Bypass from the top of the filter body by unscrewing it (careful, there is a rubber grommet there to act as a seal). The HFB valve looks like this -

dbtgallery.php


12. Disassemble the valve by making sure it is the open position and then GENTLY push on the two side tabs to split it apart. Some force may be required -

dbtgallery.php


13. Clean the valve body and twist flange. Those two o-rings are standard sizes that can be found at any hardware store (I get replacements at Ace Hardware). They can get coated with DE and worn down over time. I usually have to replace them every two years or so. I remove them, clean them off and then re-lube them. It makes opening and closing the HFB valve easier.

14. Clean out the top body assembly of the filter, replace the HFB valve and reassemble the filter. Be sure that the drain pug has been replaced (hand tight is fine).

15. The saddle clamp bolt and screw should be cleaned off with a rag and I like to lube the bolt and screw with white lithium grease. None of that should ever be sprayed directly into the filter body. The saddle clamp bolt should be tightened down with your ratchet until the anti-backlash spring is fully compressed (no gaps between the turns of the spring.

16. Put the backwash valve into the filter position (normal operating position), open the high flow bypass valve and start up the pump. At this point you should hear lots of air hissing out of the HFB valve. Keep running the pump until all the air is out of the filter and water is flowing ("gushing like a fire hose" is a better description) out of the HFB valve. Close the HFB valve, let the filter pump run. Note the clean, uncoated filter pressure.

17. Follow you standard recharge procedure for the DE filter. I only recharge my filter with 10lbs of DE at startup. When I do backwashing (which is only at most 3 times per year), I only use 4 lbs of DE to recharge after a backwash and not the full 10lbs again. Using that much DE is overkill as backwashing typically only removes about 50% of the DE at best. Please follow whatever is your normal procedure.

Hope this helps and please respond with any additional tricks YOU have learned over the years.
  • Like
Reactions: JamesW

Fiberglass Pool Owners - Survey (Results)

Fellow TFP fiberglass pool owner, TFP is always gathering data in an to increase its extensive knowledge base and analyze that information to provide members with the most accurate and reliable information possible. As such, we developed the following survey in an effort to capture fiberglass-specific historical data. We would like your help. Please take a moment to complete the following survey. Thank you.

SURVEY (CLOSED)

We Have a Winner! TFP Pool of the Month (September 2023); Theme - Pool Toys

1. On the first of each month, a contest "theme" will be announced (i.e. water clarity, family fun, decking, custom features, lighting, scenery, etc)
2. Members have 10 days to UPLOAD ONE image for consideration; Photo must be related to the thread titled theme for that month.
3. Per general TFP rules, nothing profane, political, or insulting.
4. The first 10 days is the submission period. Posts are limited to ONE image ONLY. No discussion posts yet. This will make viewing much easier for all.
5. Days 11 - 15 the thread will be locked and is for voting only. No more uploads. Viewers now have a final opportunity to vote (or modify their selection) for their favorite upload.
6. Members are encouraged to use an emotion icon ("Like" or "Love") to vote for their favorite upload; it will be tough, but select only one favorite.
7. On day 16, emotion Likes/Loves will be tallied for a winner. In the event of a tie, we will create a poll on the thread to make a final selection.
8. Once a winner is announced, the thread will be unlocked and comments/discussions are welcomed. Winner and nominees can tell us all about their pool/photo/event.
9. A member can only be selected as winner once per calendar year.
10. Winner will receive a $50 gift certificate from tstestkits.net! Oh, and maybe some bragging rights. :poke:

Let's see those toys. Have fun and good luck to those who apply!
  • Like
Reactions: beeswax

SWG and CYA/TA/PH Help

Hi all,
I’m new to SWG world and could use some help. Here are my numbers taken from Taylor Kit:
FC: 4
Cc: 4.5
PH: 8
Alk: 110
CYA: 77
CH: 200

When I go to Leslie’s they are reading my TA as 62…So I read the post on TFP about SWG, CYA, and TA/PH relationship. The post says the following:

“In practice the concentration of the cyanurate ion is pH dependant where at a pH of 7.0 it is 22% of the CYA. The percentage increases with pH where at a pH of 8.0 it is 36% of the CYA value.”

Questions:
1) I don’t understand what this statement means. Can someone explain?
2) Should I be dividing my TA when CYA is higher? The article states the Pool Math app adjusts for CYA but it’s telling me my ALK is too high.
3) How do I lower Ph and raise ALK? Do I need to?
4) can someone explain how borates would help in this situation?

TIA
  • Like
Reactions: Brian Malone

Suction side cleaners

I'm following this with interest after trying and returning a robot. Coming from a Kreeply Classic K70405.

First try, a $100 Vingli from Amazon, isn't terrible but is missing spots and getting stuck at stairs.

@nuke_twidget What did you wind up doing?

@Dirk On the Rebel v2, did you get the hose kit or just the head? What about the short hose connector and float thing? Wondering if I need to replace my aftermarket hose if I get a Rebel.

Interesting discussion of leaf traps. I never used that with the Kreepy Classic--my hose goes directly through the Pentair Vac Plate (K12068) so all large debris lands in the skimmer. I only have one skimmer and I believe the one drain at the bottom of the deep end is actually plugged (at the skimmer), so the pump's full suction is through the skimmer. Any reason to change that setup?

How good is the Rebel v2 on walls? Will it knock off any algae starting to form? To me that's half the point of any cleaner--to not have to brush. The other half is picking up debris.

Moved from here.
  • Like
Reactions: laszlof

Coping help, please!

We just had had our coping installed and found that the edges are SO sharp. I am terrified of all the injuries it’s going to cause. We went with Techobloc Raffinato at the recommendation of the landscaper. I reached out to him and am waiting to hear back - but trying figure out what I should even be asking for. I realize that I agreed so although he recommended he doesn’t have much liability here. Can pavers be buffed? I don’t know what to do and welcome any ideas!!
  • Like
Reactions: sandy12345

Hayward High CO emissions

Hello,

I have a Hayward H200 natural gas heater we have had for 8 years and my family and I almost lost our life last month as the heater started to emit high levels CO into our home out of the blue. Luckily our CO detector functioned as it should and alerted us. The levels reached 150 ppm.

The heater is working and heating the pool and no error code so I was told the most likely cause of the issue was clogged oriface however when I checked they were clear but the burner tubes were full of soot (pictures attached) which leads me to believe it may be a gas flow issue cause if this? I just changed the heat exchange a few years ago and the pool is not leaking at all so I don’t think that’s the issue but I just don’t know what to do. Anyone ever have this happen? Could it be the valve needs adjustment or maybe a new valve all together? Does these even come unadjusted or fail sometimes? Any help would be great!

Attachments

  • IMG_2599.jpeg
    IMG_2599.jpeg
    518.3 KB · Views: 15
  • IMG_2588.jpeg
    IMG_2588.jpeg
    311.7 KB · Views: 16
  • IMG_2601.jpeg
    IMG_2601.jpeg
    654.2 KB · Views: 13
  • Wow
Reactions: Brian PacNW

Replastering a Pool - A 1 Year Saga - Problems & Lessons Learned

TFP has been helpful to me over the years and I am paying this forward hoping my experiences will help someone in the future.

Background

Pool installed by previous house owner in 2000. Pool builder is one of the top family owned companies in the area and has maintained pool ever since. 20x50 IG pool with spa and waterfall with Hydrazoo plaster finish.

Picture 159 (Small).jpg

By 2016 pool finish was showing some wear and was a bit rough especially in the spa. Then one day after a big storm this stain appeared in the deep end of the pool.

IMG_0050 (Small).JPG

I initially thought it was from some animal that crapped in the pool. Nothing I tried would clean it off. Pool company came over and used acid on the stain which removed it for a day and then after a few days it returned. Tried treating it that way three times with no lasting success. Pool guy said he thought pool took a lightning strike.

With a 16 year old pool finish I knew the pool would need to be refinished in a few years. That stain set things in motion.

Getting Bids- Fall 2016

I spoke to two friends who had their pools refinished and both had problems with the surface afterwards. Their pool builders wiggled on their responsibility saying the PH was too high and the pool was not brushed enough.

I got bids from 3 pool companies in the area in late 2016 before I closed the pool. My original pool builder proposed the best price. I also learned that all the pool builders subcontract to a few companies who do the actual plaster work. I made it clear to my pool builder that I wanted them to take all responsibility for the startup of the pool, water balancing, and brushing. Whatever it needed fold it into their price.

In early 2017 I finalized the contract with my Pool Builder. Finish is Cayman Lagoon Hydrazoo plaster. http://clindustries.com/polished-pool-finishes/hydrazzo/

The following was included as part of the contract:

2018-05-14_2128.jpg

Refinishing the Pool - Spring 2017

I scheduled them to open the pool and do the refinish as soon as weather was warm enough in Spring 2017. The pool was drained and prepped over 2 days by the pool company including a scratch coat bonding surface. Then the plaster subcontractor arrived and in 2 days shot a new coat of plaster and polished it smooth. The pool company arranged for water trucks to arrive at the end of day 4. Pool took four 700 gallon water trucks and then I finished topping it off with hoses.

IMG_0155 (Small).JPG

IMG_0159 (Small).JPG

Pool Startup

By late May 2017 pool was looking good, new water was in, and job looked great. Pool company said not to sue SWG for at least 30 days. My friends who had pool finish issues said to give it a few months. I ran the 2017 season without any salt in pool and the SWG and used chlorine tablets from Costco in the skimmers. PH needed continuous monitoring knocking it down below 7.8 as to be expected with new plaster. I monitored PH and brushed pool as well as the pool service coming weekly to check water chemistry and brush.

Problems Began Showing

Pool finish was nice and smooth for the first 2 months. By August I began seeing problems in the Spa step areas.

IMG_0180 (Small).jpg

IMG_0181.jpg

Areas were pitting and getting rough. Not what I expected to have in a few months. I asked my Pool Builder to drop by and take a look. Now this guy is the son of the owner, worked on building my pool in 2000, and is now the Director of Construction. He came by, saw the problems, and said he would get the plasterer to come by and look at it. This dragged out into September trying to get the plasterer's attention on this.

My Pool Builder reassured me that they will stand by their work. He said they have had the plasterer redo a few pools and if it was necessary it would happen. To me these issues were cosmetic but not what I should have after a few months. And I didn't know how much more it would deteriorate over time. Pool closing time came in October and we agreed we would see how the pool looked when it was opened in 2018.

This is what the spa looked like when it was closed:

IMG_4067 (Medium) (Small).jpg

IMG_4069 (Medium) (Small).jpg

To be continued ....
  • Like
Reactions: Jaffles

Chlorine or SWG

I inherited a chlorine pool when we purchased our house in south Texas a few years back. I bought a Taylor K2006 test kit and have been using that to monitor levels every 2-3 days. Unfortunately, I've maintained the guidance/recommendations from Leslie's, which I now realize was a mistake that resulted in an rather poor experience... particularly around adding chemicals. With the Texas heat as it is right now, I've been using 1-2 tabs a week and supplementing with 70% cal hypo when the FC drops low. I've found myself continually battling algae, which hasn't been horrible, but has been quite tenacious and consumes more time than I'd like. pH swings are also an issue because of high TA levels (which were maintained around 80-ish when adjusted according to the pool store recommendations). To make matters worse, the spa has a spillway that adds to the problem. This week I've been in the process to fixing the pool chemistry and leveraging the TFP methodology, which has raised a few concerns around the liquid chlorine aspect.

I will likely need 3-5 gallons of liquid chlorine (10%) to get through the week. We have a curious toddler running around right now so I'm not sure it makes sense to keep in the house where I can better control the loss of potency. This means I would be keeping it outside in the garage where the temps are consistently over 100F because it's not insulated. This has made me wonder if I'd be better off converting to SWG and easing that burden. My particular issue is around whether or not my pool is compatible... It was built in 2011 and has a considerable amount of rocks (not sure what type), built into the spillway and around the edge of a good one-third of the pool perimeter. Would it be a mistake to convert to a SWG? Pictures are worth a thousand words, so here's what I'm working with.

IMG_3378.jpegIMG_3379.jpeg

Pool robot woes

I am suffering from decision paralysis.

I was an early adopter on pool robots, purchasing the iRobot Verro back in 2007. It was a tank. Unfortunately, I killed it in 2018 and tried to get parts and a refurbished one, but nothing seemed to work. Finally replaced it with a Pentair Warrior SI in 2020. That worked great but we sold our house and left it with the new owners, figuring we'd get a new one with all the bells and whistles for our new house.

Here's my "bells and whistles" wish list:

1. Cordless (always HATED the dang cord)
2. Cleans walls and hopefully waterline, with the (probably impossible) dream that it might do wide stairs or ledges as well
3. Controllable via app
4. Retrievable through something other than a hook
5. The obvious: does a good job! Good sized basket, easy to clean, has brushes on both ends, filters well, etc.

I think if the Dolphin Liberty 400 had been released on time ("Spring 2023"), I would probably have gotten it. But I contacted the company and they said now they're "shooting for pool season 2024" which could mean anything.

I see there are a bunch of new entries in the market, many of which make me skeptical because I'd not previously heard of them.

Some of the ones I've looked at are:

- Wybot M1 Ultra (love the idea of solar charging)
- BlueNexus (although there's not a lot of information on this one, so now I can't remember what intrigued me about it)
- Aiper Seagull Pro (this one looks to have the retrieval hook, which I don't prefer)

Does anyone have any feedback, experience, suggestions, etc. or am I just a dreamer who wants too much?
  • Like
Reactions: LSU

Hyundai Elantra- Hybrid -Great car so far!

Just picked up an Elantra Limited Hybrid for my boy as his first car and I wanted so share that I'm really impressed with this car. The car is loaded with safety features including semiautonomous driving (we tested on highway and it works really well), drives very nice and gets off the charts gas mileage. We have been getting 55mpg routinely in the first couple of weeks. The warranty is phenomenal at 5/60k- 100k for powertrain and tranny. No CVT transmission but a DCT which will last longer too. We took on road to Penn State and drove very nice and quieter than I thought it would be and two teenagers fit comfortably in the back.

So if you are considering one of these I would highly recommend them in terms of a value prop for what is considered a compact sedan. Only thing missing in my opinion is a HUD and wireless carplay vs wired but for an economy car segment they had to keep costs down at some point so likely why no HUD.

Is an indoor pool from the 60s a ticking time bomb?

I'm definitely not the first person to ask this question, but I'm considering placing an offer on a beautiful midcentury modern, with both a major draw and demerit being the indoor pool in the house. I believe it's gunite. I'm in New England so I'm well aware the heating costs for this thing will be extravagant. The bigger concern is the fact that the pool is 60 years old, with the pipes running through the floor over a slab foundation along with old radiant floor heating, the pipes all running across the house into an electrical room halfway across the building. But boy is the place gorgeous. Would I buy a huge jerk if I went for this? A pool guy I spoke to said I'd be looking at a $50-70k resurface/rehab every 5-7 years which sounded insane and which I haven't been able to back up reading elsewhere. And that's not getting into the pipe situation. Oh and the main drain is currently plugged, presumably because that pipe failed at some point. But when I viewed the house the pool LOOKED great at least.

1692915654993.png

1692915693767.png
1692915724689.png
1692915808619.png
  • Like
Reactions: Hal3

Acid stain rejuvenation of 10 year old concrete pool deck

Our pool was built in 2013 and the original water based stain had almost completely faded. It was sealed originally and I had sealed it at least once in the early years, but there is one part that has very little surface texture and any sealant made it slippery (and Sharkgrip didn't last long), so I didn't do it anymore. But time took its toll. We weren't displeased with the plain concrete look, but it needed a thorough power washing for sure. But I always had in my mind that if I found the right product, I would consider re-staining it. I tested this Artist Grade Concrete Acid Stain in 23 colors - Concrete Camouflage on a few "stones" and was pleased so I moved forward with it. Here are the results. I expect this to be a much more permanent solution. The walls/steps and other areas outside of the main pool deck still need the application, but it's time to relax a bit and enjoy the pool more as summer winds down. The process was very time consuming as each stone had to be hand rolled VERY carefully to keep the stain off of the slightly depressed grout lines. I wasn't 100% successful on the grout lines, but as with anything like this, its art not science (or maybe a little of both since its an acid stain).

2013-05-10 07.21.03 (2).jpg


2023-07-23 12.26.53 (2).jpg

Evolution of An Older Pool: Rehab to Automation

Part I: Fiberglass

A few years ago, a relative passed away and left my sister and me a house with a pool. I ended up buying the house from my sister and started to rehab this home. While it was unique and well decorated, there were a number of things that fell behind - including the pool. Below is the state I started with....I'm told the stains are cobalt stains - but they were not just surface level - There was a lot of pitting and bubbling behind the gelcoat.

IMG_0458.jpeg
I tried to get them out with Ascorbic Acid, but they had been there for too long and the damage was greater than just surface level.

After a lot of homework, I decided to hire a company to repair the damage and re-glass the pool. It turned out to be a larger job than they anticipated and they found that it had been "repaired" before, but someone just put gelcoat over the top of prior damage. This picture was during the process of repair...

IMG_0664.jpeg

After a little more than a week, the final product looked great - and still does more than a year later.

67253469252__4D17C4FC-6FFA-408B-8E5C-7AE350D35389.jpeg

Continued in Part II
  • Like
Reactions: Bperry

GlassCoat Resurfacing

For those who might have become tired of my ruminating about my less-than-ideal plaster on my one year old pool, fret no more. I was just as tired myself. Seemed like every time I used the pool, in the back of my mind I knew it wasn’t right and the PB wasn’t interested in addressing it. That would be a builder whose name rhymes with the cooking shortening Crisco in the Seattle area.

I found a local pool service guy closer to my location and once I was confident of his ability and business ways, I contracted him to do a spray and seal of the original plaster with the GlassCoat system. No more blotchy plaster leaching calcium into the water. No more bulk acid purchases. As you can see, I’m refilling the pool and they are just masking the safety edge stripes on the steps. As I live with the product, I’ll report back on my experience. If anyone has a question, just send me a conversation. And oh yes, for the 18x38 pool the bill was $15k. For me, being A-R, it was money well spent.3FA3B847-9542-43C1-86E9-FC20CDA65092.jpeg
  • Like
Reactions: VegasOas-us

Hurricane Prep/Recovery Posts


(wather guy Steve Cantore)

Got Schooled by my Taylor K-2006C - Big thanks to TFP!

Second season over here and last year was uneventful, was going along with those strips, thinking I had things under control, boy was I wrong:

CC 0.2 ppm
FC 13.5 ppm (my Cell is on 90% power output and tests were taken at 9AM). Chlorine has been dropping to ~1 ppm by sun down (measured with strips).
pH 9.1!; added 83 fl Oz of Muriatic acid
TA 230 ppm!
CH 190 ppm
Salt 3100 ppm (reading from Hayward box)

and for the drum roll.....
.
.
.
CYA= 0! So now I know why my FC has been doing the yoyo thing for the past weeks! Little did I know about stabilizers! and needless to say, I am DONE with these stupid things telling me CYA was ~30-40 BS.

Of course my saturation index is near 2! and yes, I have white scale at the bottom of the pool.

Thanks to TFP for emphasizing the need for a solid testing kit! I feel I have things under control, or at least a basic understanding of what is currently wrong with the pool.

Plan (please correct me, and thank you for taking the time to do so).

Gonna add water, do a back wash and get cranking on the TFP app to calculate lbs of cyanuric acid to add to raise that number to ~70!

I will test again tomorrow and report back.

Thanks again!

Teal cloudy water

I have been battling cloudy water for over a month.

FC=1
TC=1.5
PH=6.8
ALK=140
CYA=75
Calcium=350

Last night I put in 6 gallons of liquid chlorine. The above numbers are what I got today.
I have a salt water pool, but the salt generator is not producing chlorine, I'm in the process of getting a new one. I'm using chlorine pucks in the meantime.
How do I get the water to clear up?
  • Wow
Reactions: CBerger02

Filter