Upgrade pump and piping issue

ahemya

New member
Sep 8, 2022
4
San jose CA
Hi guys,

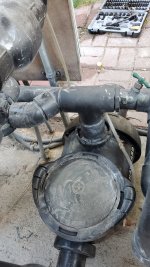
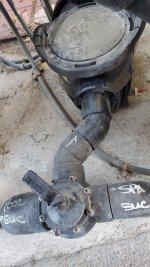
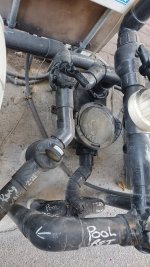
I recently bought a house and it has an old 2hp Hayward single speed pump which consumes too much electricity. I am trying to upgrade it by myself. First time doing such a job but I have experience doing many different DIY tasks.

However one big issue I cannot solve is the piping. Pipes are very crowded around the pump and there is no exposed pipe that I can cut to install the new pipe. How can I solve this without doing a major repiping including the Jandy valves?

I am attaching the pictures for reference.
 

Attachments

  • 20220908_172509.jpg
    20220908_172509.jpg
    451.7 KB · Views: 38
  • 20220908_172452.jpg
    20220908_172452.jpg
    523.9 KB · Views: 36
  • 20220908_172427.jpg
    20220908_172427.jpg
    507.1 KB · Views: 36
  • 20220908_172353.jpg
    20220908_172353.jpg
    498.6 KB · Views: 36
A,

Thanks to the original plumber, you are between a large rock and a very hard place. :(

At a minimum, you will have to replace the pipe between the Jandy valve and the pump, as well as, from the output of the pump to the filter.

The good news is that Jandy valves except two pipe sizes. Not sure of the pipe size you currently have, but if it is 2" pipe going into the Jandy valve, it will accept 2.5" pipe on the outside of the Jandy valve. That is why they are sold as 1.5"/2" or 2"/2.5".

When you install your new pump, you should use Pump Unions. You can't buy them at Home Depot and they look like this.


Good luck,

Jim R.
 
Thanks to the original plumber, you are between a large rock and a very hard place. :(
I agree. I'm a strong DIY kinda guy, but this is a tough job. I would get a quote from a reputable plumber.

Many of the fittings used to make those impossible angles are DWV (Drain/Waste/Vent) and are not intended for pressure applications. The outside connections on the valves are already in use. You could cut the existing fittings off at the face of the valve, then slip 1.5" pipe inside, connect a 1.5" to 2" reducer bushing and work from there, but you'll likely run out room to make those angles.
 
Thanks for the quick information Jimrahbe and Rancho!

If I decide to give up doing it myself, do I need a plumber or a pool place like Leslie's? Leslies quoted 400$ for installation without seeing my pipes and they mentioned it will be higher if the piping is not straightforward. I dont want to spend a fortune to reduce my electric bill but I have to get rid of my current pump since it costs more than 200$ in electric bill every month.

As an alternative solution, can I just replace the pump motor with a 2-speed motor and use the same piping? I already removed and reinstalled the motor so I am confident in replacing it. However I have no idea which motor is compatible. Currently I have a 2hp Hayward northstar sp1615-z-1-bns pump motor which is probably very old. Is it possible to just replace the motor with a 2-speed one?
 
There may be options to replace your existing motor with a VS motor. I'll defer to @1poolman1 man for recommendations.

Shop around the independent pool stores for installation. Starting costs for basic installation shouldn't cost more than $250.
 
I think you can ream out the the "T" towards the pump with a special tool and reuse the fitting in place and then as mentioned earlier Work the suction side last using the exterior of the valve with a bushing.....
 
There may be options to replace your existing motor with a VS motor. I'll defer to @1poolman1 man for recommendations.

Shop around the independent pool stores for installation. Starting costs for basic installation shouldn't cost more than $250.
Best to get rid of a Northstar pump. Most new pumps come with their own unions (except Whisperflow/Intelliflow).
 
  • Like
Reactions: Rancho Cost-a-Lotta
I have very compact plumbing, too. Have had good success with this reamer that removes pipe from already glued fittings. There are cheaper versions, but they look sketchy. This one is a pro tool; pretty foolproof. Many sizes are available.

Used so far to salvage 4 proprietary union fittings and three valves with total value of over $300. So it's paid for itself easily.

If you decide to go this route, I suggest a medium weight glue rather than light. The reason is that factory fittings have a slight taper for a tight friction fit. After reaming, that taper is gone. The thicker cement is insurance against leaks. I was bonding CPVC valve housings where Pentair recommends Weld-on 724, so just used that. No issues after about 2 years.
 
Last edited:
You will want to start on intake, make sure new vs comes with unions or purchase separately(hi temp). Intake you can go over intake diverter with 2.5” coupling reduce with 2x street 45s to get precise height(pumps vary on intake/return dimensions). Or 2.5”street reducer 2”street 45. Once intake is in you can use the heat gun technique/chip/cut flush on return and use 2” and plumb return side. Always keep the end piece in mind best of luck.
 

Enjoying this content?

Support TFP with a donation.

Give Support
I am in agreement with others to start fresh. Put your pump suction in a straight line and use union. Your filter can be pushed to side because only PVC connects to it so you can rearrange that easily. The heater is a little harder to move because you have to reroute gas line as well (hard to see in picture) unless you have heat pump which makes it easier just to reroute electrical.

Since you just purchased the home, and if you plan to stay there for extended time, it may well be worth spending time now to get the equipment pad upgraded properly or you just be dealing with the same issues each time you need to repair or replace another component.
 
  • Like
Reactions: markayash
My brain can never picture what parts I need like elbows etc. I end up making a couple extra trips to home depot while redoing it.
Spring and Fall are perfect times to do it since the weather and water have cooled off some and you can go a few days ( add liquid chlorine ) without the pump running.

Good news if if you get 3/4 done and don’t like it cut it off and start over 😎
I just plumbed my SWCG and I drew out 2 - 3 options. Then I went to HD to purchase all the fittings. Once you make that first cut on existing plumbing then dry fit to see what works best. I ended up with a lot of excess fittings which I returned to HD.
 
  • Like
Reactions: markayash
I just plumbed my SWCG and I drew out 2 - 3 options. Then I went to HD to purchase all the fittings. Once you make that first cut on existing plumbing then dry fit to see what works best. I ended up with a lot of excess fittings which I returned to HD.
It’s funny how different our brains are. I redid everything when I did my SWG and I start and figure it out as I go.
Have a neighbor who built a work bench and knew down to the inch what he needed and actually had HD cut almost everything :)

I did start buying extra stuff also. Have a 5 gallon bucket full of stuff but seems what ever I needed I didn’t have
 
  • Like
Reactions: HermanTX
Thank you guys for your valuable advices. I decided to move forward myself and used the heat gun approach to remove the existing PVC pipe on both sides and then piped the new pool pump. There was a slight misalignment and height issue which probably caused a little air bubbles on the suction side but it was gone after I raised the pump and added more glue to seal the pipe connections. Everything looks good so far.

One more question: If I observe air bubble problem again, is there a way to seal pipe connections to get rid of the leak or do I have to re-pipe?
If you already added more sealant and it is still leaking, I would cut and re-pipe it again
 
If you already added more sealant and it is still leaking, I would cut and re-pipe it again
Good to know that.

So far it seems like there is no leak. Maybe it leaked because I started the pump too early after piping and now the glue is cured. Or it was due to misalignment. Anyway the pump installation operation seems complete for now. Thanks everyone for your help and suggestions!
 
Thread Status
Hello , This thread has been inactive for over 60 days. New postings here are unlikely to be seen or responded to by other members. For better visibility, consider Starting A New Thread.