I’m posting my experience without much new information except the relatively minor issues I had with the Pentair High Power Wireless (HPW) Link Kit but I thought it might help to gather some of the URLs into a newer thread that might inspire someone else to upgrade to IntelliCenter.
Virtually all the information I needed was in the May 2021 thread by tclayton10: My foray from an EasyTouch8 to IntelliCenter
At the end of tclayton10’s thread was a helpful February 2023 comment/update by aholmes5 about bending the old-style SCG circuit breaker tab until it snaps off and making sure the new IntelliCenter transformer side holes are threaded (mine were full of paint, but already threaded and it helped to ream the threads before installation.)
Also very helpful information was in the 2020 MyAZPool thread: IntelliCenter Quick Reference/Information Guide[/FONT]and MyAZPool comments in other threads. There are other helpful comments in various threads by ajw22 and Jimrahbe. This wiki put together by ajw22 provides a nice IntelliCenter overview: Pentair Automation Systems - Further Reading
The main reason I upgraded was because we just got our pool replastered with a new Pentair IntelliBrite 5G Color LED pool light that replaced our ancient white incandescent light. However, when I went to fire up the IntelliBrite, there was only limited functionality with our 2007 EasyTouch 4. Even though we have a basic pool set up with a filter pump, IntelliChlor and a pool light, updating EasyTouch from 1.0.whatever wasn’t worth the money or the effort and ScreenLogic upgrade bundles were not significantly lower priced over the IntelliCenter upgrade, considering that IntelliCenter will probably be supported further into the future.
The other reason is that I like electronic gadgets and I like being able to control the pool equipment with my phone vs the clunky distance-challenged EasyTouch remote. Furthermore, all of the information provided by tclayton10 and others made it sound doable.
Using tclayton10’s parts list I purchased the following online:
Everything went well using the steps laid out in tclayton10’s post. Even though my set up is so basic, I had some time delays caused by my cautious labeling, photographing and double checking due to lack of experience. It was also disappointing that the supplied Pentair instruction booklets were horrible grayscale photocopies of the OEM color instruction manuals (that are also posted online.)
One of the real time consumers for me was the High Power Wireless (HPW) Link Kit that replaced the EnGenius Wireless Access Point/Bridge. The Pentair instructions were confusing and there were a lot of parts for other installation scenarios that didn’t apply to my IntelliCenter upgrade. The instructions even referred to figures that didn’t exist and some valid references were misnumbered.
There was a HPW 2-sided instruction sheet apparently meant to supersede part of the 15-page instruction booklet packed in the same bundle. The instruction sheet proclaimed: “You only need the indoor and outdoor Transceivers, the Ethernet Cables and the AC Power supply.” However, the outside transceiver also requires the Power Module connector that has 3 places for connections: 1) Female ethernet cable connection to receive the ethernet cable from the HPW Outdoor Transceiver circuit board; 2) 24 VDC connector that goes into the dedicated 2-pin connection on the IntelliCenter circuit board; 3) male Ethernet connector from the power module into the IntelliCenter circuit board.
Mounting the stationary part of the outdoor housing was easy since it required the same screw locations I used for the EasyTouch antenna I was replacing. However, getting the 2 halves of the plastic housing case aligned and screwed together was a pain. Part of the problem was due to the ethernet cable connection to the HPW Outdoor Transceiver circuit board being off to the side of the board and not aligning with the centered knockout hole into the housing.
Note: The outdoor plastic housing case knockout hole did not easily or cleanly break away (poorly perforated.) I used a razor knife to create a correctly sized hole that would accept the provided knockout hole plug which the ethernet cable runs through. A rubber mallet helps to tap the knockout plug in, but this should be done before the ethernet cable is run through the plug. It was challenging to pull the ethernet cable back through the knockout hole plug.
The HPW indoor transceiver installation was a lot easier, and the wireless communication went well after I updated the firmware from v1.047 to v1.064 which supports Over The Air (OTA) updates, the IntelliCenter 2 app and website. (I will wait for TFP blessing before updating to the v2.00X firmware.) No significant wireless connections issues with a 65-foot line of sight through a chicken wire stucco wall.
Thanks to multiple comments by ajw22 in various threads, I had a good idea how the HPW 900 MHz matched indoor/outdoor transceivers speak to each other and I avoided the issues some others had when trying to connect to the home wifi, etc.
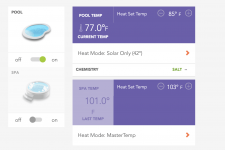
Programming IntelliCenter involved typical clunky Pentair non-intuitive menus and language. But I am getting used to it—like I did with EasyTouch. I really like being able to program and control from my iPhone wherever I am and the IntelliBrite pool light works great!
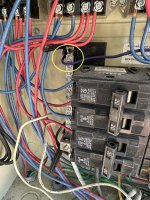
Below new transformer bracket before new Carling 12 amp circuit breaker installed in lower right slot

Below EasyTouch Outdoor Control Panel (OCP) and uncovered high voltage compartment below.

Below is EasyTouch OCP folded down exposing EasyTouch 4 circuit board in foreground, old SCG board in the background to the left and rear of the 10A circuit breaker and tab. On the right is the EasyTouch transformer bracket with circuit breakers.

Below is a closer view of low voltage (LV) compartment with EasyTouch circuit board removed.
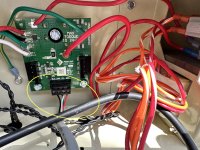
See old IntelliChlor SCG board and 10A breaker/tab that will be removed.

Below is LV compartment after removal of SCG board leaving 2 screw holes at bottom of load center wall. The right screw hole is used to partially mount the new circuit board making it easier to mark the other 2 holes for the new board. New holes (not shown) need to be tapped. Bigger top hole is 10-32 and smaller low hole is 8-32 (see tclayton10's post url above). Also note the circuit breaker tab broken off with vice grips a la aholmes5.

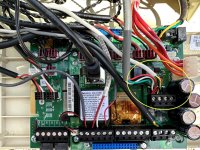
Below with everything installed. IntelliCenter board up front, SCG board in back, new transformer bracket with circuit breakers and new transformer on right.

Below IntelliCenter OCP screwed into place. The OCP panel face has pre-printed "IntelliChlor SCG" below the new 12A breaker.

Now I need an IntelliCenter decal to go over the old "EasyTouch" on the load panel door.

High Power Wireless Link Kit outdoor transceiver enclosure.

Virtually all the information I needed was in the May 2021 thread by tclayton10: My foray from an EasyTouch8 to IntelliCenter
At the end of tclayton10’s thread was a helpful February 2023 comment/update by aholmes5 about bending the old-style SCG circuit breaker tab until it snaps off and making sure the new IntelliCenter transformer side holes are threaded (mine were full of paint, but already threaded and it helped to ream the threads before installation.)
Also very helpful information was in the 2020 MyAZPool thread: IntelliCenter Quick Reference/Information Guide[/FONT]and MyAZPool comments in other threads. There are other helpful comments in various threads by ajw22 and Jimrahbe. This wiki put together by ajw22 provides a nice IntelliCenter overview: Pentair Automation Systems - Further Reading
The main reason I upgraded was because we just got our pool replastered with a new Pentair IntelliBrite 5G Color LED pool light that replaced our ancient white incandescent light. However, when I went to fire up the IntelliBrite, there was only limited functionality with our 2007 EasyTouch 4. Even though we have a basic pool set up with a filter pump, IntelliChlor and a pool light, updating EasyTouch from 1.0.whatever wasn’t worth the money or the effort and ScreenLogic upgrade bundles were not significantly lower priced over the IntelliCenter upgrade, considering that IntelliCenter will probably be supported further into the future.
The other reason is that I like electronic gadgets and I like being able to control the pool equipment with my phone vs the clunky distance-challenged EasyTouch remote. Furthermore, all of the information provided by tclayton10 and others made it sound doable.
Using tclayton10’s parts list I purchased the following online:
- Pentair IntelliCenter 522045 pool-only legacy (2003-2012) upgrade kit from epoolsupply.com for $800 which was nearly $200 less than the closest competitor.
- Pentair Intellichlor 521218 SCG Surge Board was $249 at poolsupply4less.com
- The Carling CTB-B-B12 circuit breaker was $11.25 shipped from Amazon (Pentair is still selling the same thing for $50!). It can be found cheaper with longer lead time.
Everything went well using the steps laid out in tclayton10’s post. Even though my set up is so basic, I had some time delays caused by my cautious labeling, photographing and double checking due to lack of experience. It was also disappointing that the supplied Pentair instruction booklets were horrible grayscale photocopies of the OEM color instruction manuals (that are also posted online.)
One of the real time consumers for me was the High Power Wireless (HPW) Link Kit that replaced the EnGenius Wireless Access Point/Bridge. The Pentair instructions were confusing and there were a lot of parts for other installation scenarios that didn’t apply to my IntelliCenter upgrade. The instructions even referred to figures that didn’t exist and some valid references were misnumbered.
There was a HPW 2-sided instruction sheet apparently meant to supersede part of the 15-page instruction booklet packed in the same bundle. The instruction sheet proclaimed: “You only need the indoor and outdoor Transceivers, the Ethernet Cables and the AC Power supply.” However, the outside transceiver also requires the Power Module connector that has 3 places for connections: 1) Female ethernet cable connection to receive the ethernet cable from the HPW Outdoor Transceiver circuit board; 2) 24 VDC connector that goes into the dedicated 2-pin connection on the IntelliCenter circuit board; 3) male Ethernet connector from the power module into the IntelliCenter circuit board.
Mounting the stationary part of the outdoor housing was easy since it required the same screw locations I used for the EasyTouch antenna I was replacing. However, getting the 2 halves of the plastic housing case aligned and screwed together was a pain. Part of the problem was due to the ethernet cable connection to the HPW Outdoor Transceiver circuit board being off to the side of the board and not aligning with the centered knockout hole into the housing.
Note: The outdoor plastic housing case knockout hole did not easily or cleanly break away (poorly perforated.) I used a razor knife to create a correctly sized hole that would accept the provided knockout hole plug which the ethernet cable runs through. A rubber mallet helps to tap the knockout plug in, but this should be done before the ethernet cable is run through the plug. It was challenging to pull the ethernet cable back through the knockout hole plug.
The HPW indoor transceiver installation was a lot easier, and the wireless communication went well after I updated the firmware from v1.047 to v1.064 which supports Over The Air (OTA) updates, the IntelliCenter 2 app and website. (I will wait for TFP blessing before updating to the v2.00X firmware.) No significant wireless connections issues with a 65-foot line of sight through a chicken wire stucco wall.
Thanks to multiple comments by ajw22 in various threads, I had a good idea how the HPW 900 MHz matched indoor/outdoor transceivers speak to each other and I avoided the issues some others had when trying to connect to the home wifi, etc.
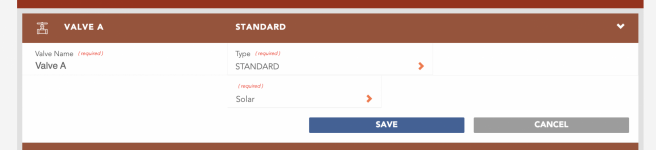
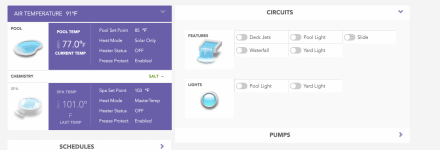
Programming IntelliCenter involved typical clunky Pentair non-intuitive menus and language. But I am getting used to it—like I did with EasyTouch. I really like being able to program and control from my iPhone wherever I am and the IntelliBrite pool light works great!
Below new transformer bracket before new Carling 12 amp circuit breaker installed in lower right slot
Below EasyTouch Outdoor Control Panel (OCP) and uncovered high voltage compartment below.
Below is EasyTouch OCP folded down exposing EasyTouch 4 circuit board in foreground, old SCG board in the background to the left and rear of the 10A circuit breaker and tab. On the right is the EasyTouch transformer bracket with circuit breakers.
Below is a closer view of low voltage (LV) compartment with EasyTouch circuit board removed.
See old IntelliChlor SCG board and 10A breaker/tab that will be removed.
Below is LV compartment after removal of SCG board leaving 2 screw holes at bottom of load center wall. The right screw hole is used to partially mount the new circuit board making it easier to mark the other 2 holes for the new board. New holes (not shown) need to be tapped. Bigger top hole is 10-32 and smaller low hole is 8-32 (see tclayton10's post url above). Also note the circuit breaker tab broken off with vice grips a la aholmes5.
Below with everything installed. IntelliCenter board up front, SCG board in back, new transformer bracket with circuit breakers and new transformer on right.
Below IntelliCenter OCP screwed into place. The OCP panel face has pre-printed "IntelliChlor SCG" below the new 12A breaker.
Now I need an IntelliCenter decal to go over the old "EasyTouch" on the load panel door.
High Power Wireless Link Kit outdoor transceiver enclosure.