A Cheap Pool Cooler for the end of Summer

Thank you! Pool Cooler update......one of those fun success stories. The black dog, Mollie, is STILL with us and at 15, still chases the ball but no more stunning leaps into the pool as she could do back in Raleigh. One of the knuckleheads in the pic is a speech and language pathologist in Chapel Hill, NC and the other one is flying C-130's for the USAF. They have all progressed very nicely as I have gotten older and grouchier.

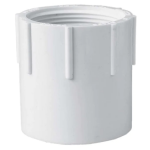
13 years later, it is my daughter's and family's pool cooler, pool and house and it still works perfectly completely unmodified.....all the exact pieces that I started with. I think the thing that allowed it to survive all the kids is I never glued it into the wall. It's a slip fitting at the return so it fits pretty tight but there is no glue. It has probably been knocked loose 15 or more times over the years but they turn the pump off and friction fit the cooler back on.

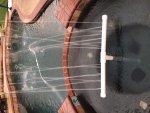
mberlew. the key to making that cooler effective is spray elevation and droplet size. On that pool, ALL the other returns were blocked off while the cooler was running so I was able to get spray and mist close to 25-30' in the air. On a 90 degree day, the mist was downright almost cold when it came back to the surface. I don't think I made much of a deal about blocking the other returns in the posts above but it really helps (psi was about 30 compared to 12 normally.)

I say all that so you can make sure you are getting the highest spray possible for the most effectiveness in cooling.

It works on the hottest days and it is effective and free.
 
Last edited:
Time flies doesn't it? Nice to hear the cast of characters from your original pic are all doing well.

Duly noted on spray elevation and droplet size. I guess you want the droplets to be large enough to launch far, but small enough to increase the relative evaporation. My brain still doesn't comprehend the whole cooling through evaporation thing - it seems counter-intuitive to me that you'd spray water into 110 degree heat and it would cool the water instead of heat it. Go figure. That's why I was never good at science. Anyhoo, the missus may not approve of something quite as high as you had in the original picture, but I take your point on effectiveness.

Regarding the connector, I had assumed that the return was threaded PVC and thus wouldn't slip out when bumped. All the better if it is just a smooth surface so the PVC would tend to just bump out instead of causing damage. I'll have to disassemble mine and see if it is threaded or not. Your mention of blocking all the other returns is interesting because assuming I do use this spa return, i have an easy way to redirect flow to that one return vs all the others without having to cap them. It's all coming together in my head :)
 
Thanks Yev and Dave. I did take apart the return hardware last night and confirmed it is threaded. This is the same solution I worked out - to get one of those threaded male to non-threaded female adapters as the connection point. Glad to hear i'm on the right track.
 
Someone might say this is not necessary, but I tend to be overly cautious when I go to lowes, otherwise I need multiple trips.

When you go to lowes, take your return fitting in the store with you. Look for this adapter (dont buy this one, this is to guarantee fit only) that will make sure you found the correct thread pitch.


This has the exact same size female thread as your return in the pool wall.

Now that you have found that fitting, locate the other style with the male threads.
http://mobileimages.lowes.com/product/converted/025528/025528131906.jpg?size=pdhi

But this one. This is a guarantee that you will get things to fit at the store.

Also, never trust the labels on the bins at Lowes (or home depot or menards, or anywhere like this). People mix up the bins all the time.
 

Attachments

  • 1592960234007.png
    1592960234007.png
    55.2 KB · Views: 2
  • Like
Reactions: mberlew
Yeah I spent about 30 minutes in the pvc fitting aisle and fortunately it worked out until I got home and my pvc glue had solidified since I last used it. So back tomorrow for finishing touches but here is the basic set up... thanks all for your guidance! My holes aren’t as pretty as Skippy’s but I’ve got a mix of heights and am pretty pleased with how it turned out. I can’t figure out how to rotate the image - sorry. Fixed it for you.pool cooler.jpeg
 

Attachments

  • B8FCF935-01B3-4ACA-BF59-0C344B490AA9.jpeg
    B8FCF935-01B3-4ACA-BF59-0C344B490AA9.jpeg
    88.8 KB · Views: 40
Last edited by a moderator:
Just got back from Lowe's, attempting to install one of these tonight. After just a few days of straight 100+ weather and overnight lows in the low 70s our full sun all day pool is already feeling swampy and the last two night we didn't even want to get in, which is just so sad. Will update with hopefully spectacular results.

Here's my question, if one fountain can cool 6 - 10 degrees, would multiple fountains increase the cooling more towards that 10 degree mark, or possibly even beyond? I know there's obviously diminishing returns, but has anyone put in multiple cooling fountains and noticed a better effect?

We have four returns, and I'm thinking of putting one on each. Partly because more fountains I hope equates to more cooling, partly because I don't want to cap off any of my returns and having the same fountain setup on each return seems like a good way to equalize the pressure throughout. Seems to me if there's only one cooling fountain the path of least resistance would just push more water through the other three open returns unless the pump is running pretty high.
 
I wish my pool would hit 90 degrees!! The warmest so far this summer has been 84ish and I LOVED it! It gets chilly some nights and it drops the temperature, ugh. Right now it’s sitting around 76 after a 60 degree night last night. I do not have a heater or a solar cover for my pool.
 

Enjoying this content?

Support TFP with a donation.

Give Support
but has anyone put in multiple cooling fountains and noticed a better effect?
Don't think so but here's my take. The process works because of evaporation. For the most effective evaporation, you need your pool water droplets to be small (more surface area) and they need to be shot up high so you get more dwell time aloft.

So, what combination will best give you those conditions? Throwing four returns 6 feet into the air or one return 20 feet into the air? I have a feeling they would be very close to equal so probably not worth it to make four when one will do.........assuming you cap off the other returns to get the extra psi for the increased dwell time. You say you don't want to cap off the other returns so making four sprays is the only way to get close to the same effect as having just one.

Bottom line, I think they both would work but I think that is simply a guess. Why don't you like the idea of capping off?
 
My only addition to this, is drill smaller holes to add more effectiveness. The OG design used 1/8' holes. Try 1/16", but add 4 times as many, or drill 3/32' and drill twice as many. Both of these options will offer the same pressure performance, but either double or quadruple your surface area.
 
  • Like
Reactions: RS220
Bottom line, I think they both would work but I think that is simply a guess. Why don't you like the idea of capping off?
A couple of reasons, some of which may be incorrect conclusions for sure. Appreciate you helping me talk through it.

I should preface by saying I don't want to have to continually put these in and out. Too much effort. I wanted to set them up and just leave them in unless we're having a party or a bunch of kids or something where they would more than likely get hit. So, with that in mind, here are my concerns.

I feel like I need my returns to keep the water circulating, don't I? That's their primary function, and it seems important to keep the freshly chlorinated water from the SWG coming out all over the pool, not just in one location. I don't want my water chemistry to suffer for the cooling.

Also, if I cap off my other three returns, isn't that going to put too much pressure on the whole system? When my pump first turns on it's up at 3500 RPM, all of that coming out of one fountain seems like it would be bad for the pump, the plumbing, or all of it. Also we had hoped to not glue or thread in the assembly but use a firmly assembled slip joint and that much water pressure seems like it would just kick the whole assembly out of the return.
 
The pump can't produce enough psi to damage your equipment.

My cooler NEVER jarred loose from water pressure as long as it was tapped on snugly with a mallet.

Your concern about water distribution is valid but my experience was that it made no difference. My pool was 25 x 54 and I had even distribution of chemistry throughout.

I never considered it a PITA taking them on and off, either. They simply threaded on loosely.....no problem if they leaked underwater a bit.

Once on, the plugs stayed on for days on end. I simply removed the cooler if I wanted more flow or to stop the process.

The evaporative process takes time.....a lot of it. I moved my water temp from 90-92 down to 86 but it took about three days with the pump running pretty much 16 hours daily if I remember correctly.

I hope that paints a little clearer picture for you.....still perfectly fine if you choose not to do it but you will lose some efficiency for sure.
 
Okay, prototype seems like it will be a success. We had nothing to cap the other returns with, so we improvised with saran wrap until a permanent solution can be found. We took the suggestion to put a valve on the end to be able to adjust the flow and/or just turn it off without removing it. Highly recommend the valve.

fountain1.PNG

fountain2.PNG

SOME THINGS I LEARNED

This isn't really my forte, it took a bit for me to figure out the parts, so if someone needs a parts list and a drawing let me know. We spent a good long time at Lowe's trying to piece it together. Probably because the vision is mine but execution is left up to the hubby. If someone needs a parts list or drawing I'm happy to share. Some of this may be second nature for you all but I really had no idea about any of this before getting started. But, we did it. And I'm so thankful for everyone's help. Here's some things that might help other clueless people like myself.

1. This whole key thing makes sense now. I had no idea my returns were three separate pieces. Our local pool store didn't have one, but the assistant manager there (very nice guy!) suggested using needle nose pliers spread into the middle to catch on the little lip. It worked like a charm.

2. We initially put the assembly on the shelf, but since the bench has the return closest to the equipment, it also has the highest pressure. For our poor saran wrap blockers this made all the difference. We moved it to the bench and it works much better.

3. Drilling holes by hand is hard to get right. The hubby got the first row nearly perfect, but the second higher row had a few go wonky that over spray too far onto the deck. We'll have my dad do it with his drill press to ensure uniformity.

4. Don't glue the top T to the base assembly until you've drilled the holes, makes it much easier to adjust.

5. This sits a little high for my tastes, next version will be about three inches shorter to try to hide the ugly PVC pipe. Hubby doesn't care naturally, but I would prefer to just see the water.

6. It sounds lovely! It was so nice to just sit and watch the sunset with the fountain on, it looks really nice too. We are going to add three more for each return just because the aesthetics are so nice.

Our unofficial experiment using a meat thermometer put our pool at 86 degrees (I swear it felt warmer than that!!) and when we collected a cup of water from the end of the spray it was 82, but the ambient temperature was still somewhere around 92 at that point. I can add this to the list of things I wish I knew about when building the pool, I might have designed something a little more built in. It would have been worth the money.
 
Nice work, RS. You've both done your homework and you will enjoy the benefit. Just a couple of reminders......

1. I believe it works as well if not better in the daytime when the relative humidity is lower. At night the atmosphere approaches saturation and evaporation is much less.

2. It will take time. Ours was on a LOT but we, too, enjoyed the "waterfall". That 4 degree differential sounds just about right. I remember mine to be five but we were throwing water 25' up.
 
Last edited:
great execution RS. I wanted to add a couple of thoughts.

To block the other returns, this is pretty easy. They sell plugs to winterize the pool. Well, maybe not in Fresno where you are, but for midwesterners like me they do. These cost a few bucks each.

Not recommending these, but for illustration purposes, these are from a quick amazon search.
Amazon.com : Optimum Pool Technologies 6 Pack - Filter Drain Plug (for Hayward and Pentair) 1.5" : Garden & Outdoor

If you were going to redo these, and you wanted the valve, this is how I might modify. Right now the valve sticks out into teh pool further, with its aim pointed out into the center of the pool. I would turn this 90 degrees, so its output is pointed down the pool wall.

why? Typically your returns are designed to get some circulation in your pool, so your water will want to travel in either a clockwise or counter clockwise direction. This helps your skimmer get debris in my experience. If you put the valves sideways, you can still get a bit of water circulation if you wanted it by turning the valve slightly open. I hope this make sense.

As for your thought on getting it into the water, when I build things like this, the first time is always a test. I would cut down the vertical pipe, and just use a union to rejoin it. I might even test if the pipe is a quarter inch underwater if it still does what you want it to do.

I want to put this in here for people who might discover this thread in the future, if you don't mind buying a new tool, buy a PVC cutter like this.
https://www.lowes.com/pd/IRWIN-1-5-in-Multipurpose-Pipe-Cutter/1000640701
This makes cutting the PVC safe, fast, easy, and most importantly leaves no saw dust to clean up or sharp edges.

I hope that duraleigh or someone else will weigh in on this. This type of fountain will act as a water aerator I believe, that will cause some slight shifting in alkalinity/pH of your pool, so just keep this in mind if you stqart to see some shifitng pH after using these. But maybe i'm wrong on this chemistry part, as this is not my area of expertise.
 
This type of fountain will act as a water aerator I believe, that will cause some slight shifting in alkalinity/pH of your pool
Good point, Yev. The pH may (should) go up.

Mine did not and I can't explain it. I stayed at 7.6 in a very large pool and my pH simply didn't want to move much all summer. The cooler had little, if any, affect. Wish I knew exactly why but was certainly happy nevertheless.
 
thanks duraleigh. And for RS, and others, dont be scared of this, just be aware that you might need an occasional adjustment, or at least keep an eye out. But dont think your water will go from 7.8 to 6.5 in a day.

Duraleigh, my pool pH tends to drift down. I attribute that to some slightly acidic rain here in the midwest, so maybe you had something like that to offset the fountain.
 
As I described in Skippy's Pool Cooler saga...he taped a piece of graph paper to the pvc and used it to guide his small holes using power drill and 1/16th drill bit. Worked a charm!
(see link in siggy line)

Maddie
 

Enjoying this content?

Support TFP with a donation.

Give Support
Thread Status
Hello , This thread has been inactive for over 60 days. New postings here are unlikely to be seen or responded to by other members. For better visibility, consider Starting A New Thread.