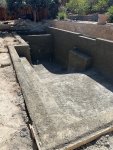
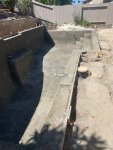
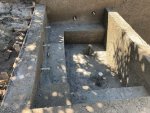
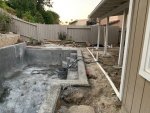
New Build, Orange County, California

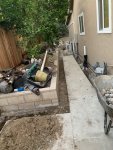
What is that drain pipe for?
Do you know where it went?

This was one of two landscape and gutter drains pipes that lead to the street. I know where it exit is on the sidewalk and in the front it runs next to the property line but in a somewhat hard to reach place because it's on the base of a footing of a brick wall. In the backyard it runs under part of a concrete path and then into a raised planter garden - the exact path I'm unsure of.

Yeah, I don't know if it transitions to a perforated pipe or the pipe was cracked. This portion appears to be the solid ABS piping, but other parts dug out were a longer diameter PVC piping.
 
Well that stinks... I hate it when someone uses the correct products but installs them incorrectly so they fail. ABS is a very rugged pipe and should never get root intrusion when installed correctly. If there is a out fall to the street drainage then there should have been no reason to use perforated pipe unless they were trying to collect water somewhere. A lot of installers will not glue the joints with the theory that if a little water leaks out it is no big deal Not thinking about root intrusion. Unfortunately no real way of telling without digging it up. You could check the transition points where the gutter down spouts go into the ABS, that might be the point where the roots got in.
 
Did you measure to make sure it is long, wide, deep, etc enough? Add about 6" for the shell and plaster. It is a good idea to be there just in case they have any questions or ideas while doing the work. There have been times where they come up with some good ideas from doing so many.

Kim:kim:
 
  • Like
Reactions: rnakawat
Did you measure to make sure it is long, wide, deep, etc enough? Add about 6" for the shell and plaster. It is a good idea to be there just in case they have any questions or ideas while doing the work. There have been times where they come up with some good ideas from doing so many.

Agree with all of the above...although the time to measure was probably before the steel went in. But, redoing steel is certainly better than after its shot so can't hurt if you thin it's off (and would be willing to fight about it). Also, the shell/walls in our neck of the woods is typically 1'. I'm sure crews sometimes offer good suggestions. Others may take shortcuts. Sounds like you are working with a builder so really, it's his job -- you can complain to him but he's paying those guys not you so there isn't much you can do really.

I was not happy with my shotcrete team. I read extensively about how shotcrete is supposed to be applied and what to look for re: shortcuts. When I voiced complaints to the PB, he basically told me I'm worrying about nothing... They literally took every shortcut the articles I read said they would take that end up compromising the integrity of the shell:

  • they used backerboard to form the walls of my 18" bond beam and the weir wall between the pool/spa...I could see it moving while they were shooting...looks like they did a better job for you on that
  • they shot the walls first which means excess material just dropped to the floor; material that doesn't stay where it is shot is supposed to be removed (rebound); the proper technique is to shoot the floor first so that rebound can be removed as it falls...
  • they didn't appear to rewet areas that they had to come back to after a while (it's fine/unavoidable to move from an area and then need to come back to it...after a certain period of time they are supposed to rewet the surface before returning)
  • the aggregate also seemed a poor mix to my (completely uneducated) eyes -- I have crevasses that I can stick a long nail completely into; my suspicion was reinforced when they had to come back to fix an area they missed (a bench) and that section is much, much different without any of those types of gaps present... I'm not saying it is supposed to be smooth -- but deep pockets of air aren't supposed to be present either
  • there were some areas that were not shot as thick as they were supposed to be; a few even with exposed rebar...meaning, it was literally 3" too shallow in areas
...and mind you, there was an inspector there the whole time as well. The inspector never returned my calls to discuss the job, instead I was mailed a report from showing the sample taken came back with sufficient strength.

A builder I hold in high regard said the only way to get a crew to shoot it properly is to set their expectations they will do so and hold them to it. That will be on your builder since they are doing it for him. You're only real option would be to stop the job if you don't think it's being done properly which obviously jeopardizes your relationship with the builder.

...and now for some balance to all of this concern...based on what I've heard from everyone in this industry, most pools are shot with the same practices used to shoot my pool and most pools don't seem to be failing quickly. So, maybe the over-engineering required here in CA offsets the poor practices used to shoot our pools. I dunno.

Good luck!!!
 
  • Like
Reactions: rnakawat
Shotcrete went in today. The crew seemed good, I got lucky that my PB used a sub that is well regarded by a few others on this forum. I’ve been happy with our PB thus far. He was there along with the crew all day directing them. He’s been onsite almost every day that I know of when a sub was onsite and definitely the start of the first day and the end of the last day that a sub was onsite (and most of the jobs have been just two days.)

IMG_8313.jpg


IMG_8321.jpgIMG_8317.jpg
 
Thanks KimKats! I gotta purchase my test kit. ;)

A few PB's mentioned they put an Elastomeric coating on the back side of the RBB. My builder does not, he mentioned something like the waterproofing is in the thinset (I don't remember the specifics.) Should an Elastomeric coating be something I push for (or I do myself) before I fill in dirt behind the bond beam?
 
We seem to be having a pretty bad outbreak of mosquito this year. Do you think it's safe to use the mosquito tablet in the unfinished pool to avoid an outbreak of larvae. I tried pumping out the water but that didn't work very well.
I dumped some bleach in mine when I saw some mosquito larvae and that seem to kill them off for a week, then repeat as needed.
 

Enjoying this content?

Support TFP with a donation.

Give Support
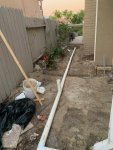
Drains are in progress, including the redo of an existing pipe that had significant roots in it. The leveling seems high, but I'm not sure if they plan on digging after they are done dry fitting. I plan on asking my PB tomorrow.We're hoping our coping and pavers are delivered tomorrow as well so they can start the install.
IMG_8373.jpgIMG_8370.jpgIMG_8375.jpg
 
Drains are in progress, including the redo of an existing pipe that had significant roots in it. The leveling seems high, but I'm not sure if they plan on digging after they are done dry fitting. I plan on asking my PB tomorrow.We're hoping our coping and pavers are delivered tomorrow as well so they can start the install.
View attachment 120473View attachment 120474View attachment 120475
it's hard to tell from the pictures but it looks like one of those gutter down dpouts is already tied in which means that's the elevation going to stay. Where does that drainage go? Could they have made it any lower?
 
it's hard to tell from the pictures but it looks like one of those gutter down dpouts is already tied in which means that's the elevation going to stay. Where does that drainage go? Could they have made it any lower?

On the side where they cut a route in the concrete it does tie into a pre-existing drain downspout (not shown in the picture above). Unfortunately today while I was out they cemented it all together and reburied it.... and it's pooling water right at the corner where it ties into the pre-existing drain. I texted the PB and he's going to meet in the a.m. to discuss. The gutter you see in the picture will be all new drain pipe as they tore out the old during the demo.

They started to apply super blockade waterproofing at the waterline and RBB today. Coping was delayed too.

Not the best of days regarding the pool build but still in the grand scheme of things I'm still very happy with the progress (and the great feedback from everyone here.) ;)
 
Last edited:
I was out they cemented it all together and reburied it...

Does that mean they are buried deeper than in the pic above?


and it's pooling water right at the corner where it ties into the pre-existing drain.

Do you mean it is leaking at the joint where it goes into the existing drain or that the existing drain seems plugged and not accepting water?
Where does all this drainage go too?
 
Do you mean it is leaking at the joint where it goes into the existing drain or that the existing drain seems plugged and not accepting water?
The pitch on the drains wasn't correct, so instead of the water draining all the way to the street it sat in the pipes. The water was visible from one of the drain outlets. The good news is they totally redid that area today so now the pitch is correct and the water drains correctly.

The bad news is I'm not 100% sure they glued the pipes together (and they already buried some of it and I don't see any glue on the joints that are exposed) AND they didn't attach the pool overflow to the drain. So tomorrow they need to both re-dig the pipes and attach the overflow and demonstrate to me that's it is glued.

Drains have been a big pain with this project. Unfortunately the are the ones doing the pavers and tile - so hopefully their attention to details for that work is better.
 
The bad news is I'm not 100% sure they glued the pipes together (and they already buried some of it and I don't see any glue on the joints that are exposed) AND they didn't attach the pool overflow to the drain. So tomorrow they need to both re-dig the pipes and attach the overflow and demonstrate to me that's it is glued

:rolleyes:... They have certainly demonstrated they bear watching with a close eye.
Did they find the issue that was clogging the old drainage?
As I stated earlier not gluing drain lines is unfortunately very common. Especially with scdl 40 because it makes it easy to make minor adjustments to get things to line up and the pipe is so ridged you can not bend it slightly for alignment purposes. You really need to see a case of root intrusion to appreciate the necessity of a good seal on drain lines. A consistent drip will invite the root right into the pipe and it only takes 1 root the size of a hair to blow up inside the pipe to a blockage.

Not having the pipes pitched correctly is just plain lazy and not paying attention to detail.

What are you using for pavers? I would ask them in advance if they are comfortable getting the water to pitch to all of those drains. That is a lot of ups and downs especially for larger pavers. I personally do not like channel drains myself and would probably use the same type of drains but it does take a experienced crew to get that type of grading to work without puddles and to look nice. At least if you discuss not ending up with puddles and they assure you there will not be puddles then if you do end up with a unacceptable puddle it "might " be easier to get them to fix it. In addition I have found just discussing these things in advance already puts them on alert that if they don't get it correct they will be ripping it out and fixing it. So it kind of says that without saying it....
 
  • Like
Reactions: kimkats
I'm using larger pavers (12x24" Stepstone). Getting the pitch correct, around the gutters, will be a real issue. I'll sit down with the PB on Monday to discuss.

Everything else regarding the drains has been addressed (glue, pitch), minus for the potential of the pipes being too high close to the back of the pool. They said once they do the final leveling of the pool and coping, they'll make adjustments to the pipe before covering. I think one of the workers of the sub is annoyed with me by now, but ?‍♂️, I'm the one that needs to live with the work once he's done.
 
Last edited:
I think one of the workers of the sub is annoyed with me by now

You'll never see that worker again. You'll see your backyard and any of its flaws until you move. They have given you plenty of reason to double and triple check their work. And its your expensive project keeping him/them employed. Don't feel bad for one second.
 
  • Like
Reactions: kimkats
They said once they do the final leveling of the pool and coping, they'll make adjustments to the pipe before covering.

That does not make much sense. You said they just fixed all the leveling issues. Then they are going to change the pitch once the coping is in? You can't just lower the high end of the line without re-pitching the entire line. It should be very simple. They should shoot the elevations with a builder's level or laser level and figure the proper pitch that will give adequate cover over the shallowest pipe. Or just start at the lowest point and work up hill putting the minimum pitch on the pipes.,
Are the pipes all still exposed from the down spout out to the existing drain? You might want to do yourself a favor and get a level (2' level is good, 4' is better) and check each pipe. Minimum pitch would be the bubble just touching the first line. If they have a lot more that that then the entire drain line can be lowered to get better coverage over the pipes.

Did they ever figure out what was plugging up the original drainage?
 

Enjoying this content?

Support TFP with a donation.

Give Support
Thread Status
Hello , This thread has been inactive for over 60 days. New postings here are unlikely to be seen or responded to by other members. For better visibility, consider Starting A New Thread.