- Jan 9, 2024
- 30
- Pool Size
- 13000
- Surface
- Plaster
- Chlorine
- Salt Water Generator
- SWG Type
- CircuPool RJ-30 Plus
Hi all,
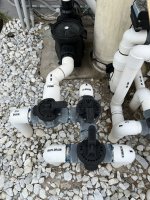
I have a 3-way valve with a crack in the body that needs replaced, but my plumbing looks like it might make this challenging. It's the valve labeled for the suction cleaner in the pics; when opened it sucks in tons of air. I've already disassembled it, inspected and replaced O-rings etc., and the vacuum leak is definitely due to a crack in the valve body unfortunately so replacement seems like the only option. As you can probably see from my pics, whoever originally plumbed my pool didn't seem to have planned it out all too well, and I don't have much room to work with. I don't see any way to replace this valve without also cutting out and replacing the other two valves that are connected right next to it. I am OK doing this since they're all old and I can see some small cracks forming around the screws on other other valves, but I'd like to plumb the replacements with some additional clearance between everything so the issue doesn't happen again and future jobs are easier. It seems like the pipes coming out of the ground are quite close together, so I'm having trouble coming up with an alternative way to arrange new valves without digging and doing some major restructuring (in which case I'd need to hire a professional). I'm also going to be replacing my single speed pump with a VS one soon so would be tackling this job all at once, and would also probably want to clean up the pump inlet so it's actually a straight line of pipe and not the weird angled thing that it is now. And yes, the exact same situation exists on the pressure side, but I'll deal with that one later lol.
I'm fine with minor PVC work, but if I'm going to need to dig and rearrange piping further down I'll get someone who really knows what they're doing to handle it. Any advice or insight into how to tackle this situation would be greatly appreciated!