Valve replacement and possible replumbing advice?

I was mostly just interested in whether or not the pump GPM metric in the app was accurate. If you're saying it should be good enough, then I'll be happy to save the money and time (and avoid cutting my nice new PVC) instead!

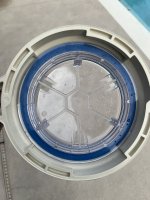
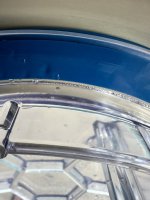
I do seem to have a tiny suction leak that I can't track down now. I tried the garden hose trick and put some extra cement around all the new joints but it didn't seem to make a difference. I did notice that the gasket in the pump lid seems to be slightly misshapen, wondering if that could be the culprit. Top left in the pic it seems to be flattened and peeking out past the clear plastic window. I sent Pentair a message and will see what they say.
 

Attachments

  • IMG_1338.JPEG
    IMG_1338.JPEG
    350.7 KB · Views: 8
  • IMG_1339.JPEG
    IMG_1339.JPEG
    328.2 KB · Views: 9
I put some lube on the big o-ring on the pump basket opening, but that gasket in the lid looks like it's supposed to be behind the window and not accessible. Tomorrow I can try to get some in that crack and see if it makes a difference. The pic is misleading, the gasket is entirely behind the clear plastic and only that tiny sliver is sticking out. It looks like its got a notch in it and is on both sides of the plastic but it's actually completely behind it.
 
1737419212483.png
1737419304120.png
1737419362057.png

7. Clean the lid O-ring and sealing surface of the strainer pot.

Note: It is important to keep the lid O-ring clean.

8. Reinstall the lid by placing it onto the strainer pot and tightening clockwise until the lid handles are perpendicular to the suction port.

Note: Ensure the lid O-ring is properly positioned between the lid and strainer pot.
 
I believe that O-ring is the one that sits on the pump body around the strainer pot opening. The gasket in my pics is sandwiched between the lid and plastic window, and doesn't appear to be accessible or removable. I don't see a Pentair p/n for the gasket or the lid window, so I'm assuming the lid is supposed to be all one piece. I don't see a way to disassemble the lid all without breaking something.
 
Ok, it looked like those stuck out a little too far to safely pry open without breakage but I'll carefully try tomorrow, thanks!
 
  • Like
Reactions: JamesW
I pried at it for a while but couldn't get the clear window to release, and it felt like I was very close to breaking something so I stopped. I squeezed a ton of magic lube in the little gap where the gasket looks misshapen, and that did stop the air leak temporarily.

Pentair is sending me a new lid assembly. I didn't get a definitive answer from them, but their response to me asking about replacing the gasket or disassembling the lid was saying they are sending me the whole thing, so I'm still not sure if it's actually meant to be disassembled. Once I get the new part maybe I'll be a little more brave and use more force to see if I can get the old one to come apart.

Also the GPM readings in the Pentair app definitely do seem to be relatively smart and not just a one to one RPM or anything like that. When I set it to stay at a certain GPM then open my solar valve, it does increase the pump speed significantly to hold the set GPM, so that's good to see. I'll need to do some testing to see what GPM setting I actually need to purge my solar system of air and keep the vacuum release closed... The first time I tried with the pump set at 45, it almost doubled the power draw to hold that flow rate :oops:
 
  • Like
Reactions: JamesW

Enjoying this content?

Support TFP with a donation.

Give Support
Also the GPM readings in the Pentair app definitely do seem to be relatively smart and not just a one to one RPM or anything like that. When I set it to stay at a certain GPM then open my solar valve, it does increase the pump speed significantly to hold the set GPM, so that's good to see. I'll need to do some testing to see what GPM setting I actually need to purge my solar system of air and keep the vacuum release closed... The first time I tried with the pump set at 45, it almost doubled the power draw to hold that flow rate :oops:
Priming of the solar panels and keeping the VRV closed is more about PSI than GPM. You need the pressure at the VRV above 0 PSI to keep it closed plus enough pressure to lift the water to the highest location in the panels which may or may not be the same height. The minimum GPM for actual return pipe priming is very low and well below the GPM required for the needed pressure at the VRV and the water lift.
 
  • Like
Reactions: smkz
Mine is like that too. I use a dental pick (see pick) to pull the o-ring up and off the clear cover, even if the outer ring is still attached. I think I got my set at Harbor Freight for a couple bucks.

1737675772016.png
 
  • Like
Reactions: smkz
Priming of the solar panels and keeping the VRV closed is more about PSI than GPM. You need the pressure at the VRV above 0 PSI to keep it closed plus enough pressure to lift the water to the highest location in the panels which may or may not be the same height. The minimum GPM for actual return pipe priming is very low and well below the GPM required for the needed pressure at the VRV and the water lift.
So you're saying the pressure to prime the panels with water and close the valve is likely the pressure I'd need to maintain constant while in solar heat mode? I've seen elsewhere that looking for bubbles in the return after the panels are primed might be an indicator that the VRV is not closed, I'll have to do some experimentation this weekend. I've got 8 panels, I believe they are the standard 12x4 size each. Based on what I can find for ideal efficiency, that would be something like 38 GPM at .1 GPM per sqft. My ancient Goldline solar controller is disintegrating, so I might replace it with a Pentair one for the extra communication ability with the pump.
 
So you're saying the pressure to prime the panels with water and close the valve is likely the pressure I'd need to maintain constant while in solar heat mode? I've seen elsewhere that looking for bubbles in the return after the panels are primed might be an indicator that the VRV is not closed, I'll have to do some experimentation this weekend.
The bubbles method is probably the most effective.

Also, you can estimate the minimum pressure at the filter that would be necessary to close the VRV just to get into the ball park. You just need the height difference between the VRV and pressure gauge.

PSI = Delta Height (Ft) / 2.31 + Margin

The margin component is for the head loss between the pump and the VRV. This too can be estimated but requires quite a bit of work. The first part of the equation at least gives you a starting point to work from. The margin is likely between 2-4 PSI.

I've got 8 panels, I believe they are the standard 12x4 size each. Based on what I can find for ideal efficiency, that would be something like 38 GPM at .1 GPM per sqft. My ancient Goldline solar controller is disintegrating, so I might replace it with a Pentair one for the extra communication ability with the pump.
Yes, the 0.1 GPM/sq-ft is a decent rule of thumb for flow rates and panels. However, efficiency does not drop off that quickly with solar panels. At 0.05 GPM/sq-ft you only lose about 15% of the efficiency. So you have a wide range to work with.
 
Last edited:
  • Like
Reactions: smkz
I think my VRV is near the top of my panels, I'd estimate 15ft off the ground. The panels are also on the opposite side of the house from the equip pad, so its got a pretty long run to get there (I have PV panels on S and E sides, solar heat W). Based on that estimate, assuming the pressure gauge height on the top of the filter counts and margin is 4, then I'm looking at... almost 30psi indicated at the filter? I must be doing something wrong there. I know my old 2hp pump was able to prime the panels quite quickly, and I never saw anything above 20psi on my old filter. I'll play with it this weekend and see how it looks. Maybe my valve is lower than I think, I know its on the panel side because I can hear it when the pump is off. Thank you for the tips to send me in the right direction!
 
Sorry, I had a typo in the equation. Should be divide not multiply. 15 ft would be about 6.5 PSI so something close to 10 PSI should work.
 
Last edited:
  • Like
Reactions: smkz
Mine is like that too. I use a dental pick (see pick) to pull the o-ring up and off the clear cover, even if the outer ring is still attached. I think I got my set at Harbor Freight for a couple bucks.

View attachment 625537
If that dental pic is the only tool that will do the job, then so be it. Otherwise, you really shouldn't be manipulating an o-ring with anything metal, and certainly not something that sharp. Stabbing or nicking or otherwise compromising an o-ring can cause a leak. And not necessarily right when you do it. The o-ring could fail at a later date.

A better tool for this application would be a nylon spudger, typically used for computer repairs. They're much less abrasive. They can still damage an o-ring, but it's less likely. This is a good set of tools to have on hand for all sorts of uses:


I only shared this tip so that I could use the word "spudger!" ;)
 
When I set it to stay at a certain GPM then open my solar valve, it does increase the pump speed significantly to hold the set GPM, so that's good to see.
I'll defer to @mas985 regarding this "warning," but I thought I learned it here. Pumps that can maintain a specified flow (GPM) can be useful, but also risky. If you get any sort of obstruction, the pump will happily increase RPMs to maintain the GPM, even if that means creating a harmful or even dangerous pressure condition. Perhaps modern pumps have some sort of fail safe, but I read about this possibility years ago, and so thought I'd pass it along for your consideration.

I don't have a GPM pump, but I do have a slew of GPM settings. I initially used my FlowVis to determine what RPMs were necessary to achieve the desired GPM, and then programmed those RPM settings into my pool automation controller. And then I periodically check my FlowVis to confirm the flow rate is correct for the various tasks (vacuuming, solar heating, chlorine generation, etc).

When a dirty filter impedes the flow rate, my pump won't automatically compensate, but I'll see it in the FlowVis. Then I'll sometimes goose the pump a bit to manually compensate, until I can get around to cleaning my filter (then I'll restore the original RPM settings).

It's not completely automatic, but it works, and there's less risk of the GPM getting out of control. If the automatic GPM ends up being a concern for you, I believe you can defeat that in the pump settings, and run it like a "dumb" RPM pump.
 
  • Like
Reactions: smkz

Enjoying this content?

Support TFP with a donation.

Give Support
Thread Status
Hello , This thread has been inactive for over 60 days. New postings here are unlikely to be seen or responded to by other members. For better visibility, consider Starting A New Thread.