
Stains and Plaster Bumps
- Thread starter NewB77777
- Start date
You are using an out of date browser. It may not display this or other websites correctly.
You should upgrade or use an alternative browser.
You should upgrade or use an alternative browser.
- Jul 16, 2012
- 7,283
- Pool Size
- 27000
- Surface
- Plaster
- Chlorine
- Salt Water Generator
- SWG Type
- Hayward Aqua Rite (T-15)
You hit the TFP service/consultancy jackpot! On-site, same-day service by an expert. I don't think we'll be able to advertise that capability any time soon though.
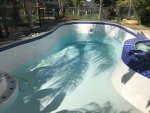
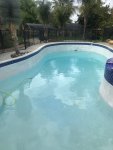
Finally we finished to remove all spots couple days ago.
BTW, we found a grinder with a special disc made job much faster.
After grading, I though to sand with 60->80->.. .-> 220.
However we are ended to sand with 60 grit.
After filling water, it looks new!
BTW, we found a grinder with a special disc made job much faster.
After grading, I though to sand with 60->80->.. .-> 220.
However we are ended to sand with 60 grit.
After filling water, it looks new!
Attachments
- Jun 22, 2014
- 52,078
- Pool Size
- 17888
- Surface
- Fiberglass
- Chlorine
- Salt Water Generator
- SWG Type
- CircuPool RJ-45 Plus
 Thanks for the update.
- Apr 10, 2018
- 6,437
- Pool Size
- 18375
- Surface
- Plaster
- Chlorine
- Salt Water Generator
- SWG Type
- CircuPool RJ-45 Plus
Amazing transformation NewB! You're off to a great start for spring.
I just saw this. Wow what a great happy ending story. When I first starting reading I was “oh man this is going to be a train wreck of a situation”. Pros here step in and a holy grail stop from onbalance and 10 posts later water back in and it looks awesome!
That gets a huge golf clap!
??
That gets a huge golf clap!
??
You did GOOD! That does look so much better! I can't wait to see it full of water and sparkling!
So lets keep that pool looking like this! Did you get a test kit yet? If not you need to asap......look in my siggy below for the test kit I think it the best bang for the buck.
Kim
So lets keep that pool looking like this! Did you get a test kit yet? If not you need to asap......look in my siggy below for the test kit I think it the best bang for the buck.
Kim
Today a pool guy(he is my father's friend) came, and installed all equipments, and he poured some kind acid granular(I forgot the name), and chlorine.
I got the kit months ago already. I will check and will post the result here.
BTW,
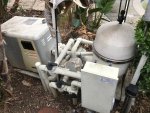
If we open only side vacuum line, then air occur in the pump with noise.
The pool guy told me it looks like leaking somewhere in side vacuum line.
Can you let me know what I need to do to solve the issue?
We have 011028( Pentair Intelliflo Variable Speed Pool Pump (3HP)), and it is about 20,000 gallon with small spa.
Are there a post which shows how to setup the pump?
Thank you!
I got the kit months ago already. I will check and will post the result here.
BTW,
If we open only side vacuum line, then air occur in the pump with noise.
The pool guy told me it looks like leaking somewhere in side vacuum line.
Can you let me know what I need to do to solve the issue?
We have 011028( Pentair Intelliflo Variable Speed Pool Pump (3HP)), and it is about 20,000 gallon with small spa.
Are there a post which shows how to setup the pump?
Thank you!
Try this link for the air problem: Suction Side Air Leaks - Page 2 of 2 - Trouble Free Pool
For the pump I would find your owners manual and see what it says and go from there.
For the pump I would find your owners manual and see what it says and go from there.
Though underground plumbing leaks are less common than many people fear, if you are unable to locate a leak above ground, it may be worthwhile to dig down to the first fitting below the surface on the pump inlet lines. These are the source of many plumbing leaks and are generally not far below ground.
And below is what I found.
1. The most common source is the pump basket lid...
>>> In my case, it leaks when I open only the side vacuum suction, and close all other suctions.. So I think this is not my case.
Any how, I poured water on pump gasket lid area, and it doesn't make any change.
2. Most all pumps have two drain plugs. One is near the bottom of the basket and the other further back on the motor side of the pump. Only the basket drain can introduce air into the pump. Remove the plug and inspect the O-ring.
>>>Again.. In my case, only the side vacuum suction leaks.. So I think this is not my case. And it is new pump which I just installed.
3. Poorly made or broken, cracked PVC joints. If it looks sloppily made or crooked, it should be VERY suspect. Sometimes you can identify them by using the same running water technique as the one for the lid above.
>> I poured water.. however nothing was changed..
4. All valves. They can be cracked or perhaps need new seals. Identify by listening (very close) or using the running water test again.
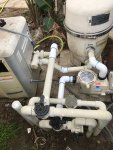
>>Does valves refer black things in a picture that I attached, right?
Okay, I'm going to open it tomorrow to check.
5. The pool water level.
>>Level of water is good.
6. If your pump or plumbing “spits” a little water from somewhere when the pump shuts off, that often indicates the location of an air leak
>> No, it doesn't spits any water.
7. Though underground plumbing leaks are less common than many people fear, if you are unable to locate a leak above ground, it may be worthwhile to dig down to the first fitting below the surface on the pump inlet lines.
>> I didn't dig down to check yet. I will check tomorrow.
So,, according to the article,
in my case, It may leaks from a valve or inlet lines underground.
I will check tomorrow valve and underground.
Is there any other spots or way to check?
Thank you!
Today, I checked to find the leaking spot according to Suction Side Air Leaks - Page 2 of 2 - Trouble Free Pool.Thank you for the link. It is very helpful. I will check and update here!
And below is what I found.
1. The most common source is the pump basket lid...
>>> In my case, it leaks when I open only the side vacuum suction, and close all other suctions.. So I think this is not my case.
Any how, I poured water on pump gasket lid area, and it doesn't make any change.
2. Most all pumps have two drain plugs. One is near the bottom of the basket and the other further back on the motor side of the pump. Only the basket drain can introduce air into the pump. Remove the plug and inspect the O-ring.
>>>Again.. In my case, only the side vacuum suction leaks.. So I think this is not my case. And it is new pump which I just installed.
3. Poorly made or broken, cracked PVC joints. If it looks sloppily made or crooked, it should be VERY suspect. Sometimes you can identify them by using the same running water technique as the one for the lid above.
>> I poured water.. however nothing was changed..
4. All valves. They can be cracked or perhaps need new seals. Identify by listening (very close) or using the running water test again.
>>Does valves refer black things in a picture that I attached, right?
Okay, I'm going to open it tomorrow to check.
5. The pool water level.
>>Level of water is good.
6. If your pump or plumbing “spits” a little water from somewhere when the pump shuts off, that often indicates the location of an air leak
>> No, it doesn't spits any water.
7. Though underground plumbing leaks are less common than many people fear, if you are unable to locate a leak above ground, it may be worthwhile to dig down to the first fitting below the surface on the pump inlet lines.
>> I didn't dig down to check yet. I will check tomorrow.
So,, according to the article,
in my case, It may leaks from a valve or inlet lines underground.
I will check tomorrow valve and underground.
Is there any other spots or way to check?
Thank you!
Attachments
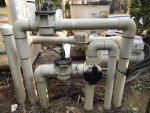
After my father's friend installed euqipments, I saw a pump manual, and It has couple of requirements, like "Do not install 90 degree elbows directly into the pump inlet or outlet", "install the pump a minimum of 3 feet from the heater outlet."
And I saw that he just attached 90 elbow directly into the pump.")
And I saw the pump level also not very flat.
He is doing pool managing business for about a year, and I think he is doing about more than 50 houses' pool.
So he is professional.. however he might don't have enough experience installing equipments.
Please check pictures, and let me know if we need to do piping again.
Img_6828 is what he install.
img_5069 is before
By the way, can wrong piping cause this kind of air leak issue only for side vacuum suction line?
Thanks.
And I saw that he just attached 90 elbow directly into the pump.
And I saw the pump level also not very flat.
He is doing pool managing business for about a year, and I think he is doing about more than 50 houses' pool.
So he is professional.. however he might don't have enough experience installing equipments.
Please check pictures, and let me know if we need to do piping again.
Img_6828 is what he install.
img_5069 is before
By the way, can wrong piping cause this kind of air leak issue only for side vacuum suction line?
Thanks.
Attachments
Last edited:
- Apr 10, 2018
- 6,437
- Pool Size
- 18375
- Surface
- Plaster
- Chlorine
- Salt Water Generator
- SWG Type
- CircuPool RJ-45 Plus
Just updated photos. thanks.
I tested my water today finally.
Again, My home is near Los Angeles, California, and size of pool is about 20,000 gallon plaster with Liquid Chlorine
and we recently drained water, and filled new water, and a pool guy added CYA just a week ago.
1. Chlorine: 1.6ppm
2. PH 8
3. alkaline: 180
4. Calcium: 250
5. CYA: 0
With Taylor water gram--> Saturation index: about 0.7 If I assume current water temperature is 65F
I read articles in Pool School.
Please let me know if what I think it right.
first of all, Because CYA is 0, my chlorine level is okay. However it is weird because when pool guy came to install pool equipment, he added lots of CYA. It is possible that I made mistake when I checked..
Second, PH 8 is acceptable max. However it is better to make lower. I saw Taylor manual, and it looks like that I need to put 1.72qt acid.
Third, Alkaline level is too high, so I need to make it lower. (BTW, is it possible to get such a big number??. I think I might made mistake). And how can I make Alkaline level lower?
Forth, Calcium is acceptable minimum. So it is better to make it higher. How can I make it higher?
Please let me know if what I think it right.
And I got to think that I need to use lots of drop to test water, and the tester is expensive.
So I think it might better to use test strip like this( -> Amazon.com : Poolmaster 22211 Smart Test 4-Way Swimming Pool and Spa Water Chemistry Test Strips, 50 count (Pack of 1) : Swimming Pool Testing Strips : Garden & Outdoor) for most time, and I use the Taylor kit only every months or quarters. Is it fine to do like that?
We didn't use pool yet because it is still too cold, and I was thinking to heat our pool tomorrow to use.
However It will rain from tomorrow for 4 days.
I'm thinking to heat it up even it rains. Do you think it is good idea to heat pool when it rains?
if it is not a good idea, I can wait.
By the way, Can you let me know the best time to heat it up?(morning, afternoon, or it doesn't matter?)
And how long will it take to heat pool? (about 20,000 gallon)
One more question.
Is there something that I need to do after raining?
Do I need to test water again?
Last question.
Like I asked last time, there is air leak(I can see bubble in a pump) if we run only side vacuum suction which we connect automatic vacuum . And I couldn't find the spot.
Anyhow if we run both main and side suction, then it looks normal.(there is no bubble In the pump).
So I'm thinking to use like that for now.
By the way, the automatic vacuum looks like doesn't work anymore for 2-3 days. And I saw there is small holes in the vacuum.
When I pressure washed the vacuum, It made holes...
Can those holes make vacuum doesn't work anymore, or it is because not enough water pressure in vacuum suction for the leak?
Thank you in advance.
- Apr 10, 2018
- 6,437
- Pool Size
- 18375
- Surface
- Plaster
- Chlorine
- Salt Water Generator
- SWG Type
- CircuPool RJ-45 Plus
If you know the pool guy put CYA in the pool, it's probably there, just not registering on the CYA test. Do you know how much he used? CYA is usually sold in 5-pound packages, which would raise CYA to 30 in a 20,000 gallon pool. You can add enough to raise CYA by 10 ppm and test again in 24 hours. Repeat until you get to your target CYA.
Don't worry about the TA number. It will come down as you lower pH with MA. Bring pH down to a range that puts your CSI in a slightly negative range (0.0 to -0.30).
Your CH is fine. It will come up during the season with evaporation and top-offs.
Don't use the cheap test kit. You're just wasting your money. Stick with your test kit. As you become familiar with your pool, you won't need to test as often.
With temps in the 40s and 50s, I wouldn't bother trying to heat the pool. I think you'll find it's a losing and costly battle. Wait until we get into normal spring temps.
Hopefully you'll get some help on the suction leak. You may want to try to start a new thread to get more eyes on it.
Don't worry about the rain. A few inches will have little effect on pool chemistry. If anything, it will bring pH down a bit and make up for normal evaporation.
Great job getting the pool set up!
Last edited:
- Apr 10, 2018
- 6,437
- Pool Size
- 18375
- Surface
- Plaster
- Chlorine
- Salt Water Generator
- SWG Type
- CircuPool RJ-45 Plus
I was thinking...If you really want to get into the water, you can warm up the spa. You should be able to get it up to 85+ in 30-45 minutes or so. Then take the polar bear challenge and jump in the pool. Raise you FC to 4 ppm and make sure your pH is range.
mikes112
Well-known member
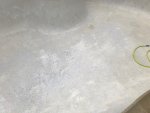
The embedded black algee staining is exactly what I have! The plaster is well bonded to the gunnite and no calcium build up. Just so much discoloration. I will do the multiple acid washes as Onbalance has reccomended, but would want to sand as well to give the new thin layer of plaster Im applying something to mechanically bond too. Does the sand paper have to be a diamond grit? Where can I buy 30 grit?It was a nice coincidence that I happened to be traveling through Los Angeles at this time. I was able to stop by to see this pool for a few minutes with NewB. Here are a couple of my observations and thoughts on this pool's discoloration spotting.
First, this type of discolored spotting problem is very unusual, at least in my experience. The plaster appears to be at least 10 years old, but in overall good condition in the non-spotted areas. As far as I could tell, and even though the slightly raised calcium spots looked somewhat similar to "Calcium Nodules" (which are due to delamination or cracking), I am certain that Calcium Nodules isn't the problem.
I think the pool may have some bad black algae growth some years ago (as evidenced by the discolored, disfigured, and spotted areas, but I am not certain of that assessment. If it is true, then it also appears that the black algae was also effectively killed some years ago, but left the plaster discolored and disfigured. In the past, I have seen some pools that had a very bad and long term black algae problem (with roots that had grown into the plaster surface, and which left the plaster somewhat disfigured under the growing black algae spots. In a couple of those pools, I remember having to power-sand for a very long time to remove the roots, and also noticed that the plaster surface had been damaged also. However, I don't remember that those black algae spots resulted in slightly raised bumps of disfigured calcium surrounding the smooth plaster. So that is why I am not absolutely sure about this diagnosis.
Regardless of what caused the discolored spotting, the advice I gave NewB was that sanding was the best method to remove the raised, disfigured, and discolored calcium spots. And that no type of acid treatment would accomplish that, but would only age the entire pool plaster surface. The current sanding that NewB has performed has not exposed the underlying gunite or substrate. It has not damaged the plaster surface, but in fact has simply removed the disfigured and discolored spots and left a very smooth and non-discolored finish. It looks slightly different than the surrounding areas only because there is not a very thin cream layer that troweling of plaster often leaves on top. I believe that when the pool is filled that those areas will be barely visible, and a lot better in appearance than how it appeared before the sanding.
Power Sanding can be performed with 60 or 80 grit sandpaper and will make the plaster surface very smooth and dense. Acid treatments will only make the plaster rougher and more porous. One exception to that is when the pool has calcium scaling uniformly everywhere. Then an acid treatment can be an effective way to remove the scale and making the plaster smooth again. Of course, it needs to be done properly which is not easy to do.
Removing the many, many discolored spots will take a lot of sanding and work, but it will be a very good way to make his pool look much better. Since the weather is cool currently, and that the older plaster surface is fully cured, then leaving it drained for a few more days to perform that work will not harm the plaster. Hopefully there isn't a high water level around that pool area to be concerned about.
Lastly, I believe that NewB's plaster pool will last many more years before needing to re-plaster.
No, I did not recommend acid washes at all. Just sanding and polishing is needed and is best.
Just regular wet&dry sandpaper also works (instead of using power sanders), but obviously is a lot harder to do the job. Go online, plenty of suppliers.
Just regular wet&dry sandpaper also works (instead of using power sanders), but obviously is a lot harder to do the job. Go online, plenty of suppliers.
Thread Status
Hello , This thread has been inactive for over 60 days. New postings here are unlikely to be seen or responded to by other members. For better visibility, consider Starting A New Thread.