Looks great nice work. I will say you are worst than me with the OCD and that's hard. Theres no need really for level or plumb for the most part. I always put slight downhill pitch if possible from the pad to the pool to help draining for winter. What you dont want is bellies in piping. Nice job on sleeving it I'm sorry I didnt mention it went over my head you were going thru a retaining wall. Regardless excellent job this far.
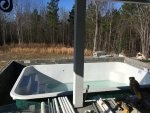
Owner pool build started - fiberglass partially in-ground
- Thread starter TKR
- Start date
You are using an out of date browser. It may not display this or other websites correctly.
You should upgrade or use an alternative browser.
You should upgrade or use an alternative browser.
LoL - I take that as a complement!I will say you are worst than me with the OCD and that's hard.
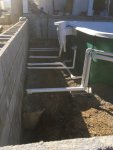
It has been raining alot but I have managed to get most of the plumbing done except remaining pipe runs in the muddy trench.
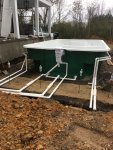
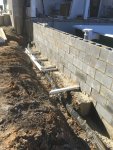
The masons showed up two days ago, ahead of schedule. So I stubbed out last return lines in sleeves and placed two extra sleeves - just in case. They started the retaining wall but a storm cut that work short.
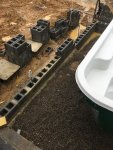
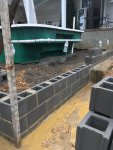
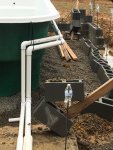
They finished the retaining wall the next day. We put in a bond beam with 5/8" horizontal rebar, wire-tied to the vertical rebar previously set in the footing. We will fill the entire CMU wall with concrete/grout once wall cures.
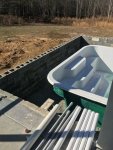
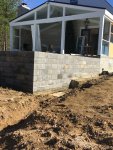
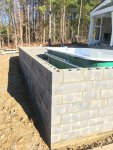
NEXT:
Grout the wall and place bases for fence posts with anchors before it sets..
Finish home runs and pressure test lines.
Last edited:
I was looking at the pics and skipped over the fact you were filling the block. Looks good and make sure they do a good job filling and not just the rebar channels it needs to all be grouted in a retaining application. Coming along nicely
Nice work ,surely coming along. One question, is that skimmer on angle and can that be righted now that it's all connected.
Yes - good catch! I was going to ask about that here next. The skimmer came installed on pool by distributor. The pool manufacturer molded a place into the coping for it.... is that skimmer on angle and can that be righted now that it's all connected.
It came with two extension rings which I assumed are intended to bring the access hatch level when installing the pavers. Something like this...
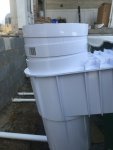
May be bad assumption. Any suggestions/experience to share on that?
Last edited:
If it's out of level it'll have to be corrected period. One more piece of advice if it isn't too late since the wall is done but still easy enough to do would be to connect the second port on the skimmer and run it to daylight and cap it off as an insurance run if something was suspect with the first such as an air leak or the like. Pipe is cheap and most of it is still open so I say go for it. Most important of all to pressure test all the plumbing before the back fill to assure all is perfectly sealed.
Last edited:
Thanks for reply.If it's out of level it'll have to be corrected
.....connect the second port on the skimmer and run it to daylight and cap it off
......pressure test all the plumbing before the back fill to assure all is perfectly sealed.
Running the extra skimmer port to daylight is straight forward at this point as wall is not yet grouted.
I will have to think about leveling the skimmer. Plumbing is no big deal but I will need some sort of wedge between the pool wall and skimmer flange.
I just started pressure testing. I do not want to over pressurize - what is good PSI for testing? First return line has been stable at 10 psi for over an hour
Attachments
I'll let others chime in since this isn't my end of things. I don't think an hour is enough......
30 lbs of pressure overnight is the standard I have seen the most. There might be some slight fluctuation due to the temp changes but they are very slight.
The extension rings are to bring the skimmer cover to level of whatever the pool deck is but skimmer would have to be level period.Yes - good catch! I was going to ask about that here next. The skimmer came installed on pool by distributor. The pool manufacturer molded a place into the coping for it.
It came with two extension rings which I assumed are intended to bring the access hatch level when installing the pavers. Something like this...
View attachment 127233
May be bad assumption. Any suggestions/experience to share on that?
One more thing just comes to mind. That skimmer should have been supported before and after delivery while it was being loaded and transported. Check around it very well. Make sure there aren't are any visible cracks or sealing issues as now would be the time to correct. I'm sure it was level when they installed it and got bounced a bit in tranport.
One more thing just comes to mind. Check around it very well. Make sure there aren't are any visible cracks or sealing issues as now would be the time to correct. I'm sure it was level when they installed it and got bounced a bit in tranport.
I just checked carefully and do not see any cracks or damage. But I think I will support it regardless during backfill.
I should mention .. I think that the reason the top edge of the skimmer slopes away from the pool is because it is bolted flat to the end wall of the pool. The end wall of the pool is not plumb. It, and all of the walls of the pool, angle outward a few degrees.
A rough check with my level shows the skimmer out of level about the same amount the wall is out of plumb.
We got the wall filled today. I decided to ask the excavation/footing contractor to fill the wall. They brought out a concrete vibrator and all went well.I was looking at the pics and skipped over the fact you were filling the block. Looks good and make sure they do a good job filling and not just the rebar channels it needs to all be grouted in a retaining application.
Before filling, I clamped a piece of 8g copper wire to the rebar steel in each wall section near the pins in existing foundation. All the vertical and beam rebar is wired-tied together so I'll tie this copper into the equipotential bonding loop later.
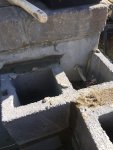
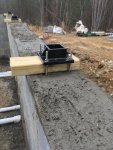
Before the grout set, I placed some 2" post mounts around the top of the wall with enough space for 1.5" (or maybe 2") pavers underneath later on.
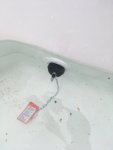
Now....back to pressure testing. I am using threaded winterization plugs with o-rings to cap off the the return line fittings, but had to go buy a couple of these 2" pneumatic test plugs to block off the drain line fittings. They are a pain to use, especially underwater.
Last edited:
is that skimmer on angle and can that be righted now that it's all connected.
Back to this issue. The skimmer is definitely sitting at the same angle as the pool wall. Everything looks solid around the skimmer and pool wall.
I checked with the distributor, who told me his installers use extension rings to level the top of skimmer and that the rings need not be water tight. I found this video from Thursday pool which pretty much sums it up.
Thursday Pools does not seem to sell their angled skimmer, so I can think of two solutions...
(1) Pull the skimmer and fashion a wedge/shim to go between the pool wall and the skimmer. I think this route has the potential of creating other leak issues.
(2) Use extension ring(s) making sure the angled extension is watertight up to the maximum pool water level. It would take a bit of "creativity" to get things tight and sound.
Is there a common practice for doing this?
Last edited:
I don't think you can change the angle as it's dependent on the wall. Anything you try to do will be a potential for a leak so don't go there. The rings need not be water tight because midway or two thirds high on the skimmer opening is the pools water level and the rings as you call them are above that point. The only time the water can get that high would be a massive rain storm and the off season if water level isn't monitored. I'm also not familiar in the following: if there is a way to install a overflow pipe at a given level so then water would drain off automatically and never reach a flood level.
Using the extensions seems to be the practical option. I am going to take some height measurements to see where overflow runoff from any gaps in angled skimmer extensions would end up, or, if rainwater could flush paver base/sand into the skimmer.. The only time the water can get that high would be a massive rain storm and the off season if water level isn't monitored
....... if there is a way to install a overflow pipe at a given level so then water would drain off automatically and never reach a flood level.
Because most of the pool is above grade, an overflow would be easy to run to daylight, if I need it.
Measure the diameter to the inside and outside of the of the existing skimmer. If I remember correctly a 10" pvc pipe goes right over it. You can taper cut it or bevel as needed and cap with the original lid. Once you do pavers it wont matter the mortar around coping hits the front half and the polysand hits the back half. You can caulk it real well from outside/inside to make it work. I do believe there is a shim kit for fiberglass pools to make throat sit level at the shell.
Thanks. I measured the skimmer (CMP brand), and the opening is sized basically as a 8" thinwall PVC female fitting. 8.625" ID, 8.875 OD, 0.125 wall thickness. So, per you suggestion I'll get a piece of thin wall pvc pipe and bevel cut the top. The lid may need some modification as it is meant to fit onto a round female opening.If I remember correctly a 10" pvc pipe goes right over it. You can taper cut it or bevel as needed and cap with the original lid.
I am considering the Jandy Sheer Arc as a small water feature. It looks like it might work in a fiberglass pool. I posted a separate thread here hoping for some feedback.
Will Jandy's Sheer Arc work in fiberglass pool?
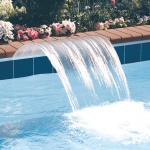
Will Jandy's Sheer Arc work in fiberglass pool?

Thread Status
Hello , This thread has been inactive for over 60 days. New postings here are unlikely to be seen or responded to by other members. For better visibility, consider Starting A New Thread.


