Newb OB with BYOP in Buckeye AZ - Short vacation pH and FC question

Hey @Jm13004 thanks for letting me know you've found some helpful tidbits along my journey. I plan to provide a a timeline with dates and notes after all is said and done.

@kimkats once I get the tile from my contractor I'll be separating the good from bad tiles and I'll also do a mockup of the feature wall. That's a good idea!

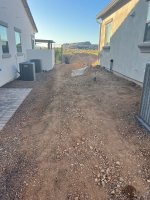
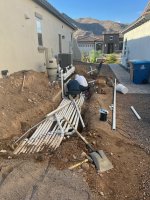
One random piece of advice for those of you who have narrow access and will be digging near property lines. Take the time with anyone doing excavation to keep all soil on your property. You might even go so far to string a line so the property line is immediately visible.

While my contractors were pretty good overall, I should have made a very direct point about keeping all the excavated soil on my property. Yesterday I strung a mason's line along the property line for the contractor who will be excavating and pouring the equipment pad (once they saw that they didn't get any soil on my neighbor's property). As I did this it became very clear just how much excavated soil ended up on my neighbor's property that needs to be cleaned up. In our area most yards have decomposed granite (gravel) instead of grass and the soil gets very hard, especially after a rain. It's difficult to get the excavated soil back with a shovel and rake, but I worked at it for a bit. I will have to regrade and put down more decomposed granite on my neighbor's property along with mine.
IMG_5743.jpegIMG_5746.jpeg

A few random pictures of partially graded yard with a few small piles of rocks.
IMG_5736.jpeg

IMG_5737.jpeg
IMG_1117.jpeg
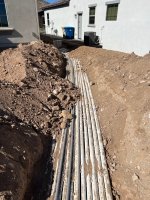
I cleaned out the little cave-ins of the trench so I could have a clean 2" of sand on top of the water pipes.
IMG_5738.jpeg

Next post will be pics of the backfilling work, equipment pad, install and an updated timelapse.
 
Last edited:
The equipment pad ended up being 12' long and 3' wide (with the last four feet being 4' wide for the future chiller). I decided to shorten it from 14' to 12' after thinking I didn't want concrete pad in front of the intellicenter in the event I ever want to run any more conduit from it. Hopefully that will be plenty of space to install the equipment and have ample room to put your feet down between everything. The pad install went fairly well. He didn't put crushed stone as a base for the concrete, but he was tamping the hard soil pretty good. I have gutters installed on this side of the home, so the only water I'll be getting is what comes from above. It was a one man show and took about 6 hours.
IMG_5762.jpegIMG_5771.jpeg

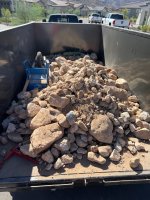
The backfilling was a TON of work (pun intended, I couldn't believe how many rocks WE removed, yes, we). I was out there helping to load the rocks into the bobcat to dump in his trailer and I did a fair amount of raking and shoveling to help out. Felt great to do some physical work for a change. Although the day after didn't feel quite as great!
IMG_5761.jpeg

He compacted the two inches of sand on top of the plumbing but that was all that was compacted. He didn't compact the fill on top of the sand, gas line, or electric (other than driving over it a million times). In retrospect I should have required that, at least for the plumbing and electric (those lines will eventually have travertine and turf over them). I'm now flooding the trench areas with water to help things settle. It will be about 1 to 2 months before landscaping starts, so hopefully I can get the majority of the settling completed before they start.
IMG_5747.jpeg
IMG_5750.jpeg

I didn't think too much of it when the gas went in, but I really made access very difficult with one of the gas risers for grill. It made the area too tight for the 52" track bobcat. After thinking it might still be possible to do the work with the 52", my contractor damaged the neighbors fence a little. Just bent the bottom rail and about three vertical pieces (you can spot it in the picture below). Not significant damage but I felt horrible about it he immediately offered to pay to fix the damage and apologized many times. Needless to say we called off the backfilling that day until he could get a 36" wheel bobcat. That worked much better, but it was still tight.
IMG_5773.jpeg

Overall the backfilling took an entire day, wrapped up around 5pm. A few pictures of the semi-finished product.
IMG_5774.jpeg
Area on the right side of pool was not backfilled at request of landscape contractor. They wanted to be onsite when backfilled to make sure it was compacted well, it will pass under quite a bit of travertine.

IMG_5775.jpegIMG_5776.jpeg

Oh, and the plumbing pressure has remained around 35psi and the gas pressure around 15psi. Feeling good about that.

Next week will be very busy, I have the plumber lined up for Monday, electrician on Tuesday, and mason/coping/tile contractor on Wednesday. I hope to be ready for the landscaper in about two more weeks. Too bad I have to wait for them to finish their current job. They won't start until they have all the materials, completely finished their current job, and they stay on one job at a time until finished (that last part will be good).

A few questions I'm hoping someone can help with:
  1. Since landscaping won't complete for probably 3 months and I won't plaster/fill until after landscaping I was thinking it would be a good idea to have the entire system under pressure until ready to plaster. Does the plumber need to install a gauge or would the pressure gauge for the filter work?
  2. I have read somewhere here that it's a good idea to anchor the pump to the pad (using something like a hilti) and put rubber between the pump and the pad. Can someone point me to what would be a good rubber product to use?
  3. Does travertine coping go on before waterline tile? When I talked to my contractor he said they have done it both ways. Should I insist on a particular order?
  4. Should I have the small gap between the waterline tile and the coping filled with grout, caulk, or leave unfilled?
I haven't had a chance to update the timelapse yet, will do that when I get a chance.
 
Last edited:
That was a LOT of rocks!! Did you keep any to use in the landscape?
No we didn't. The HOA doesn't allow the "dry riverbed" landscaping look and for an accent piece the biggest ones weren't big enough. The largest ones were not too difficult for one person to move, I'd guess at most 100 pounds. While that is big when you hit it with a shovel, not quite big enough for landscaping pieces.
 
  • Like
Reactions: kimkats
What would you do?

I have an unopened IC40 that came with my intellicenter bundle that has a 5 year warranty (I wanted the IC60 as discussed earlier in this thread). The pool design says it will be 20,164 gallons and I’m probably 3 to 4 months from filling the pool to know for sure. I was thinking of selling the IC40 and buying the IC60, but not sure if giving up the 5 year warranty on the IC40 for the IC60 and a 2 (?) year warranty is the best decision.
 
Thanks @ajw22 , I was thinking if the pool comes in with more volume, say 3to 5K gallons, that might be a bit more that I should do with the IC40. I'm still learning, but is the only downside that I'll have to run the chlorination longer which results in a shorter life?
 
And this post is for the queen of bling @kimkats

Got our fire bowls a couple days ago and finally unpacked. Absolutely love them! For the low low cost of one kids set of braces. Finally it's time to spend our money on ourselves.

Oh Yeah Love GIF by ZDF Magazin Royale


IMG_5819.jpegIMG_5820.jpegIMG_5821.jpeg
 
Last edited:

Enjoying this content?

Support TFP with a donation.

Give Support
What will you be putting in the inside? (please say colored glass!)
Lava rock came with the bowls. Now that you bring this up, I’ve got an idea.

The firepit will *likely* have glass which my better half doesn't want, she wants lava rock. It's a 36" x 12" fire pan (or 432 sq inches). The two fire bowls have firepans that are 18" x 18" (or 324 sq inches). Maybe I can do the old switch-a-roo, buy some extra lava rock, and take care of two things at once.
 
  • Like
Reactions: kimkats
Plumbing and electric are both done now. This post will cover plumbing and the next (when I get some time) will include electric. Today we start the mason work.

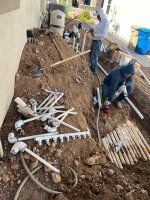
Plumbing went as scheduled on Monday, although they didn't get started until around noon, they had to fix a plumbing line that was broken by shotcrete on another job. Here are some in progress and final pictures.

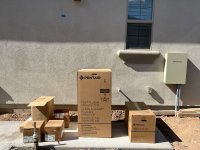
I was feeling helpful so I put the equipment out on the pad for my plumbers. Blue tape on the wall is for equipment pad light to be installed by electricians.
IMG_5815.jpeg

They dug below their manifold both to cut and put on couplings, but also to allow them to run a pipe below the rest, which you will see later.
IMG_5817.jpeg

You can see the bonding wire in this pic along with the electrical conduit I installed for my 120V circuits to the backyard (it's just stubbed out and staked right now).
IMG_5818.jpeg

A work in progress picture. Note I told them I didn't want any excavated soil on my neighbors property, they listened!
IMG_5822.jpeg

You can see all the 45's and the some of the lines they crisscrossed to get them where they wanted them. Some lines they ran under and others they went over.
IMG_5824.jpeg

They are basically done in this photo, just spraying on some paint (which I was expecting to do myself).
IMG_5829.jpeg

Finished plumbing work! Took them under 6 hours. The three pipes stubbing up in the foreground and connected are for the future chiller, one side goes to the 3-way diverter valve in the main line, the other goes to a 2-way diverter valve on the return header, and the third goes to the pool floor. IMG_5833.jpeg

I have a document where I wrote down all the lines after they finished. I have some temporary labels I'll be putting on all the valves. I have home runs for every pipe, except the waterfall which has one line that runs there and three valves to split for the scuppers. I was glad I was here as I ensured he had at least 5x the pipe size as a straight run into the pump. When I mentioned he needed that much space he said he knew but he was still a couple inches short at first (I now have 15"). Also, in front of the intellichlor you need 12 inches. He was putting it right behind the check valve. I wasn't sure about this, but I told him I wanted 12 inches after the check valve, figuring the check valve introduces some disturbance in the flow. Not sure if that is accurate or not, but you can see the way he laid it out, I had plenty of space, so why not! I now have 15" of stright pipe in front of the intellichlor.
Pull all the documentation and paperwork and then ask the plumber what he wants. You will be surprised what he ignores.

You should review the Installation Manuals and point out to the plumber manufacturers installation requirements that you want him to follow. Don't expect him to know or review the manual before he begins work.
You were spot on, he didn't want to see any documents, and as you see in my notes above, he may not have gotten it correct.

I originally wasn't going to install the three-way valves for the future heater and chiller, he had them on the truck, so he installed them along with the check valve for the future heater bypass loop. He stubbed the heater bypass loop going straight down and capped them sitting at the bottom of the excavation. Not sure how easy it will be to install the future heater, maybe just cut the pipe at ground level when the time comes.
IMG_5836.jpeg

A few plumbing questions sprinkled in this paragraph here that are underlined. I hope I can explain this clearly (you might need to reference my plumbing diagram at the bottom of this post). He tied the plumbing from the chiller three-way diverter valve to the return header through the 2-way diverter valve I have between the pool return header and the chiller line. I'm not quite sure if this is a bad idea, but in effect it creates a 2" bypass for the SWG if for some strange reason I want to bypass it. Is this ok? He also moved the check valve in the main line to be between the future chiller and the SWG rather than after the filter and before the future heater. Any concerns with this location? I just noticed this morning that the stretch of pipe that has the intellichlor has 2" pipe. I'm asking them to fix that to 2.5" that I called for. He responded saying the SWG is 2" so it won't make a difference. Not knowing what is typical, I wanted the plumbing loop to the heater to also be 2.5" but the plumber is saying that is 2". Is it ok to leave as is with 2"? I updated my plumbing diagram to represent what was installed. Let me know if you have any questions or concerns with how it was installed.
IMG_5835.jpeg

Plumbing Diagram 10-10-2023 Rev 10 As Installed.jpg

My last comment. If you are doing anything out of the norm for a plumber (this probably applies to any trade), it takes them out of their comfort zone of what they typically do. If that is the case, you really need to make sure you slow them down and take the time to go over it multiple times. I think you also have to be on site as the work is going on and check in on progress. You can see above there are several items that didn't go exactly as I had planned.
 
Last edited:
I have my plumber install an extension for the drain on the bottom of the filter for easier access.

Also, think about having a saddle installed to help support the long run of the top manifold.
Both fantastic ideas, thank you so much! Since I'm having my plumber come back I'll ask them to do these mods. Any thoughts on the plumbing questions? Or is that more of the ballywick for @mas985?
 
Do a mock up this way and that way and share the pics. Don't forget grout lines for the sizing.
Hey @kimkats we took your advice and seem to have settled on this placement. The bottom row of tiles will be the waterline. Just above the scupper we will have 1 short row of tile, about 1.5 inches. Seems to sit right with us, but we'll let it soak and look around the neighborhood.

IMG_5873.jpeg
 
Last edited:
  • Love
Reactions: kimkats
Also, today I have the masons/tile/coping contractor. I asked specifically for waterline and feature wall waterproofing with hydroban but told them I'll be ok with super blockade or base crete and they brought this stuff (even after sending an email that they will use base crete)!!! :crazy::eek:
IMG_5860.jpeg
And... I asked for epoxy grout and adhesive for the tile and they brought this (top bag).
IMG_5859.jpeg
Needless to say, I told them they can't install the waterproofing or tile until we settle the grout/adhesive and the waterproofing.

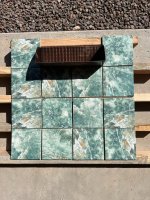
We laid out the tiles along the bond beam and the baja ledge to pick out the pretty ones for the feature wall and back wall (thanks for that advice @kimkats).
IMG_5861.jpeg
 
Last edited:

Enjoying this content?

Support TFP with a donation.

Give Support