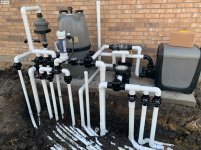
I have no idea.. LOLDoes that 'demo wall' have filter, heater, etc in the loop? The head loss due to the piping is a fraction of that through a filter and heater.

You are using an out of date browser. It may not display this or other websites correctly.
You should upgrade or use an alternative browser.
You should upgrade or use an alternative browser.
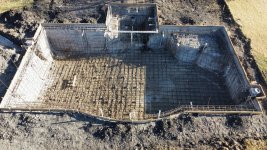
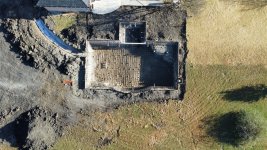
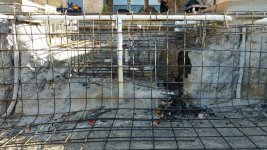
Steel went in yesterday
Attachments
-
 RemoteMediaFile_6815804_0_2021_12_02_09_11_46.jpg871.4 KB · Views: 74
 -
 RemoteMediaFile_6815818_0_2021_12_02_09_18_54.jpg895.4 KB · Views: 76
 -
 RemoteMediaFile_6815809_0_2021_12_02_09_15_18.jpg727 KB · Views: 73
 -
 RemoteMediaFile_6815808_0_2021_12_02_09_14_10.jpg692.6 KB · Views: 73
 -
 RemoteMediaFile_6815807_0_2021_12_02_09_13_26.jpg783.3 KB · Views: 71
 -
 RemoteMediaFile_6815806_0_2021_12_02_09_13_00.jpg667.9 KB · Views: 68
 -
 RemoteMediaFile_6815805_0_2021_12_02_09_12_30.jpg757 KB · Views: 74
Good point ... I don't remember what they had there besides the pipes as it has been quite a while since I was in the dream center or whatever they call it. Very nice showroom.Does that 'demo wall' have filter, heater, etc in the loop? The head loss due to the piping is a fraction of that through a filter and heater.
Nice pics... wish I would have had a decent drone during my build.Steel went in yesterday

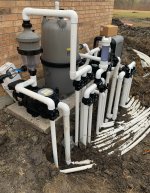
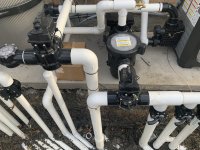
@Jimrahbe I verified with PB that the pre-filter is for the pump running the water features. Below is pic from side showing the pre-filter and associated plumbingJoe, @joel98z
I had assumed that it was part of the main pool pump and filter plumbing, but it is not..
I now assume it is a pre-filter for water going to one or more of your water features. If that is true it makes more sense to have it.
Please tell me what the pump right below the pre-filter is going to run.
And, if you can, show a pic from the side showing pre-filter and associated plumbing.
I like the way your builder has individual valves going to most pipes.. As an example; your Skimmers and Main drain all have individual 2-way valves.. This is much better than trying to use 3-way valves for skimmer and main drain control..
Thanks,
Jim R.
Attachments
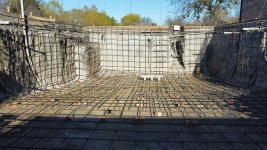
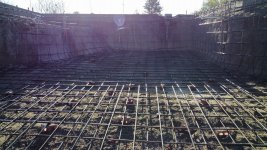
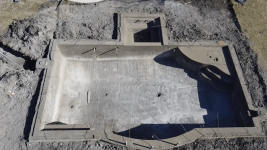
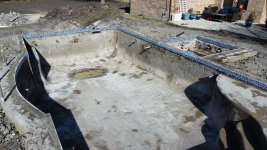
Two weeks from dig to Gunite!
Attachments
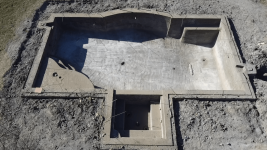
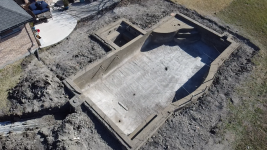
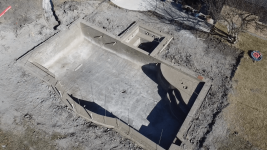
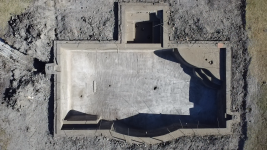
I really like the corner sun deck with steps. It opens up the rest of the pool.Two weeks from dig to Gunite!
Thanks. Thats exactly why we did that we wanted to maximize the swim area.I really like the corner sun deck with steps. It opens up the rest of the pool.
That should work fine. I personally would have liked it to be on that horizontal pipe from the wall to the front as it may be easier to service but it appears you have access to that backside.I am curious to know, if anyone sees a problem with where the salt cell is placed?
I really like how the plumber used Jandy 2 way valves on each suction and return for better control and those valves are serviceable if needed in the future.
That should work fine. I personally would have liked it to be on that horizontal pipe from the wall to the front as it may be easier to service but it appears you have access to that backside.
I really like how the plumber used Jandy 2 way valves on each suction and return for better control and those valves are serviceable if needed in the future.
Thanks @HermanTX , The reason I ask is that someone on another forum mentioned there should be a check valve before the salt cell to prevent damage to the heater from treated water. Also they said the chlorinator should be before the salt cell because salt cell produces chlorine gas that could react with chlorinator causing an explosion. But we will only be using the chlorinator for the first 30 days while plaster cures so they will not be used together.
First, the SWCG only produces chlorine when pump is flowing so no need for check valve. With an inline chlorinator, the chlorine can flow back thus the need for the check valve. Once you start the SWCG, you can disconnect the hose from the side of the inline chlorinator and put 1/2 NPT plug in both holes. Alternatively, you can turn the controller to zero to stop all flow if you do not want to remove the black hose. The inline chlorinator has a check valve internally on the cylinder so no flow will go into the cylinder from the pipe to which it is mounted. Also, remove all pucks from the inline chlorinator.Thanks @HermanTX , The reason I ask is that someone on another forum mentioned there should be a check valve before the salt cell to prevent damage to the heater from treated water. Also they said the chlorinator should be before the salt cell because salt cell produces chlorine gas that could react with chlorinator causing an explosion. But we will only be using the chlorinator for the first 30 days while plaster cures so they will not be used together.
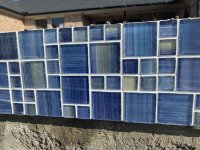
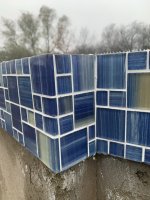
I love that tile! We were really close to choosing the same tile.
I think white grout looks great! But I can’t comment on maintance.
I think white grout looks great! But I can’t comment on maintance.
I love that tile! We were really close to choosing the same tile.
I think white grout looks great! But I can’t comment on maintance.
Thanks!, Its what my wife wanted.. I think its a little busy but its growing on me. Some additional pics:
Attachments
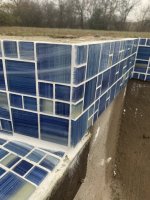

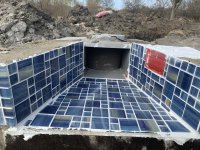
When the pool has plaster and full of water, the tiles will be half submerged. When it all comes together, it will great looking day or night.I think its a little busy but its growing on me.

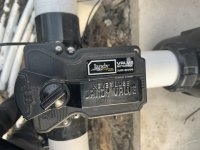
@joel98z Do you know why you have 2 antennas? I have the iAquaLink 3.0 which is the one on the left that gives you control via PC or phone app. What is the Black one on the right control?
Now just waiting plaster and water fill. Good Luck.
Now just waiting plaster and water fill. Good Luck.
@joel98z Do you know why you have 2 antennas? I have the iAquaLink 3.0 which is the one on the left that gives you control via PC or phone app. What is the Black one on the right control?
Now just waiting plaster and water fill. Good Luck.
I have no idea what that other antenna is for ?? I will ask PB
Thread Status
Hello , This thread has been inactive for over 60 days. New postings here are unlikely to be seen or responded to by other members. For better visibility, consider Starting A New Thread.