luma7

Gold Supporter
Jun 3, 2020
108
Baldwin County, AL
Pool Size
19500
Surface
Plaster
Chlorine
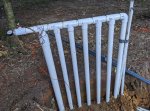
Salt Water Generator
SWG Type
Jandy Aquapure 1400
Good evening!

We're new to TFP and have really appreciated all the information on the site and helpful members. In a different thread, where many of you were kind to help us with depth and equipment questions, someone asked me to post pictures and updates on the build. I will update this thread each day of actual work.

Our project and construction managers came out to the house today and painted our pool shape in the yard. We were well prepared by the designer for what we saw and were very happy with it. The only sticking point was the equipment pad. It is going to be 9' long perpendicular to the house and I *really* don't like how far it will stick out in the yard so my husband and I will kick around options this weekend and let the PB know Monday what we will do.

Now that we have the pool painted in the yard and a dig date, we have lots work to do this weekend in preparation. We will cut down some brush, trees, and a fence; move a small raised garden; and tape off the area through the yard the big trucks can come in and out without damaging anything. I also have to attempt to locate a tree service to take down some really large trees next to the house where the equipment pad will be.

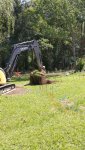
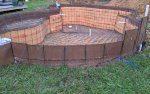
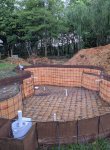
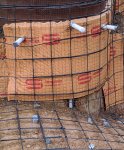
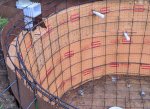
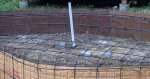
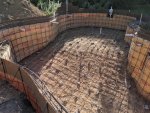
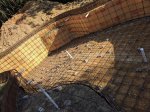
Pool shape and pictures attached.

We're excited!

Ya'll have a great weekend!


Screen Shot 2020-06-12 at 8.04.10 PM.png


Screen Shot 2020-06-12 at 8.01.56 PM.png
 
  • Like
Reactions: Apsuhead
Yesterday, the PB worked a 12 hour day and we went from the first scoop to a fully stubbed out pool that appears to be ready for gunite. Other than the excavator damaging a nearby willow I really liked, everyone was very careful of our property, communicated well and we are happy so far. I'll post more as things proceed....
 

Attachments

  • VID_20200616_100642_exported_6591_1592346763038.jpg
    VID_20200616_100642_exported_6591_1592346763038.jpg
    866.8 KB · Views: 191
  • IMG_20200617_055043.jpg
    IMG_20200617_055043.jpg
    727.2 KB · Views: 209
  • pool.JPG
    pool.JPG
    633.6 KB · Views: 312
That rebar looks light if they are done. I believe you need (3) #3 rebars in the bond beam, looks like you only have 2. Typically we see more reinforcement by the curves at the floor/wall joints.

@bdavis466 what do you think?
 
That rebar looks light if they are done. I believe you need (3) #3 rebars in the bond beam, looks like you only have 2. Typically we see more reinforcement by the curves at the floor/wall joints.

Thanks, Allen, we're in Alabama and follow the international swimming pool code. I will check it to see what is required. Really appreciate the input. A couple more photos attached of curves (shallow and shallow leading to deep). It does look like they have layered some of the rebar but not as much as you're suggesting.
 

Attachments

  • curve2.JPG
    curve2.JPG
    662.5 KB · Views: 102
  • curve.JPG
    curve.JPG
    455.4 KB · Views: 101
That rebar looks light if they are done. I believe you need (3) #3 rebars in the bond beam, looks like you only have 2. Typically we see more reinforcement by the curves at the floor/wall joints.

@bdavis466 what do you think?
Just had pre-inspector come by (independent from the PB) who validates the work prior to ordering the county inspection. He said everything looks great. I asked about the bond beam and he said it is #4 in the beam and #3 everywhere else. Said the beam looks perfect. I did check code but everything was conditioned on soil and site conditions so it didn't mean anything to me.
 
Yeah, you other pics show two strands of rebar together that looked like one.

We have seen pools with poor rebar work develop cracks. The fact that your builder put it in a day concerned me as they could have been building to minimum requirements to get done. I would rather pay for another day of rebar work and over build it. It is a small expense for insurance against major problems later on.
 
  • Like
Reactions: cgtx
The fact that your builder put it in a day concerned me as they could have been building to minimum requirements to get done. I would rather pay for another day of rebar work and over build it. It is a small expense for insurance against major problems later on.
Really appreciate you looking out for us! The inspector also mentioned that the build was amazingly quick but that it all looked excellent. My guess is the PB was able to do it from sheer headcount combined with competency in their work. There were 11-15 people here for 12 hours. We didn't see people standing around or asking questions. Everyone had a purpose and worked well individually and together as a cohesive unit. It was impressive to watch.
 
Yesterday I had time to walk around the pool and just look at it. Noticed the depth profile is wrong. It drops off too soon to the deep end. Also, bubbler plumbing is missing form the step. PB is coming out today to look at it and discuss options with us.
 

Enjoying this content?

Support TFP with a donation.

Give Support
PB here now working on putting the bubbler in the step. County inspection is tomorrow, after we pass it, we're onto gunite by the middle of next week.

PB agrees the depth profile does not match what the designer and I agreed to or the design I was given. Apparently, there was a set of technical type plans that may have indicated a different depth profile and he followed it. Not sure. So options are:
  1. Add more rebar to build up the area that is too deep. Fill the original area in with dirt. I get the depth profile I wanted.
  2. Add some sort of 'walking ledge' around the perimeter of the shallow end that is 4' deep so that I can walk on it out to my shelf, the rest of the area that is too deep would stay that way (this would be on the wall opposite the house, between the waterfall and the shelf)
  3. Leave it the way it is
I read through several threads about people who had depth issues and resolved it with extra gunite. There were suggestions to get specific paperwork regarding the warranty on the fix. I will do that.

So - two questions:
1) anything other than the additional paperwork you suggest I obtain or think about?
2) Any thoughts/concerns about the options provided by the PB? I haven't seen the walking ledge thing he is talking about but one of you might have one?

Tagging a few people who always seem to have good feedback and/or know who to get help from: @kimkats @Newdude @JoyfulNoise @Texas Splash

Thank you in advance!
 
Yay progress !!
your preference on if you want it left alone, completely fixed, or modified to make due in the middle somewhere. There are no wrong answers.

if it was my pool, I would not be ok sleeping until @jimmythegreek and/or @bdavis466 chimed in with their thoughts.
 
It's your pool so do what you want. Their error should not be your issue.

If you do change the depth profile, add rebar but DO NOT LET THEM BACKFILL WITH DIRT! Have them makeup the difference with gunite. It's hard enough to properly compact level backfill but to do it on a pool slope transition is downright impossible.

Something to consider: The pool shell sees the highest stress at the transition from shallow to deep so having extra reinforcement there with extra gunite is an added bonus. Pretty much every pool I've seen crack has done so at that transition.
 
If you do change the depth profile, add rebar but DO NOT LET THEM BACKFILL WITH DIRT! Have them makeup the difference with gunite.
Really appreciate the quick reply and information. Do I have to worry about or look for anything that would indicate "shadowing" if extra rebar and gunite are used?
 
Really appreciate the quick reply and information. Do I have to worry about or look for anything that would indicate "shadowing" if extra rebar and gunite are used?
You've been reading! Shadowing would be pretty hard to have happen on a pool floor since the rebar shouldn't be spaced closer than 6". I would ask that the first pass of gunite just barely covers the lowest layer of rebar and then have someone go through the pool with a wand connected directly to the compressor and blow off all the gunite on the upper rebar layer. Good luck convincing them to do this though...
 
  • Like
Reactions: luma7
Two more pix...plumbing that is pressure tested & the bubbler they added after the other plumbing. My husband thinks they ran the conduit for the lights, also; however, I don't see any spot for the lights yet. I will be asking the PB when he drops by today.

Really appreciate your help, @bdavis466! When the PB comes by today, we are going to ask him to make the depth profile what we asked for originally and be sure to request he not backfill with dirt.

Inspection is today, gunite next week. My T100 test kit is on the way. Shopping robots now. I thought I wanted an M500 but @JoyfulNoise's review of his bot made me think we can get a 2 year warranty/cheaper one, instead.
 

Attachments

  • bubbler.JPG
    bubbler.JPG
    344 KB · Views: 86
  • plumbing.JPG
    plumbing.JPG
    527.3 KB · Views: 86
  • Like
Reactions: Newdude
PB stopped by while I was delivering groceries to my parents on my lunch hour from work. He texted me to let me know he'd arrived and I was 30 minutes away. Left before I could get home. My husband said he doesn't think he can match the profile the designer promised us which is really frustrating because we increased our budget by almost $10K to add length and get what we wanted. Supposed to be calling me back this afternoon.
 
  • Sad
Reactions: Newdude
If it's a matter of too deep just build up like Brian explained. The only way I would let them do it from underneath would be to cut the cage out and use clean 3/4 stone to change the sub base amd then properly tie it back in. I would think adding an overhead cage to what's there and 2 yards or so of concrete is cheaper, but hard to say without seeing plan and what you actually have there now
 
  • Like
Reactions: bdavis466
Thanks, @jimmythegreek and @bdavis466, met with the PB and the designer today. They said they can't add to the cage and just gunite it because the difference between the current and planned elevation is over 20". They plan to put gravel bags in and on top of the current cage, build another cage on top of the gravel bags and then gunit to the originally planned depth. Two pictures attached. There are two orange strings, one is taut and the other is loose. The taut one is where the elevation was supposed to drop from 4 to slope down to 6.5. They will build up before the string and slope down to the existing 6.5 after the string. I'm very happy to get my original depth profile! Just hope their gravel plans are structurally sound...
 

Attachments

  • depth change 1.jpg
    depth change 1.jpg
    905.8 KB · Views: 116
  • depth change 2.jpg
    depth change 2.jpg
    883.9 KB · Views: 116

Enjoying this content?

Support TFP with a donation.

Give Support
Thread Status
Hello , This thread has been inactive for over 60 days. New postings here are unlikely to be seen or responded to by other members. For better visibility, consider Starting A New Thread.