I hear you!! There are a quite a few things that did not get done this summer due to the heat. So not worth getting heat sick from!

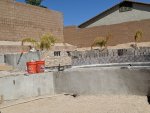
Blank canvas in Laughlin, NV.
- Thread starter akageorgi
- Start date
You are using an out of date browser. It may not display this or other websites correctly.
You should upgrade or use an alternative browser.
You should upgrade or use an alternative browser.
- Dec 20, 2016
- 257
- Pool Size
- 30000
- Surface
- Plaster
- Chlorine
- Salt Water Generator
- SWG Type
- Pentair Intellichlor IC-60
I wish I would've started a log book to document the full days of work that I have put into this endeavor. Today probably marked the 100th FULL day (8hrs +) of manual labor for yours truly.
I finally got the stainless steel tubing cut for my spillways.
This morning I went to work with spillway #1.

Added the last few rows of stack stone and leveled the top of the spa a bit.

Anyway, I'm noticing some gaps and such in the stack stone that I'll need to address later but there is progress here in Laughlin.?
Our dogs little monkey didn't fare as well as me in the 114° dry heat today!

Next on the agenda is finishing the spa, outside and in.
Then we're off to never never (coping) land...
I finally got the stainless steel tubing cut for my spillways.
This morning I went to work with spillway #1.
Added the last few rows of stack stone and leveled the top of the spa a bit.
Anyway, I'm noticing some gaps and such in the stack stone that I'll need to address later but there is progress here in Laughlin.?
Our dogs little monkey didn't fare as well as me in the 114° dry heat today!
Next on the agenda is finishing the spa, outside and in.
Then we're off to never never (coping) land...
Loving the stacked stone!! So well done!
You say you see some gaps and such with it...........I don't see any! I would not even try to "fix" them as it might make they stand out.
Poor monkey hehe Are you setting up any kind of shade for him and you while you are working?
Kim
You say you see some gaps and such with it...........I don't see any! I would not even try to "fix" them as it might make they stand out.
Poor monkey hehe Are you setting up any kind of shade for him and you while you are working?
Kim
Just started reading your build thread today, thinking I would see a finished pool.
I'm blown away by what you've done. Design, colors, the sheer manual labor, kuddos to you. The only part I dont understand is your continued good humor and patience??
Following your build, anticipating much happiness for you and yours on completion!
I'm blown away by what you've done. Design, colors, the sheer manual labor, kuddos to you. The only part I dont understand is your continued good humor and patience??
Following your build, anticipating much happiness for you and yours on completion!
Quick question for safety, did you connect a bond wire to the stainless steel scuppers, previous pictures did not show one. If you did not i would suggest stopping and doing the correct bonding before finishing up that area.
- Dec 20, 2016
- 257
- Pool Size
- 30000
- Surface
- Plaster
- Chlorine
- Salt Water Generator
- SWG Type
- Pentair Intellichlor IC-60
Thank you for the reminder post!!!Quick question for safety, did you connect a bond wire to the stainless steel scuppers, previous pictures did not show one. If you did not i would suggest stopping and doing the correct bonding before finishing up that area.
Up until last weekend, I didn't know I needed to bond them. I talked with somebody that knows more than me the other day and he set me straight.
Today my morning project was going to be completing the stack stone and spa waterline tile, now it's attaching the homemade scupper thingy's to the bonding wire. I bonded the spa railing brass cup fittings, should be able to tap into that without doing too much work.
Next pool building class project for me coping...questions to follow..
- Dec 20, 2016
- 257
- Pool Size
- 30000
- Surface
- Plaster
- Chlorine
- Salt Water Generator
- SWG Type
- Pentair Intellichlor IC-60
SOME OWNER/BUILDER ADVICE (3 YEARS IN THE MAKING):
1. ALWAYS GO WITH YOUR FIRST INSTINCT.
2. ASK TOO MANY QUESTIONS!
3. DON'T HURRY ANYTHING.
THAT'S IT, BACK TO WORK ON SOMETHING I SHOULD'VE, (1) GONE WITH MY FIRST THOUGHT, (2) DIDN'T ASK WHEN I SHOULD'VE, (3) TRIED TO GET THINGS (SPA) DONE QUICKER.
LESSON LEARNED, GO BACK 3 SPACES, LOSE A TURN.
?
1. ALWAYS GO WITH YOUR FIRST INSTINCT.
2. ASK TOO MANY QUESTIONS!
3. DON'T HURRY ANYTHING.
THAT'S IT, BACK TO WORK ON SOMETHING I SHOULD'VE, (1) GONE WITH MY FIRST THOUGHT, (2) DIDN'T ASK WHEN I SHOULD'VE, (3) TRIED TO GET THINGS (SPA) DONE QUICKER.
LESSON LEARNED, GO BACK 3 SPACES, LOSE A TURN.
?
- Dec 20, 2016
- 257
- Pool Size
- 30000
- Surface
- Plaster
- Chlorine
- Salt Water Generator
- SWG Type
- Pentair Intellichlor IC-60
There's going to be one HUUUGE (insert Trump emoji here) party when this pool is finally done.?
Attachments
Last edited:
With the money you are not spending you will be able afford to fly me out to help you with this party!!!
- Dec 20, 2016
- 257
- Pool Size
- 30000
- Surface
- Plaster
- Chlorine
- Salt Water Generator
- SWG Type
- Pentair Intellichlor IC-60
Scuppers bonded, check.
Spa stack stone completed, check.
Taking the rest of the week off to go to a cousin's wedding, check.
111° outside but it's a dry heat.
Have a great week....
?
Spa stack stone completed, check.
Taking the rest of the week off to go to a cousin's wedding, check.
111° outside but it's a dry heat.
Have a great week....
?
- May 3, 2014
- 62,727
- Pool Size
- 6000
- Surface
- Fiberglass
- Chlorine
- Salt Water Generator
- SWG Type
- Pentair Intellichlor IC-40
- Dec 20, 2016
- 257
- Pool Size
- 30000
- Surface
- Plaster
- Chlorine
- Salt Water Generator
- SWG Type
- Pentair Intellichlor IC-60
Warning:
Possible Philosophy Lesson Ahead
In order to succeed, you must unbuild what you have built.

Looking at the stacked stone on the side of the spa, I couldn't help but notice that the side facing the house, the side that is the most visible, was totally skewed. The pieces on the side were smaller on the top than on the bottom. The top of the rock somehow was 1/2"-1" pushed forward and it was very noticeable. So, please add a half day project to my half a century project. ?
Possible Philosophy Lesson Ahead
In order to succeed, you must unbuild what you have built.
Looking at the stacked stone on the side of the spa, I couldn't help but notice that the side facing the house, the side that is the most visible, was totally skewed. The pieces on the side were smaller on the top than on the bottom. The top of the rock somehow was 1/2"-1" pushed forward and it was very noticeable. So, please add a half day project to my half a century project. ?
So how did you just happen to notice it? Were you just sitting there thinking about all of the wonderful but hard work you had done THEN saw the boo-boo??? I have a sad BUT also a glad for you and your pool. It will get done and it will be done RIGHT in the end even if there are some steps backwards!
- Dec 20, 2016
- 257
- Pool Size
- 30000
- Surface
- Plaster
- Chlorine
- Salt Water Generator
- SWG Type
- Pentair Intellichlor IC-60
It just looked "off." Better to fix now than have it bother me later. I told the wife this afternoon that it wasn't the first thing I've done then redone on this pool, but hopefully it will be the last. I should be able to ☑ off some projects here pretty soon...?So how did you just happen to notice it? Were you just sitting there thinking about all of the wonderful but hard work you had done THEN saw the boo-boo??? I have a sad BUT also a glad for you and your pool. It will get done and it will be done RIGHT in the end even if there are some steps backwards!
Last edited:
- Dec 20, 2016
- 257
- Pool Size
- 30000
- Surface
- Plaster
- Chlorine
- Salt Water Generator
- SWG Type
- Pentair Intellichlor IC-60
Putting in another full day of pool building.
Today's culprit is spa tile, harder than I thought, trying to put the waterline tiles around the scuppers and still somewhat be symmetrical.
Glad I live in a country in which I can spend three years building a pool.
?

Today's culprit is spa tile, harder than I thought, trying to put the waterline tiles around the scuppers and still somewhat be symmetrical.
Glad I live in a country in which I can spend three years building a pool.
?
- Dec 20, 2016
- 257
- Pool Size
- 30000
- Surface
- Plaster
- Chlorine
- Salt Water Generator
- SWG Type
- Pentair Intellichlor IC-60
So hello again....
Here is my first attempt at tiling around the scuppers. Thought I did a great job until I stepped back, ugh!
Just looked bad, too many pieces, unevenm, gaps...

Here is my second attempt. I'd like to point out that I have never done any tile work in my entire lifetime. This time I notched into full tiles which cut down on the number of pieces.
Think it looks better. If I don't come back and redo it next month, all pool & spa waterline tile is done.

I know that doesn't sound Earth shattering, but to me it is. I'm pretty much done cutting tile!!!!
I have 7 step tiles to replace in the spa and then my work in the spa is done.
Trying to order pool coping but keep chickening out!
That's it, have a good weekend...
Here is my first attempt at tiling around the scuppers. Thought I did a great job until I stepped back, ugh!
Just looked bad, too many pieces, unevenm, gaps...
Here is my second attempt. I'd like to point out that I have never done any tile work in my entire lifetime. This time I notched into full tiles which cut down on the number of pieces.
Think it looks better. If I don't come back and redo it next month, all pool & spa waterline tile is done.
I know that doesn't sound Earth shattering, but to me it is. I'm pretty much done cutting tile!!!!
I have 7 step tiles to replace in the spa and then my work in the spa is done.
Trying to order pool coping but keep chickening out!
That's it, have a good weekend...
I was going to fuss at your for not liking the first pics as I thought it looked good. THEN I saw the second pic and am GLAD you redid it! That does look better. I would leave them just like they are!!!
So talk to me about what is worrying you about picking the coping? Want me to pick some for you?
So talk to me about what is worrying you about picking the coping? Want me to pick some for you?
- Dec 20, 2016
- 257
- Pool Size
- 30000
- Surface
- Plaster
- Chlorine
- Salt Water Generator
- SWG Type
- Pentair Intellichlor IC-60
Houston we have a problem...so I'm beginning to see the negative effects of taking 2+ years to build a pool. I worked all morning cleaning, getting ready to grout the step tiles in both the pool and spa.
The first issue, which isn't a big deal was that while cleaning the step tiles on the wet ledge, a whole row came off! I think people have been stepping on them for months and slowly weakening the bond to the concrete. I checked the rest and everything seems to be good.
Problem number 2:
Even though I have had my light niches covered with plastic and cardboard, the sun and heat have worked their magic on one of them.
The plastic is sunburned and worse, it has a crack.
Now I've read about problems with the niches failing at the conduit, but I can't seem to find any examples of a niche cracking in the front.
Can I fix this with some plastic Bondo stuff or do I have to replace the whole thing?

Note the crack is just under the black and white sticker.
On a side note, since it officially not summer any more, should I put in my lights? We are still a ways off to get plaster in here just don't know if installing the lights would mess them up, by being exposed to the elements.
They were pretty pricey and I feel safer having them sitting in my office....
That's it for now...any advice would be appreciated this week...lol
The first issue, which isn't a big deal was that while cleaning the step tiles on the wet ledge, a whole row came off! I think people have been stepping on them for months and slowly weakening the bond to the concrete. I checked the rest and everything seems to be good.
Problem number 2:
Even though I have had my light niches covered with plastic and cardboard, the sun and heat have worked their magic on one of them.
The plastic is sunburned and worse, it has a crack.
Now I've read about problems with the niches failing at the conduit, but I can't seem to find any examples of a niche cracking in the front.
Can I fix this with some plastic Bondo stuff or do I have to replace the whole thing?
Note the crack is just under the black and white sticker.
On a side note, since it officially not summer any more, should I put in my lights? We are still a ways off to get plaster in here just don't know if installing the lights would mess them up, by being exposed to the elements.
They were pretty pricey and I feel safer having them sitting in my office....
That's it for now...any advice would be appreciated this week...lol
NOOOOOOOOOOOOOO! Oh I bet your heart skipped a beat when they came off!!  THEN finding this crack I don't know what the best thing is to do. My gut says replace though. After all of this work and the cost of the light do you want to even take a chance with water getting to the light? I will call in a couple of people to see what they think @bdavis466 @ajw22 @Pool Clown THoughts?
I don't know what the best thing is to do. My gut says replace though. After all of this work and the cost of the light do you want to even take a chance with water getting to the light? I will call in a couple of people to see what they think @bdavis466 @ajw22 @Pool Clown THoughts? Thread Status
Hello , This thread has been inactive for over 60 days. New postings here are unlikely to be seen or responded to by other members. For better visibility, consider Starting A New Thread.