Hayward OmniLogic
The links below are for helpful Hayward OmniLogic resources:
Hayward OmniLogic How To Guide
Hayward OmniLogic Troubleshooting Guide Residential
Hayward OmniLogic Controller Release Notes for Firmware Revision R1.2.0 MSP/WMT
Firmware Updates
When doing a search for the latest Hayward OmniLogic firmware you may find some pages that have links to firmware that is not the latest.[1] The latest firmware can be found at the Hayward OmniLogic product page[2], Support tab, then scroll down to Omni Firmware. A search may find a hayward-pool.ca[3] website page that does not have the latest firmware.
Also note at the bottom of the Firmwware section it says:
- In order to install firmware, installation files must be on the root directory of the USB drive.
- It is best if you download the firmware in Chrome, Firefox or Safari browsers. If you download in Internet Explorer, once your download is complete, please remove the ".TXT" extension from the file on the USB device.
When you get the new firmware (at hayward.com/firmware), the first two items in the list are firmware upgrades for the MSP and the MPP. The MSP is for the main display on the Omni, and the MPP is for the main board in the Omni. You need to apply both firmware updates for everything to work right. Applying just one or the other may cause issues.[4]
The instructions for installing are in the release notes. You need to copy the two firmware files to a USB drive (at the root level), remove the front panel on the Omni to expose the USB (they should have really mounted this port on the panel in an accessible location!), plug in the USB, then follow the instructions to install each file.
Use a small USB memory drive. A 512MB drive worked for one member while a 32GB drive failed.[5]
Release 4.1.0
Release 4.1.0 was released June 15, 2021.[6] Features and Enhancements are:
Omni now has the ability to configure heaters that support both heat and cool. For this version, the heater can be placed in Heat mode or Cool mode. For future versions, it will be allowed to do both automatically. Solar heater can now run in cool mode when the cool mode is selected.
- Heat Mode switched ON
- The body of water is heated as long as the filter pump is running, the set point has not been met and the water is below the set point by at least 2°F.
- Cool Mode switched ON
- The body of water is cooled as long as the filter pump is running, the set point has not been met and the water is above the set point by at least 2°F.
- Both Heat Mode and Cool Mode switched OFF
- All heaters/coolers are turned off and will not run even if the heater is enabled and switched ON.
- The Solar Set Point is a separate set point that applies only to solar devices.
- In Heat Mode, the solar set point must be greater than or equal to the main heater set point. Therefore the solar setpoint will move automatically 1°F above the main set point to support heat mode.
- In Cool Mode, the solar set point must be less than or equal to the heater main set point. Therefore, the solar set point will move automatically 1°F below the main set point to support cool mode.
- Solar priority will allow the solar heater or cooler to run alone to maximize the low cost of solar heat/cool.
- Solar temperature is displayed as “roof” on the heater screen.
- The “heater” feature in the BOW screen is now named “heat/cool”.
- Types of devices that support heating and cooling:
- Heat Pumps
- Geothermal
- Solar
- Types of devices that support heating only:
- Gas heaters
- Controlling Heat/cool via the OmniLogic app requires upgrading to the latest version of the app (4.4.0)
- Support for the new ENS610EXT Engenius HWLAN bridge. NOTE: To use WPS, hold the Engenius reset button for 2-4 seconds and upon releasing the orange LAN and WAN led lights will flash. They will continue the flash pattern until it associates with the router.
Firmware Revisions Included in this Release:
- R4.1.0 -MSP_AR_R0401000-Unified OmniLogic Control (OmniLogic, OmniPL and OmniHub)
- After upgrading the MSP controller, the following firmware updates will be available over the air:
- R4.1.0 -WDT_AR_R0401000-Unified OmniLogic Remote (Wired Wall Mount and Wireless Waterproof) to be downloaded over the air.
- R4.1.0 -EP_AP_R0401000 -OmniLogic Expansion Panel
Release 4.0.1
- Over the Air Updates: Once upgraded to R4.0.0 via USB, the MSP will have the ability to perform internet upgrades of future firmware distributions of the controller and smart components.
- Pentair and Jandy light control: Control the colors and shows of Pentair and Jandy Color LED lights from the Controller or Hayward OmniLogic App version 4.2.5. Not supported on legacy OmniLogic iPad app.
- Solar Heat Priority: Support for solar priority and separate solar setpoint. Systems with a solar heater will now have the ability to set the solar temperature separately from the rest of the heaters, allowing people to maximize their free solar heat. In addition, if solar priority is enabled it will turn off the other heaters that are running when the solar heater becomes available. Solar prioritization of multiple solar heaters is not supported. Supported on OmniLogic App version 4.2.5. Not supported on legacy OmniLogic iPad app.
- Sensor calibration: Ability to calibrate temperature sensors. To calibrate any temperature sensor, enter service mode, select the Sensors icon, then select the sensor that needs to be calibrated.
- pH Timeout increase: pH Timeout can be increased to a maximum of 240 minutes during configurationEdit Interlocks: Ability to edit interlocks. If an interlock needs to be modified, it now has the option to edit without having to delete and re-create the interlock.
- Interlock: Support new interlock: “If equipment A is OFF Equipment B is forced ON, if equipment A is ON Equipment B is unaffected”
- New TCELL: Support configuration of TCELL S3 (TCELLS315, TCELLS325, TCELLS340). Note: These cells will be available in the future.
- Smart Component Recovery: The recovery option is only available when the system detects that a smart component needs to be recovered.
- Cavitation alarms: Cavitation alarms are no longer displayed on the OmniLogic and the mobile app.
Release 4.0
Hayward released R4.0.0 firmware for the OmniLogic automation system in November 2020.[7] The big news here is that future updates can now be done directly from the internet - no more plugging in a USB to perform an upgrade!!!
Per the known issues list you have to restart the OmniLogic twice for everything to return to normal.
Here is a list of features and enhancements added:
- Over the Air Updates: Once upgraded to R4.0.0 via USB, the MSP will have the ability to perform internet upgrades of future firmware distributions of the controller and smart components.
- Pentair and Jandy light control: Control the colors and shows of Pentair and Jandy Color LED lights from the Controller or Hayward OmniLogic App version 4.2.5. Not supported on legacy OmniLogic iPad app.
- Solar Heat Priority: Support for solar priority and separate solar setpoint. Systems with a solar heater will now have the ability to set the solar temperature separately from the rest of the heaters, allowing people to maximize their free solar heat. In addition, if solar priority is enabled it will turn off the other heaters that are running when the solar heater becomes available. Solar prioritization of multiple solar heaters is not supported. Supported on OmniLogic App version 4.2.5. Not supported on legacy OmniLogic iPad app.
- Sensor calibration: Ability to calibrate temperature sensors. To calibrate any temperature sensor, enter service mode, select the Sensors icon, then select the sensor that needs to be calibrated.
- pH Timeout increase: pH Timeout can be increased to a maximum of 240 minutes during configuration
- Edit Interlocks: Ability to edit interlocks. If an interlock needs to be modified, it now has the option to edit without having to delete and re-create the interlock.
- Interlock: Support new interlock: “If equipment A is OFF Equipment B is forced ON, if equipment A is ON Equipment B is unaffected”
- New TCELL: Support configuration of TCELL S3 (TCELLS315, TCELLS325, TCELLS340). Note: These cells will be available in the future.
- Smart Component Recovery: The recovery option is only available when the system detects that a smart component needs to be recovered.
- Cavitation alarms: Cavitation alarms are no longer displayed on the OmniLogic and the mobile app.
Release 3.2
R3.2 added a number of new features, several that recommend moving to the latest version as soon as possible:[8]
- Touch Screen Calibration: Pressing the boot screen for ten seconds during power up enters touch calibration mode. Under previous versions of firmware, if your calibration gets to the point where you can't use the screen, there is no easy way to correct the issue short of a factory reset or a touchscreen replacement.
- Low Salt Chlorination: Added a Low Salt configuration that lowers the alarm threshold for low salt operations down to 800ppm. (HLBASE only). This allows the cell to continue to run in lower salt concentrations - not sure how much I like this as the cell has to work really hard when salt drops that low.
- Schedule - Heat and Chlorination: Schedules can now enable/disable Heaters and Chlorination as part of the schedule. This one was huge for me. The scheduling did not work for heaters or chlorinators properly in previous versions. Although I could set the heater to heat to a given temp for a period of time, I couldn't actually tell it to NOT heat outside of the scheduled times. I live to run my heater later in the morning when it's getting warm out. Much more efficient than in the middle of the night. I found that my heater only takes about an hour to raise the pool temp 4 degrees in mid morning, but takes nearly 3 hours when done between midnight and 6am. I also like to run my filter 24x7, but only run my salt cell during the day when the sun is hitting the pool. I couldn't do that before R3.2.
- Omni Direct: Direct access to change light modes for UCL and Omni Direct in Service Mode. Omni Direct was added in R3.1, but it works much better in R3.2. I haven't had any sync issues with my lights since R3.2.
- Default Startup Speeds for Valves: Added ability to associate VS filter speeds to valve positions. This is pretty cool! If you have a valve position for, say, a waterfall or a spa, and want a specific pump speed for it, you can just set it so the system changes the speed whenever the valve moves to that position.
- Pool Cover Interlock Scaleback: Added ability to associate filter speed, heater set point, and chlorination percentage to the pool cover closed interlock. For those of you that have an integrated pool cover, this lets you have your system set specific settings based on whether the cover is closed or not.
There is more, but I have found R3.2 to be far more stable than previous releases. I have found that when you upgrade to R3.2, it's a good idea to delete existing schedules and re-create them. I had schedules that didn't kick in for 24 hours, and one that never turned on when it was supposed to. After playing for several days, I called Hayward and they recommended re-creating the schedules. No issues after I did this.
Release 3.1.0
- New Spaside Remote.
- Network screens were improved to make it easier on the user to run diagnostics, change, and view the network settings.
- Wireless Remote connectivity to the Omni was improved.
- New spillover to external sensor (pool cover) interlock.
- New interlock that when engaged, turns the interlocked equipment on but when not engaged, allows the interlocked equipment to be unaffected and to be operated freely.
- New Themes/Favorites default countdown timer can be entered during the creation or edit of Themes or Favorites.
- Ability to configure heaters to a high voltage relay.
- Ability to configure multiple chlorinators when using ORP
Missing Shell Command
You may find that one of the steps in the OmniLogic Troubleshooting Guide is to clear the DDT - Device Discovery Table - to refresh communications.[9] Unfortunately the shell command was removed in R3.0 and Hayward has not updated their manuals.
If you are not on R3.2 - update the firmware to R3.2 before you try anything else.
To erase a configuration or DDT use the “Factory Reset” option under Service Mode. Note that Factory Reset will also reset the current network settings.
As always, before doing anything as drastic as a Factory Reset, make sure you backup your current config to a USB or your PC. Once you perform the Factory Reset, you'll need to either add and reconfigure all of your system components to the Omni, or you can first try reloading your config and see if that works.
Heater Extend
If you want to be able to turn on the filter pump automatically to maintain a desired temperature by flipping the heater on, you'll need enable "Heater Extend" in the OmniLogic's configuration.[10]
The OmniLogic can be configured to run the VSP at a minimum speed when call for heat is present.
By turning the heater on, you're only enabling the heater to maintain temperature when the filter pump is running.
OmniLogic VS Pump Communication
HUA is Hayward Unique Address that the VS pumps possess. The Omnilogic should auto detect the HUA’s in config mode and let you select which HUA does what. You normally have to select the pump address box to get a full list of all the detected HUAs.
Up to 16 pumps can be connected to the low speed bus.
You can check the com bus status from the pump diagnostic menu (Com Bus Online Address:xx). You can also see everything on the bus in the Omnilogic Config menu -> System Info
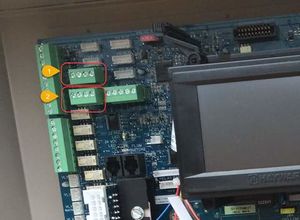
1 & 2 green blocks are actually the same and you can connect to either one.
If you have an issue getting OmniLogic to recognize a pump HUA note that the low speed bus numbers are read R to L instead of L to R. You should wire the communication in the following order on the LS Bus, 4,3,2,1.
EcoStar Pump
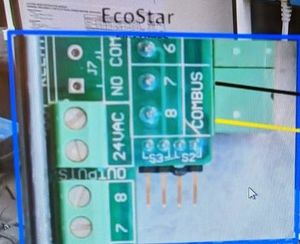
COMBUS 7 in the pump connects to terminal 2 on the green plug in the Omnilogic. COMBUS 8 in the pump connects to terminal 3 on the green plug in the Omnilogic.
Ecostar pumps made prior to 2015 need a $300 Digital Display upgrade, Part#VSX3400LCD, for the 3400VSP to communicate with OmniLogic.[11]
TriStar Pump
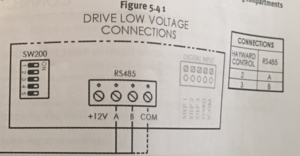
Communication wires should be run from 2 & 3 on the RS485 connection green block on the OmniLogic to A & B on the pump. Terminal 2 - A and Terminal 3 - B.
Pentair IntelliFlo Pumps
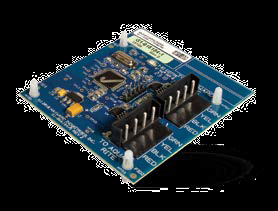
Firmware Revision 3.2 and the Pump Converter accessory board (HLPMPCONV) gives the ability to control Pentair Intelliflo VS pumps.[12] Based on the picture of the HLPMPCONV board it looks like it connects to the Omni RS-485 bus and the IntelliFlo RS-485 data port.
OmniLogic Drops Connection Between Pool and Pump
If you find that the HUA of the pump being recognized in the Omnilogic unit matched the HUA of the Ecostar pump itself but the pump does not turn on then the OmniLogic may have lost the connection.[13]
You can try powering everything off including the main circuit board for the OmniLogic and powered it all back on.
Or go back into the config wizard and you may find the pool had no pump assigned to it. If so select the pump from the drop down menu while in config wizard, save, reboot.
Sometimes it does that with power surges or power cycles or if you are going in and making changes "too much" in the config wizard.
CHLOR Too Low Salt Chlorinator
This error can come from having too low salt, or cold water temperature, or because the OmniLogic dropped the flow sensor location from the configuration.[14] You should first check your salt level preferably with a K-1766 salt test kit. Then check that your flow sensor is still in the OmniLogic configuration.
Buttons Become Unresponsive
See Hayward ProLogic - Buttons Become Unresponsive
Colorlogic Lights and OmniDirect
These documents may be helpful in solving ColorLogic problems:
- Hayward ColorLogic Installation Guide
- Hayward Universal ColorLogic & CrystaLogic Troubleshooting Guide Residential
The OmniDirect mode only supports the new lights that are low voltage. 120V lights need to go through a relay, while the low voltage lights are connected directly to a specific input on the OmniLogic. OmniLogic is capable of sending a digital message over the low voltage line to change light color, but the light has to have the appropriate firmware and hardware to receive the message and act on it to change colors.[15]
ColorLogic 4.0 120V, does not support OmniDirect, only the low voltage lights built after June 2018,
It’s mentioned in the newer manual....
” Omni Direct Mode (Universal ColorLogic Lights built after June 2018) Universal ColorLogic lights built after June 2018 are capable of Omni Direct mode. To run in this mode, select Omni Direct mode when configuring your lights in the Configuration Wizard (see Installation Manual). The OmniLogic will test your lights during configuration to confirm that they support Omni Direct mode. If so, the ColorLogic Control Screen will display a Settings icon rather than a Synchronize button, which allows both Speed and Brightness control shown on the diagram below. Note that Settings will also be an option when setting up schedules and timers for lights running in Omni Direct mode. Refer to your Universal ColorLogic manual for more information about Omni Direct mode.”
A member reported[16] the upgrade process as:
“I found a local hayward dealer and ended up buying:
- LSCUS11050 (50') Spa
- LPCUS11050 (50') Pool
Both had a blue label on the outside (3x5 label with serial# and part #). So this confirms what was stated on this forum about knowing which is good and not. Turns out my existing lights were same model just from 2014-2015 timeframe (no omniDirect) both were not working.
The installer manual that came with the lights talked about OmniDirect Mode so I know these were the right ones.
Steps:
- I upgraded my MPP and MSP the day before to ensure I didn't run into any problems.
- Checked Transformers. Good. My existing lights were 12v.
- Checked where transformer was installed. Had to move from Relay Bank HV to Main Panel HV as it was stated that omniDirect only works on main relay HV1-HV4.
- Entered service mode to change light to omnidirect mode. did a bunch of clicking and finished.
- Had to configure lights through a power cycle scheme to get them into "omniDirect Mode" on the light themselves. READ the steps in the install manual as I wasn't paying enough attention and couldn't figure this out. Re-read, followed to a tee and got everything set right.
Start to finish in about an hour. Not bad for a DIY'er. The OmniLogic app how shows all of the new colors, shows, brightness and speed for shows and works way better than the old model.”
OmniLogic Touchscreen LCD
The OmniLogic touchscrren LCD loses calibration and the touch points do not align with the text displayed.
You can try calibrating the screen if you can figure out the touch points.[17] The process is:
- Config
- arrow to right - Shell Command
- reserve for trained
- Erase calibration
- Get little boxes in each corner, have to touch them one after the other and finally one in the middle.
- Power down and then back up
Some screens will not be fixable depending on whether you are able to "touch" the needed spots. If your OmniLogic is within its 3 year warranty then make a warranty claim. Even if a bit out of warranty try and make a warranty claim with Hayward.
The screen part number is HLX-LCD to replace just the screen. HLX-LCD-DSP is the display with the board. Hayward instructions for replacing the HLX-LCD say:
WARNING: THE LCD SCREEN CABLE CONNECTOR IS VERY FRAGILE.When viewing the underside of the MSP Local Terminal, you’ll see the MSP circuit board which is held in place by 4 Phillips head screws. Before removing the screws, the LCD screen ribbon cable must be disconnected from the circuit board. The connector that holds the ribbon cable is very fragile and care must be taken when attempting to unlock the latch.
Hayward made a change to the to the OmniLogic’s (HL-Base) LCD.[18] They switched to a new manufacture for the LCD in the MSP. The part number for the new LCD is HLX-LCD0520.
- If the HL-Base was manufactured prior to May 14, 2020 continue to use HLX-LCD for a replacement LCD screen.
- HL-Base manufactured after May 14, 2020 will use the new LCD screen with the part number HLX-LCD0520. If a replacement LCD is needed, use only HLX-LCD0520.
- HLX-LCD0520 is not backwards compatible with units manufactured prior to May 14, 2020.
- HLX-LCD cannot be used in units manufactured after May 14, 2020.
.
- ↑ https://www.troublefreepool.com/threads/hayward-omni-logic-firmware-update-be-careful-because-the-firmware-updates-are-found-in-different-places-on-the-hayward-website.197019/
- ↑ https://www.hayward-pool.com/shop/en/pools/omnilogic-i-auomni--1
- ↑ https://www.hayward-pool.ca/shop/Product_10201_10057_73531_-1___
- ↑ https://www.troublefreepool.com/threads/hayward-omnilogic-lighting.197475/post-1744604
- ↑ https://www.troublefreepool.com/threads/cannot-upgrade-omnilogic-firmware.202013/post-1816458
- ↑ https://www.hayward-pool.com/assets/static-content/pools/omnilogic-support/release-notes/Release-Notes-R4.1.0.pdf
- ↑ https://www.troublefreepool.com/threads/hayward-omnilogic-r4-0-0-msp-released.221155/post-1936723
- ↑ https://www.troublefreepool.com/threads/thoughts-on-upgrading-to-newer-hayward-omnilogic-firmware.205384/post-1808406
- ↑ https://www.troublefreepool.com/threads/hayward-omnilogic-option-to-clear-ddt-is-missing.202967/post-1789743
- ↑ https://www.troublefreepool.com/threads/hayward-omnilogic-question.200609/post-1770860
- ↑ https://www.troublefreepool.com/threads/omnilogic-not-detecting-hua-for-hayward-vsp.98518/post-852296
- ↑ https://hayward-pool-assets.com/assets/static-content/pools/omnilogic-support/release-notes/Release-Notes-R3.2.0.pdf
- ↑ https://www.troublefreepool.com/threads/omnilogic-ecostar-pump-control-not-working.167372/post-1477743
- ↑ https://www.troublefreepool.com/threads/misleading-chlor-too-low-salt-chlorinator-1-alarms.198806/post-1755106
- ↑ https://www.troublefreepool.com/threads/colorlogic-lights-with-omni.201410/post-1777807
- ↑ https://www.troublefreepool.com/threads/colorlogic-lights-with-omni.201410/post-1816587
- ↑ https://www.troublefreepool.com/threads/hayward-omnilogic-touch-screen-problem.144260/
- ↑ https://www.totallyhayward.com/techservices/attachments/Technical%20Updates%20for%20Pool%20Professionals%20May%202020.pdf


