| Line 95: | Line 95: | ||
He cut half of both sleeves on the 1-1/4F side of the thread and the 1-1/4 sleeve on the 90D elbow so that it made an exact fit below filter housing. 1-1/4 pipe between both 1-1/4 elbows and 1/4 turn pipe are cut 4 inches. He will then connect a 10ft 1-1/2 in pipe from 1/4 turn to drain that's away from house. | He cut half of both sleeves on the 1-1/4F side of the thread and the 1-1/4 sleeve on the 90D elbow so that it made an exact fit below filter housing. 1-1/4 pipe between both 1-1/4 elbows and 1/4 turn pipe are cut 4 inches. He will then connect a 10ft 1-1/2 in pipe from 1/4 turn to drain that's away from house. | ||
| + | |||
| + | It was suggested a support be put under the valve in the picture below to prevent cracking if someone steps on the pipe. | ||
[[File:Pentair Cartridge Filter Drain mod.jpg|thumb]] | [[File:Pentair Cartridge Filter Drain mod.jpg|thumb]] | ||
Latest revision as of 15:08, 23 April 2024
Cartridge Filters
Cartridge filters capture particles down to 10-15 microns.
Colored stains on filter cartridges are usually caused by metals in the water. Blue/green turquoise stains are from copper.
How to Clean a Cartridge Filter
Basic cleaning instructions can be found in Pool School at Maintenance and Cleaning of Pool Filters.
In a perfect situation you would have a second set of grids soaking in TSP and when needed exchanged with the currently dirty grids. Soaking grids is the most efficient way to clean them. Using a high pressure nozzle only pushes the contaminates deeper into the grid lowering its efficiency to pass water through it. TSP helps removes the oils.[1]
Cleaning Tools
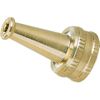
Use a garden hose with a gun type nozzle or brass sweeper nozzle.
Special filter cleaning tools can be found at FilterFlosser and AquaComb.
It is not recommended to use a pressure washer to clean a cartridge filter. Unless done extremely carefully at a low pressure, a pressure washer will tend to tear the filter fabric.[2] You also run the risk, if there is too much pressure, of pushing the small particles into the interior of the filter elements.
Normal garden hose pressures are more than sufficient if you use an appropriate nozzle.
There have been mixed reviews of using the Worx Hydroshot for cleaning filters.[3]
Cleaning Tool Comparison
I put the brass nossle, the Filter Flosser, and the AquaComb to the test to clean 4 Hayward cartridges.[4]
The Filter Flosser wasn't worth the effort. It shoots some nice streams, but the added feature of the combs in the AquaComb make it the overall winner.
The AquaComb is better than the brass nozzle because it's a more efficient and cleans a larger area saving both water and time. The brass nozzle delivers a nice hard blast of water, but it has a limited area and takes more time.
The fingers (comb) on the AquaComb make it much easier to get deep into the filter. If you need a little extra blast of power in a smaller area, you can turn the AquaComb sideways and deliver more water vertically. This came in handy a couple of times and worked really well for a final once over.
Overall the brass nozzle does a very good job for the price, but you'll probably spend a bit more in water (for some areas this is an issue). I really liked the AquaComb and its now my tool of choice for cleaning the filters. It was faster, easier and used less water.
Cartridge Cleaning Instructions for Chlorine Users
When should a cartridge element be cleaned?
For swimming pools, clean the cartridge when filter canister pressure reaches 25% above the initial system or new cartridge starting pressure.
For spas, establish a routine cartridge cleaning schedule based on the amount of spa usage. If Baquacil® is used as a sanitizer, the filter element must be cleaned with Baqua Clean® before any cartridge cleaner is used (Step 4). Please refer to "Cartridge Cleaning Supplement for Baquacil® Users."
What is the procedure to clean my cartridge?
- Remove the cartridge from the filter housing following the manufacturer's instructions.
- Use a garden hose with a straight flow nozzle to wash down the filter element. Work from the top down, holding the nozzle at a 45 degree angle, and wash all the pleats with emphasis between pleats.
- Rinse until all dirt and debris are gone.
- For all spa cartridges and elements used in swimming pools where perspiration, suntan lotions, and other oils are present, soak the element for at least on hour (overnight is most effective) in (1) a commercial filter cleaner; or (2) one cup trisodium phosphate (TSP) to five gallons water.
- Rinse the cartridge again to remove oils and cleaning solution.
- If the filter has a coating of alage, calcium carbonate (residue from calcium hypochlorite), iron, or other minerals, soak the cartridge in a solution of one part muriatic acid to twenty parts water until all bubbling stops. WARNING: Failure to remove all oils and cleaning solution before acid soaking will result in a permanent restriction of water flow and cause premature cartridge failure.
- Rinse the cartridge clean and reassemble housing.
Don't use acid to clean a filter cartridge without first cleaning with a degreaser like TSP. If there is any grease on the filter, acid will solidify it, quite possibly damaging the cartridge.
A note on dishwasher detergent chemistry - automatic dishwasher detergent hasn't contained TSP (trisodium phosphate) since the 1970's. The EPA all but banned the use of phosphate-based cleaning formulations as they were, unnecessarily, branded as the main cause of eutrophication of waterways (farm runoff is the real source of phosphate pollution in waters). Most dishwasher detergents utilize carbonates and organic surfactants.[5]
You can still purchase TSP as a granular powder in hardware stores (often sold in the paint section) but be careful not to pickup the "eco-friendly" TSP...which is not TSP at all but sodium carbonate (washing soda). Real TSP is banned in some US states though. TSP substitute is pretty worthless IMHO. (it is soda ash and sodium metasilicate) The most common brand sell the real stuff in a red box and the useless stuff in a green box.[6]
Use heavy duty arm length rubber gloves and wear goggles before handling Muriatic acid. Use an over sized plastic container because the neutralizer will take up volume. Put the measured amount of water into the container first MOST IMPORTANT, always add the acid to the water. NEVER add the water to the acid.
Ammonia will also neutralize Muriatic acid. Ammonia will react less violently than baking soda. Additionally, use your pool PH Test to affirm that you have neutralized the acid wash. Look for a PH of 7.0 before you dispose of the solution.
NOTE: Unicel does not recommend the use of diatomaceous earth (DE) with cartridge filters. DE particles will become trapped in the body of the media and shorten cartridge life. If desired, a cellulose fiber (synthetic DE) can be used in moderation.
Cartridge Cleaning Supplement for Baquacil/Biguande Users
What should I know about cleaning my cartridge element if I use a biguanide system such as Leisure time FreeTM or Baquacil®?
Unlike chlorine which oxidizes the bacteria in the water, the active ingredient in biguanide systems, polyhexamethylene biguanide (PHMB), destroys the bacterial cells. PHMB locates and binds to the bacterial surfaces, and then attacks the outer bacterial wall. Once this wall has been compromised, the inner cell membrane (the cytoplasmic membrane) is destroyed. This destruction allows the cell contents to disperse into their surroundings where they are further broken down into their elemental parts by a non-chlorine oxidizer such as Leisure Time BoostTM or Baqua Shock®.
In addition, Leisure Time BoostTM and Baqua Shock® are mild coagulants which combine bacterial cells and other small particles in the environment into particles large enough to be trapped by the filter. The resulting deposit is a gray sticky film on the media which can only be removed with Leisure Time Filter CleanTM or Baqua Clean®. If trisodium phosphate (TSP) or any TSP type cleaner is used prior to stripping the film, the cleaner and the gray film will combine to form a gum-like substance. Once this occurs, the substance cannot be removed from the media and the filter cartridge must be replaced.
WARNING: Follow all manufacturer's instructions, warnings and cautions when using Leisure Time FreeTM or Baquacil® products.
Leisure Time® and Leisure Time FreeTM are registered trademarks of Advantis Technologies, Inc.
Lessons Learned in a First Time Cleaning
A member shared what he learned the first time he cleaned his cartridge filter.[7]
- Cleaning Filter - The first thing I did was take apart the swimclear filter and clean the four CX875REM cartridges in it. I wanted to do this since this was a brand new system and it had not been cleaned since the pool was filled three months ago. All I could think of was that the filter was full of left over crud in the pipes, pebbletec plaster, and gunite pieces. I wanted it to filter like new, so I wanted to restore it to new.
- Taking it apart - I opened the relief valve on top and unscrewed the drain plug at the bottom. The drain plug was a bit inconvenient around plumbing but doable. Once water stopped draining, I had to get a wrench and a 3/4" socket to undo the band around the filter. This is probably the least user-friendly filter that I have ever seen. Instead of just using a screw on band, you literally have to use a wrench. Once the band was off, you separate the two halves of the filter and remove the manifold on top of the four filters. Then it is a matter of taking out each filter and cleaning them.
- It was a mess to clean - I was right. The filter compartment and the filters were full of pebbles and junk. I cleaned each filter with an AQUA COMB purchased off of Amazon. Best tool ever! I washed the debris from the filter compartment using a hose and spraying it out the drain hole. IF YOU HAVE A NEW POOL, DEFINITELY CLEAN THE FILTER AFTER A FEW MONTHS TO REMOVE THE STARTUP GUNK.
- Putting it back together - Should be easy right? Just reverse the steps and you should be golden. Wrong! When I did the obvious and turned back on the pump, water sprayed out of the filter from the middle band like crazy. No matter how tight I set the band, water still leaked. So read the manual right? Well since this was put in by Blue Haven, Hayward makes special filter models for them. Manuals are not easy to find. However according to instructions for a C4030 filter, you were supposed to only tighten to 150 inlb. Who the heck has a torque wrench that is in-lbs and is large enough to hand 3/4" nut? Ugh! So I took it apart again and put it back together thinking maybe something didn't sit just right. Leaks again! So I took off the lid and wiped the edge until it was clean of any possible dust. I took off the gasket from the bottom half and did the same on the bottom ledge. Put back on the gasket and put it back together. No leaks! Lesson learned: WHEN YOU REASSEMBLE YOUR FILTER, WIPE OFF THE RIMS OF THE TWO CONTAINER HALVES FROM ANY DUST.
Filter Drain Extension
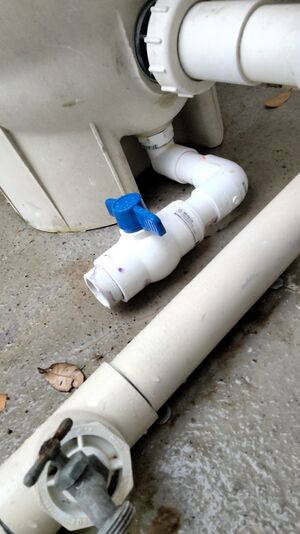
A member constructed an extension to the filter drain to route water using the following:[8]
- 1-1/2 thread to 1-1/4 F
- 1-1/4 F to M 90D elbow
- 1-1/4 90D elbow
- 1-1/2 1/4 turn pipe
He cut half of both sleeves on the 1-1/4F side of the thread and the 1-1/4 sleeve on the 90D elbow so that it made an exact fit below filter housing. 1-1/4 pipe between both 1-1/4 elbows and 1/4 turn pipe are cut 4 inches. He will then connect a 10ft 1-1/2 in pipe from 1/4 turn to drain that's away from house.
It was suggested a support be put under the valve in the picture below to prevent cracking if someone steps on the pipe.
Repairs
Repairing a Broken Band
Use hot glue to glue broken bands back together. If you clean the filter in the morning, by late afternoon on a hot day, they are dry enough to hot glue the bands. You only need the surface of the pleat and the band to be dry and it really doesn't need to be completely dry either.[9]
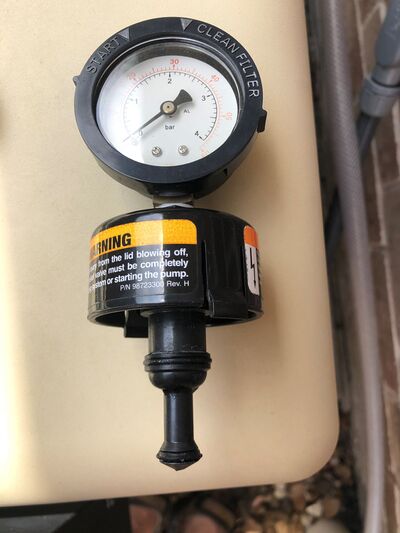
Pentair Highflow Manual Air Relief Valve Leaking
There are two O rings in the air relief that can be lubed and replaced.[10]
- slightly pull out the 2 tabs (opposite each other) and continue to rotate counterclockwise and slightly pull up to release the top part which also contains the pressure gauge on top.
- there are 2 little protruding tabs that must align to 2 holes to separate the top from the lower piece (the lower piece remains on the filter top).
- There are 2 o-rings on the stem of the part that you removed. These create a seal when in full lock position. If either are damaged then that could be causing the piece not to full rotate into the lock position.
Ace Hardware has 2 orings that match the original orings. The lower one (the smallest of the 2) is 5/16" ID x 1/2" OD and 3/32 body diameter. ACE #59597. The upper o-ring is 3/4" ID x 7/8" OD and 1/16" body diameter. ACE #56012. They cost 0.79 cents and 0.69 cents respectively.
To remove the O rings squeeze with 2 fingers (on opposite sides) so that it makes like an oval and you can then roll the oring out of the groove. Try not to use a sharp object to dig it out of the groove as that can damage the oring. Once out, clean the groove and then also clean the oring with a paper towel. Do not stretch the oring. Then take some Pool Lube and rub on the oring. Since these are small o-rings you can just work it around with your finger in palm of your hand.
The big O-ring should always be lubed if you remove the top. Since this is a large o-ring seal, remove it with 2 hands and try not to stretch it. Put lube on o-ring and work it around the entire circumference with your fingers. You may have to add several daps of Pool Lube as you work it around. Just let the o-ring hang as you work it around, do not stretch or pull on it. Also, clean the bottom and top sections where the o-ring will seal - you want to wipe those down with a rag to remove debris. Then place the o-ring back in place on the bottom half of the filter and ensure it is not twisted and sits properly on the circumference of the filter housing.
Cracked Filters
Cracked filters can be due to water going from the inside of the filters to the outside instead of from the outside to the inside. Check that the in and out pipes are correct in the filter.[11]
Cracking filters can be due to excessive water flow. Check the maximum rpm that the pump uses.
Pentair 2019-2020 Filter Cartridge Defects
A filter service tech who in in charge of scheduling 7000 filter cleans and filter repairs every year posted that since 2019, Pentair has had an end cap molding issue at their cartridge plant. They changed the end cap material in the beginning of 2019 when they switched from the chemical resistant green end caps to blue end caps.[12]
He has sent out warranty claims for over 200 2019 and 2020 CCP 320, 420, and 520 filters installed that have end caps that say "Pentair Aquatic Systems" because they were completely falling apart even with perfect chemistry. It has gotten better recently and the newest style just says Pentair. There is still a lot of discoloration with the new ones, but the material used has improved.
When to Replace Cartridges?
Cartridges can last quite a while if you take good care of them. Aside from an obvious hole or tear, they can eventually get clogged. A clogged cartridge shows up as the filter pressures starting quite high right after cleaning the cartridge, compared to the filter pressure observed when the cartridge was new.[13]
If after you clean cartridges and get normal filter pressure, and then the pressure rises back up to your "need to clean" pressure within a week or even a couple of days then the cartridge needs to be replaced.[14]
Overnight detergent soak followed by an acid soak never removes everything when cleaning a cartridge. So, physically intact but "well used" cartridges do eventually need to be replaced. However, with proper care this should not happen for a long time.[15]
Note the clean pressure on a new set and every time you clean as well. Just so you can keep track. The clean pressure may rise over time and that is normal wear.
Winterizing a Cartridge Filter
- The drain plug should be removed and the filter drained for the winter
- The PSI gauge should be removed and taken indoors
- Cartridges should be removed and cleaned
- Cartridges should be stored indoors, not in the filter, and reinstalled at opening
.
- ↑ https://www.troublefreepool.com/threads/soaking-cartridge-filters-in-acid.263202/post-2302204
- ↑ https://www.troublefreepool.com/threads/re-how-to-clean-a-cartridge-filter.4224/post-475356
- ↑ https://www.troublefreepool.com/threads/re-how-to-clean-a-cartridge-filter.4224/post-1525462
- ↑ https://www.troublefreepool.com/threads/re-how-to-clean-a-cartridge-filter.4224/post-396989
- ↑ https://www.troublefreepool.com/threads/ahhsome-cleaner-and-no-filter.193221/post-1724623
- ↑ https://www.troublefreepool.com/threads/ahhsome-cleaner-and-no-filter.193221/post-1724711
- ↑ https://www.troublefreepool.com/threads/hayward-swimclear-c4530bhmb-filter-lessons-learned.260823/
- ↑ https://www.troublefreepool.com/threads/perfect-filter-drain-mod.290902/#post-2553198
- ↑ https://www.troublefreepool.com/threads/re-how-to-clean-a-cartridge-filter.4224/post-340682
- ↑ https://www.troublefreepool.com/threads/pool-filter-valve.225494/post-1977982
- ↑ https://www.troublefreepool.com/threads/salt-cell-strainer-always-full-of-debris.208414/post-1829497
- ↑ https://www.troublefreepool.com/threads/pentair-filter-cartridge-deteriorating-a-known-problem.285188/post-2499875
- ↑ https://www.troublefreepool.com/threads/when-to-replace-cartridges.18073/post-151454
- ↑ https://www.troublefreepool.com/threads/when-to-replace-cartridges.18073/post-151485
- ↑ https://www.troublefreepool.com/threads/when-to-replace-cartridges.18073/post-151935


