
TLDR:
Question 1 - where should I cut to put in the replacement jandy valve?
Question 2 - Do I need to replace my filter housing?
__
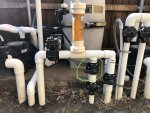
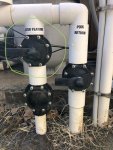
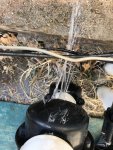
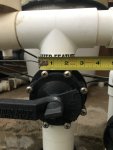
Another Texas freeze victim here. I managed to get the drain plugs out of the pumps and filter when the power went out and before things froze. It seems like we managed to get away with one crack in a Jandy valve. Note, the previous pool guy labeled this valve “water feature” when in actuality it is the return to the bottom of the spa that initiates the over flow/cascade into the pool when in “pool” mode. I actually think this might just be an expansion of a crack that was already there as I’ve had issues with the pump loosing prime when off and the sound is the same as it was before the freeze, just bigger/louder. I think the crack was so small before that I just couldn’t locate it.
Is this the right part? Amazon.com : Jandy 4724 2-Port 1-1/2 to 2-Inch Positive Seal NeverLube Valve : Swimming Pool Filter Valves : Garden & Outdoor
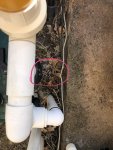
My problem is this valve is in a very awkward place to fix. Any recommendations on the best places to cut to fit in a new one?
If it helps I don’t think we use the automatic In-Line Chlorine/Bromine Feeder. At least I’ve never touched it before. We have a saltwater pool and in the winter when the salt/chlorine converter is not working I just use bleach. Should I just remove it from the system to give myself more room to work with?
If I need to replace the Jandy valve AND the check valve since they are plumed so close together I will. I’m not seeing a way around that at this point.
Any creative suggestions?
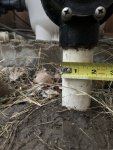
While I’m at it; the seepage around the middle of the DE filter has been there awhile. I have replaced and lubed that gasket and the seepage remains. I think the filter is original which would make it 14 years old. I replaced the grids last year. Is there any easy way to fix that or do I need to look into replacing the whole filter housing while I’m out there working with the pipes?
Question 1 - where should I cut to put in the replacement jandy valve?
Question 2 - Do I need to replace my filter housing?
__
Another Texas freeze victim here. I managed to get the drain plugs out of the pumps and filter when the power went out and before things froze. It seems like we managed to get away with one crack in a Jandy valve. Note, the previous pool guy labeled this valve “water feature” when in actuality it is the return to the bottom of the spa that initiates the over flow/cascade into the pool when in “pool” mode. I actually think this might just be an expansion of a crack that was already there as I’ve had issues with the pump loosing prime when off and the sound is the same as it was before the freeze, just bigger/louder. I think the crack was so small before that I just couldn’t locate it.
Is this the right part? Amazon.com : Jandy 4724 2-Port 1-1/2 to 2-Inch Positive Seal NeverLube Valve : Swimming Pool Filter Valves : Garden & Outdoor
Amazon.com: Jandy 7235 180-Dgree, 1-1/2-Inch to 2-Inch Check Valve: Garden & Outdoor
Amazon.com: Jandy 7235 180-Dgree, 1-1/2-Inch to 2-Inch Check Valve: Garden & Outdoor
smile.amazon.com
My problem is this valve is in a very awkward place to fix. Any recommendations on the best places to cut to fit in a new one?
If it helps I don’t think we use the automatic In-Line Chlorine/Bromine Feeder. At least I’ve never touched it before. We have a saltwater pool and in the winter when the salt/chlorine converter is not working I just use bleach. Should I just remove it from the system to give myself more room to work with?
If I need to replace the Jandy valve AND the check valve since they are plumed so close together I will. I’m not seeing a way around that at this point.
Any creative suggestions?
While I’m at it; the seepage around the middle of the DE filter has been there awhile. I have replaced and lubed that gasket and the seepage remains. I think the filter is original which would make it 14 years old. I replaced the grids last year. Is there any easy way to fix that or do I need to look into replacing the whole filter housing while I’m out there working with the pipes?
Attachments
Last edited:
 Where do you stop???

