SWG and other questions

Don't raise the salt level any further. When i installed my RJ45+, I took the salt to 3000. The unit works fine. I believe anything 2800 or above will work. A salt reading on the lower end is supposed to keep the amps and heat lower in the control unit.

Hope the pool light works out for you.

The heater - and your new SWG controller - also need to be connected to the bonding grid. You should be able to check the water bond with a meter. Chances are the light niche acts as the water bond.
 
  • Like
Reactions: swimspaguyy11
Don't raise the salt level any further. When i installed my RJ45+, I took the salt to 3000. The unit works fine. I believe anything 2800 or above will work. A salt reading on the lower end is supposed to keep the amps and heat lower in the control unit.

Hope the pool light works out for you.

The heater - and your new SWG controller - also need to be connected to the bonding grid. You should be able to check the water bond with a meter. Chances are the light niche acts as the water bond.

Thanks, I will stop adding salt, my guess is I am at around 3200 now, I will confirm today. I would imagine with splash out and lots of rain I should be able to get it back down closer to 3000 easily.

I will download the manual for the heater and figure out where the bond should be connected. Since I just have the single bare wire coming out of the ground, I guess I will connect it to a grounding block and then connect from that to the various components.

When you say check the water bond, you mean stick one end of the probe in the pool and check continuity to the bonding wire coming out of the ground near the pump?

Thanks.
 
Yup - check the water bond as you desribe.

On the bond wire connections - just be sure the wire at the connection point and the bonding lug are free of oxidation and bright shiny copper.

Unless the pool overflows or needs draining, the salt lefel won't change all that much. Splash out will affect the salt level a little.
 
  • Like
Reactions: swimspaguyy11
Fear sells and get clicks that pay content creators. Pool equipment corrodes whether you have a salt system or not. SWGs are easy to put the blame on.

NEC requires gas heaters to be connected to the bonding grid.

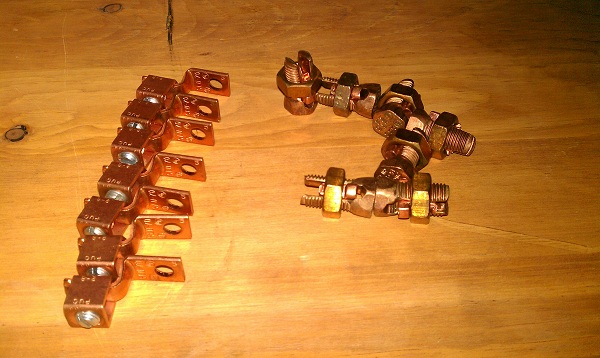
Copper lugs and split bolts are used to connect the bonding wires together into one loop.

Copper_lugs_and_split_bolts.jpg
 
  • Like
Reactions: proavia
Yup - check the water bond as you desribe.

On the bond wire connections - just be sure the wire at the connection point and the bonding lug are free of oxidation and bright shiny copper.

Unless the pool overflows or needs draining, the salt lefel won't change all that much. Splash out will affect the salt level a little.

After removing a lot of oxidation from the bonding wire, I checked the water bond to my loose bonding wire and it came up as 150ohms, so I would say its pretty good. I am actually surprised I was able to get such a good reading because when I stuck my 2 meter probes in the water 2ft apart I got like 170k ohms, not sure what the science is behind that difference....


Fear sells and get clicks that pay content creators. Pool equipment corrodes whether you have a salt system or not. SWGs are easy to put the blame on.

NEC requires gas heaters to be connected to the bonding grid.

Copper lugs and split bolts are used to connect the bonding wires together into one loop.

Copper_lugs_and_split_bolts.jpg


My heater doesnt have a bonding lug, I checked the manual and it shows 2 positions you can put it on the left or right side of the exterior case. I bought the offset copper lugs yesterday, I just scrape off the paint before I attach it I assume? I didnt see your post until today but yesterday I bought the offset lugs and split bolt but I bought 1 big copper split bolt, is that not correct? I figured I take the wire coming out the ground and the wires that I am going to install going to the pump, swg, and heater and stick them all in the single split bolt, should I be using 1 split bolt per device instead? I guess with the picture you posted you attach each branch to the main bonding wire with it's own split bolt?

EDIT: Also, should I be wrapping the split bolt in splicing tape to prevent oxidation? All the videos on YT show them being wrapped but they are mostly working with insulated conductors and not bare copper like the pool bonding system is.

EDIT2: I read that putting as many conductors that will fit into a single split bolt is common practice but not NEC compliant.
 
Last edited:
should I be using 1 split bolt per device instead? I guess with the picture you posted you attach each branch to the main bonding wire with it's own split bolt?

That is best practice.

EDIT: Also, should I be wrapping the split bolt in splicing tape to prevent oxidation? All the videos on YT show them being wrapped but they are mostly working with insulated conductors and not bare copper like the pool bonding system is.

Not necessary.

EDIT2: I read that putting as many conductors that will fit into a single split bolt is common practice but not NEC compliant.

Lot's of things work in electrical but are not correct.

You want a low resistance connection and circuit for the bonding grid and one wire per split bolt gives the best connection.
 
  • Like
Reactions: swimspaguyy11
The Intermatic T101 or 104 timers can have an optional 156T4042A Heater Control Switch Kit that will open the fireman's switch on the heater 20 minutes before the timer, usually controlling the filter pump, will shut off. The heater control will prevent the heater from operating EXCEPT when the Time Switch contacts are closed (automatically or manually).

Models that have the 24-Hour Mechanical Time Switch in Enclosure with Pool Heater Protection are:
  • T101P201 - 120V SPST plastic enclosure with Pool Heater Protection
  • T101R201 - 120V SPST metal enclosure with Pool Heater Protection
  • T104P201 - 240V DPST plastic enclosure with Pool Heater Protection
  • T104R201 - 240V DPST metal enclosure with Pool Heater Protection

The 156T4042A Heater Control Switch Kit can be added to any existing T101 or T104 timer.


No, you should not use bleach that contains Chloromax in your pool. Chloromax are polymers that will create foaming.

Look for liquid pool shock in Walmart, HD, or your local pool stores.


Unfortunately I can't easily add this, my pool has 3 lines going to it. 120v line for the light, 120v line for the pump, 120v line for the service outlet. The heater is connected to the 120V pool service outlet, that is why it always has power even when the pump is off. I have I guess 3 options at the moment:

1) Change the heater so it's wired off the pump timer so at least it turns off and doesnt keep running after the pump turns off (or perhaps if i can fix the heater, see below)
2) Change the service outlet so it becomes a dedicated heater circuit. This would then allow me to install the pool heater control switch. I would lose the service outlet but A) its not used much anyways because it's not the only power up there and B) if i need it i just need to have power going to the heater, which will be whenever the pump is on which is most of the time anyways.
3) install some kind of zwave relay at the heater, and install a zwave relay for the pool pump, and do a kind of home made automation system using home assistant.


Based on the internal skimmer pic...
  • There are 2 ports inside the skimmer, one is plugged - the open port runs to your equipmemt pad.
  • The port in the side of the pool below the skimmer is probably a vac port and is plumbed back to the equipment pad. As it is threaded, it is missing its safety cover.
On the suction side of the pump I see 2 pipes with a shutoff valve between them. What happens if you close that valve? My guess is there will no longer be suction to the port in the pool and skimmer suction will increase.

The threaded port should have a safety cover installed - even if the valve at the equipment pad is off - similar to this...

The pool store didnt have the flip cover so I just got a plug for now. The pool store guy seemed to think it should have a screen over it and be left open. He also agreed that the valve probably should have been on that and not the skimmer though.

That is best practice.

Lots of things work in electrical but are not correct.

You want a low resistance connection and circuit for the bonding grid and one wire per split bolt gives the best connection.

Thanks, I returned the single large split bolt and bought one for each device.
 
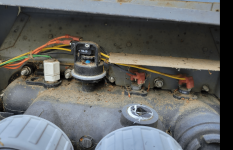
I forgot to put this in the previous post, I took my heater apart to clean it because it smelled like burning Crud and hurt my lungs to be near it, it was full of leaves and debris, probably hasnt been cleaned out since it was installed 7 years ago. While I had it open I checked the various sensors on the manifold and I am not sure which is the flow valve but assuming its a Normally open or normally closed switch, and assuming its not the device on the far left, it's broken and that would explain why the water heats to like 150F in the heater after the pump shuts down because the heater doesnt seem to know when flow has stopped.

I checked the 3 devices on the right and they were all fully closed at all times according to my meter, if the pump was running or not. I didnt check the device on the left because the wires were exposed but I realize now I should have checked them at the service panel where they connect on the other end. It looked like a temp sensor though and I assumed the big black device was the flow sensor since its directly over the intake port. That black device showed continuity if water was moving or not.


1653315541256.png
 
Unfortunately I can't easily add this, my pool has 3 lines going to it. 120v line for the light, 120v line for the pump, 120v line for the service outlet. The heater is connected to the 120V pool service outlet, that is why it always has power even when the pump is off. I have I guess 3 options at the moment:

1) Change the heater so it's wired off the pump timer so at least it turns off and doesnt keep running after the pump turns off (or perhaps if i can fix the heater, see below)
2) Change the service outlet so it becomes a dedicated heater circuit. This would then allow me to install the pool heater control switch. I would lose the service outlet but A) its not used much anyways because it's not the only power up there and B) if i need it i just need to have power going to the heater, which will be whenever the pump is on which is most of the time anyways.
3) install some kind of zwave relay at the heater, and install a zwave relay for the pool pump, and do a kind of home made automation system using home assistant.

The 156T4042A Heater Control Switch Kit that will open the fireman's switch on the heater 20 minutes before the timer. If does not open the 120-V AC and will work fine with your heater connected to the service outlet.


From the right int he pic below - you have two High Limit Sensors (HLS), one for 140F and one for 135F. They should be closed unless the water exceed those temperatures.

Then you have the Water Pressure switch. That should be open when the pump is off and closed when the pump is running.


1653315541256-png.414071
 
The 156T4042A Heater Control Switch Kit that will open the fireman's switch on the heater 20 minutes before the timer. If does not open the 120-V AC and will work fine with your heater connected to the service outlet.


Unfortunately I think I still cant use it, my timer is in the garage, not by the pool, I dont have an extra pair of conductors running to the pool that I could use for the firemens switch conductors. That makes doing my home made automation using zwave relays even easier though, I can just put the relay on the firemens switch.


From the right int he pic below - you have two High Limit Sensors (HLS), one for 140F and one for 135F. They should be closed unless the water exceed those temperatures.

Then you have the Water Pressure switch. That should be open when the pump is off and closed when the pump is running.

Thanks, that confirms my pressure switch is broken and permanently closed. I read that it should be removed every winter and never has been so that doesnt help. I just ordered a new one from Amazon. Thanks much.


I performed the ascorbic acid test on my stains and its amazing how well it worked. The sock was like a magic eraser, just completely removing all the stains with minimal effort. Now my floor is stripped though from where I wiped the dark stains, because now I realize the entire liner is stained. I am iffy on wanting to bring my chlorine to 0 to do the ascorbic acid treatment. Has anyone had any success putting a big sock over the pool brush loaded with crushed vitamin c pills? I feel like it would work pretty good since it comes off so easily when wiped with the sock. EDIT: reading that thread again it looks like I need sequestering agent to prevent all this iron I am removing with the sock to not end up right back on liner/stairs as a stain.


I still havent been able to get the salt system installed because things keep coming up but I need to get it installed ASAP because I am burning through liquid chlorine fast. I've already gone through 2.5 gallons of 10% trying to keep it at FC of 8, it's usually 6 when i test daily and I add like 2/3 of a gallon based on pool math app.
 
Last edited:

Enjoying this content?

Support TFP with a donation.

Give Support
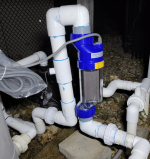
I got my SWG cell installed, things didnt go perfectly, I had the glue setup on me fast a couple of times on the manifold so I didnt get everything perfectly straight but I think it will work. the biggest issue is I ended up like 1/2-3/4 inch too wide and had to really force it into place between the 2 unions i installed. its kind of squeezing my vertical manifold together, do you think this is ok? It got late so I didnt wait for the glue to fully cure and turn it on and check for leaks, that is going to happen today. I might try to find a shorter female to female coupler in the left of the first photo, I think that will make it fit nicer and less tight. Now just need to do the electrical.

1653485265776.png

1653485295207.png


Regarding my light. I bought the new bulb, and I got a new gasket from thee local pool store and I went to replace it and the gasket seemed really nicely sealed still and in great condition but there was a lot of water inside the fixture when I opened it. For now I left it all opened up because I didnt want to waste the $50 led bulb. I noticed there was some silicone around where the wire goes into the housing, so I am suspecting it might be leaking from the connection and not the gasket. How should I go about handling that, should I try to silicone it again? Also its all rusted inside from probably years of water in it, do I need a new housing? How is the electrical changed if I need to change the housing? Does it unplug from that gland at the housing or I need to drain down the pool and change it from the light nook?

1653485586853.png


This is after i unscrewed the cap piece and removed the silicone:

1653485645464.png
 
So I was quite happy when I turned on my system after being off for a day and the swg cell installation appeared ot be working well and not leaking. Then I heard some noise from the pool and realized the skimmer was barely getting enough water. My water had dropped probably 2-3inches in the past day or few. I dont know when the water started to drop but I suspect it could have been when I removed the light. The light has been sitting on my pool deck for a week waiting for the parts to fix it. It was my understanding that water can easily flow in and out of that niche to cool the bulb, so I dont understand how the light being removed would cause it to start leaking. I dont know what else could have caused to start leaking though. I dont see how it could be related to the salt cell installation because its above the pool slightly.
 
Oh no - bummer. If you're pretty sure it's leaking and dropping faster than you'd expect, you could see if it stops leaking once you drop below the light niche, but I'm not sure you want to wait for that, and it'd be hard to keep circulating water in the mean time. I don't own an inground pool and don't know much about niches. I guess it's feasible that the installed light would only allow trickles of water into the niche, so any leak would be barely perceptible? Search the site a bit, I believe there's some tests you can do with dye to see if water is being sucked out of your niche?

As for the SWG - the extra tension and slight binding might bother me too - but I don't think it would cause any long-term harm. If there's an easy fix though, I would probably do it.

Thank you! Yes I want to avoid dropping below the niche because that would require draining basically the entire shallow end and I've been advised to not drain a lot due to the age of the liner. I was thinking the same thing that maybe the leak was tiny in the light niche (i assume through the wiring grommet) and the light was enough to slow it down to not be noticable. It didnt lose any water over the winter though, you would think if it was a slow leak at that light it would have lost water over the entire winter, unless rainfall/snow melt was enough to make it up.

My wife also reminded me she saw a small crack in the fiberglass steps when she cleaned the iron stain away with the ascorbic acid. Perhaps her putting pressure on the crack made it start leaking from there.

I am going to buy the dye from the local pool store and check both the stairs and the light niche.

It does seem like it mostly happened after I drained the pump/filter, then installed the SWG Cell but then didnt turn the pump back on (leaving it drained) for about a day. I dont know if its possible there was some kind of spihon effect happening, but if there was, I have no idea where all the water would have gone, the drain to waste valve was closed.

As far as the SWG, I tried to shorten it but it's not possible with changing a lot more so I am going to just leave it for now. It seemed to be working fine last night when I tested it. The plumber doing other work inside my house called it "turbulence city" due to the vertical kit lol.
 
I think I may have a suction side leak, but I'm not sure what would have caused it out of the blue, because i didnt have the problem when I first opened the pool. I checked the niche and the hairline crack in the steps with dye and nothing. I realized that i am getting a lot of bubbles in my return and I hear the bubbles in the system. I didnt have that when the pool was first opened that I can recall. I havent lost water, in fact I had to drain water due to heavy rain fall, but I would imagine I will show signs of losing when we get dry hot weather this week. Unless the air is getting in, in some other way. I am going to try the bucket method and going to get some threaded plugs to try and isolate the supply side lines.

As far as the heater, I replaced the pressure valve, the new valve does in fact open when no pressure and close when pressure, yet my heater still heats until the temp cut off when the pump shuts off. I confirmed the wires are not jumpered. Seems odd, the old presssure switch was definetly bad so I expected the new one to solve this.
 
You don't lose water with a suction side leak. Air comes into the leak, no water goes out.

You lose water from leaks on the pressure side, from the pump outlet and on into the equipment.

So if your symptoms are only air bubbles and no water loss youc an focus your hunt on the suction side of your pump back to your skimmer(s).

Well mystery solved..... Earlier in the thread I had talked about wanting to increase flow into the skimmer, my pool has 1 skimmer and 1 suction side port located slightly below the skimmer. I threaded a plug into the suction side port which massively increased the functionality of the skimmer. I guess it also put so much suction on that single skimmer that it was pulling air in somewhere. As soon as I removed the plug the air bubbles went away. Does that mean I have an air leak but its only a problem when suction gets over a certain level I guess?

I believe I may also have a leak but I am not 100% sure. I know I was at the correct level on the skimmer (3rd screw) and unfortunately I am not sure how quickly because I wasnt paying close attention, I ended up with barely enough water to go in the skimmer. It seemed like 2-3 inches of loss over 1-2 weeks. It sure seemed like it dropped mostly when I had the pump turned off for a day while working on the salt system though. It was fine when I left it and the next day it was making noise because the skimmer was a waterfall and that is when I noticed. Problem is I dont know if it had been slowly dropping or it happened suddenly. Its over full now and I am waiting to see how much I lose and watching it closely.
 
Thread Status
Hello , This thread has been inactive for over 60 days. New postings here are unlikely to be seen or responded to by other members. For better visibility, consider Starting A New Thread.