Greetings from island Rab Croatia,
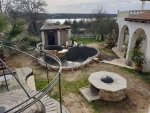
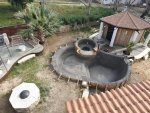
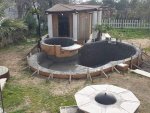
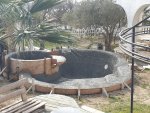
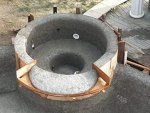
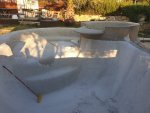
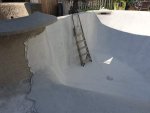
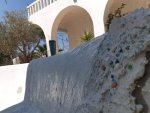
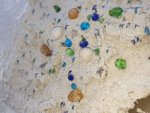
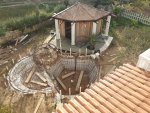
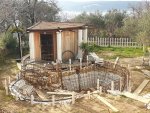
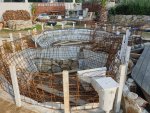
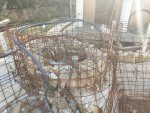
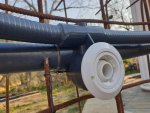
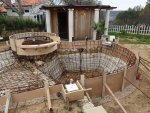
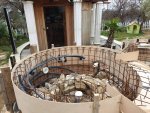
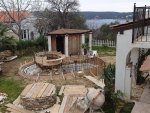
Looking forward to find and share valuable information with those interested. Started a month and a half ago with digging on our pool/spa that is also for our guests as we also rent, currently completed with steel rebar and setting installations in place. Have to say rebar is by far the hardest part with all the bending and tying, compared to anything else if you're DIY, but depends on the shape of the pool, and if extremely curvy as this one will make you throw pliers as far as you can many times. Basically there's not a straight line on this pool. Being on the island here, one's options of working with contractors from land are severely reduced and costs fly to the sky. Pool is a small one with three levels of depth in three circular shells (1.5m, 0.8m shelf with a stair between and a spa about half a meter above pool with a waterfall). Spa has 4 Venturi jets (one on the floor), not requiring a separate air blower because they are connected to an air valve that sucks in air in a special pipe, but will probably require more HP's from the main VS pump. There will also be a bubbler in the middle of the shelf but not expecting some spectacular activity above water as the shelf is pretty deep (20 inches/50 cm). If it shows to be too weak of a bubbler I'll try with some sort of flexible transparent tube to channel water to top and not present danger to kids, or in the end, add another special pump for Spa and bubbler. Idea is to keep it minimal with equipment and fancy stuff but still able to operate 4 Venturi jets and bubbler. Also bubbler, spa and pool have separate pipes so it's possible to turn off and control any one of them. I expect turning some off will make other work better. Pool is integrated with an outdoor sauna's decking, and both suction and return lines are strongly fixed to the wood below decking and above ground. We'll see if this might show to be a problem due to vibrations or sounds but for freezing I'm not concerned because it's never so cold here. For the finish a typical white cement/quartz with 50/50 pebbles/glass beads seems fine to me coated with a special permeating waterproofing liquid. I worked with white cement/quartz sand before and it's not only great for pool but also for columns (pillars) around the house and such elements made from mold. Hoping to find and share valuable information on this forum and perhaps if someone feels I'm in a wrong direction or has a tip I'm very thankful. Also I'll be glad to answer any questions.
Looking forward to find and share valuable information with those interested. Started a month and a half ago with digging on our pool/spa that is also for our guests as we also rent, currently completed with steel rebar and setting installations in place. Have to say rebar is by far the hardest part with all the bending and tying, compared to anything else if you're DIY, but depends on the shape of the pool, and if extremely curvy as this one will make you throw pliers as far as you can many times. Basically there's not a straight line on this pool. Being on the island here, one's options of working with contractors from land are severely reduced and costs fly to the sky. Pool is a small one with three levels of depth in three circular shells (1.5m, 0.8m shelf with a stair between and a spa about half a meter above pool with a waterfall). Spa has 4 Venturi jets (one on the floor), not requiring a separate air blower because they are connected to an air valve that sucks in air in a special pipe, but will probably require more HP's from the main VS pump. There will also be a bubbler in the middle of the shelf but not expecting some spectacular activity above water as the shelf is pretty deep (20 inches/50 cm). If it shows to be too weak of a bubbler I'll try with some sort of flexible transparent tube to channel water to top and not present danger to kids, or in the end, add another special pump for Spa and bubbler. Idea is to keep it minimal with equipment and fancy stuff but still able to operate 4 Venturi jets and bubbler. Also bubbler, spa and pool have separate pipes so it's possible to turn off and control any one of them. I expect turning some off will make other work better. Pool is integrated with an outdoor sauna's decking, and both suction and return lines are strongly fixed to the wood below decking and above ground. We'll see if this might show to be a problem due to vibrations or sounds but for freezing I'm not concerned because it's never so cold here. For the finish a typical white cement/quartz with 50/50 pebbles/glass beads seems fine to me coated with a special permeating waterproofing liquid. I worked with white cement/quartz sand before and it's not only great for pool but also for columns (pillars) around the house and such elements made from mold. Hoping to find and share valuable information on this forum and perhaps if someone feels I'm in a wrong direction or has a tip I'm very thankful. Also I'll be glad to answer any questions.
Attachments
Last edited:


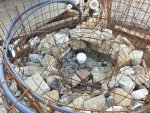

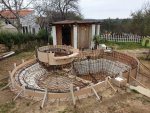
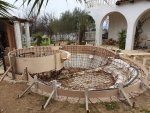
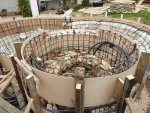

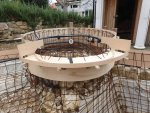
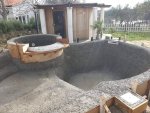
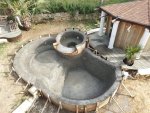
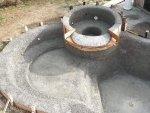
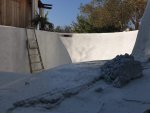
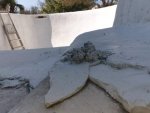
 , getting ready to apply concrete. So far the biggest wait is on the weather. Looking for at least 6 days without extremes. It doesn't get cold here on the island, but rain can be trouble as this will not be a typical fast gunite pool job. I'll have a cover on the side just in case..