SF Bay Area build (done!!!)

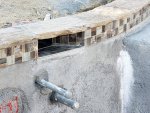
Ok good - looked like a flex line from here! :)

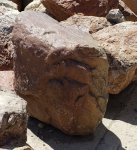
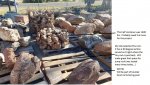
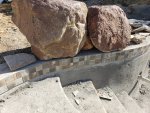
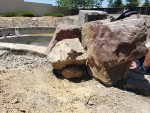
PS. the problem with boulders in the waterline is cleaning / brushing them. if they do the plaster correctly, then there wouldn't be anyplace for the algea to hide, but you must still get the brush into the crevices....you will also have white calcium buildups where the mortar meets the water, but it does look good.

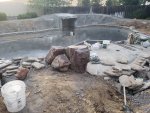
..and I waterproofed my entire waterfall before running it.

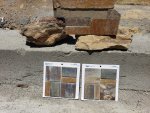
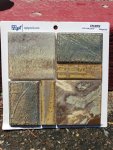
PS. Be aware that "matching" the colors of the stone / coping / tile will result in a very bland looking pool - add some color. People always seems to strive to match all the colors perfectly! :)
 
Last edited:
  • Like
Reactions: NorCalX
Colors and selections are driving my wife insane today.

We had a scramble drill b/c the PBs cell was broken and he was out of contact and missed our boulder appointment and the meet/greet with my landscaper.

I got the update from the owner of the company and was back in touch with my PB within 24 hours but we had to fix some of the fallout that resulted.

Landscaper reviewed the current status of the yard and said if the coping isn't completed before next week I will have to reschedule because we aren't ready for hardscape.

When I got back in touch with my PB he said he understands and will make sure we don't lose our landscaping project date.

PB met us at 730am today to finalize selections and order materials
His crew will begin Fri and work Sat (maybe Sun) if needed. My wife and I are going to make sure and have a cooler of food and drinks to thank them if it goes that far.

We decided we only live once and are embracing the higher end jasper. It "may" make our project cost go up depending on cost of materials. But there is no extra labor etc. My PB will be sharing weights and receipts so we can keep an eye on it.

We decided to take 2 of the larger boulders as well.

At this point we hit the NEXT roadblock. Our selection of quartzite sockeye coping was no longer available. This was perfect because it is durable quartzite (my requirement) and has a red/pinkish hue that goes well with the jasper. We spent the next hour plus looking at alternatives but couldn't find something we were 100% happy with.

We settled on a coping identified as El Dorado. It is definitely not a quartzite so i will be keeping an eye on it for durability issues but it has the appropriate warm tones we need to go with the jasper.

All material acquired and now they need to complete the work so landscaping can kick off as scheduled.

Focus will be on getting coping and raised wall completed so the pool deck can proceed.

Tile and other rock detail work will resume when pool deck is done.

A few more details from our boulder decision experience are in this thread as well
 

Attachments

  • Jasper.jpg
    Jasper.jpg
    434.3 KB · Views: 58
  • El Dorado.jpg
    El Dorado.jpg
    377.3 KB · Views: 57
Last edited:
Blessing in disguise, cause the
sockeye
quartzite


will bleed...they should have told you that?
We were told it is a possibility. We also saw a pool from 1 or 2 years ago with the sockeye coping and my wife loved it.

The give and take of aesthetic choices.

On the positive side (from my view) we are shifting our tile selection away from the natural quartzite pinwheel pieces to one of the larger 6x6 ceramic tiles. We also need to repick our wall ledger stone to a different color.

I'm laughing to myself because the official selection of jasper is having a domino effect on other stuff we "thought" was done. Everything we had preselected was based on calistoga/napa basalt brown and white boulders. The purple and reds of jasper are just too different
 
Did another round of boulder selection and I have 6 selected for installation around the pool now.

Here is the entire first batch of jasper boulders ready for pick up

The boulders range from 240lbs up to 542lbs
My suggested cap was 600lbs from PB so woo hoo


Here is the final El Dorado coping selection next to a jasper sample

Bad news
I confirmed it is a sandstone. This makes me nervous. Our prior selection was a nice durable quartzite but out of stock and quarry closed

Good news
It is an extremely dense sandstone and has color my wife was hoping for
I know not all sandstone is bad so here is to hoping I will be lucky and not complaining about crumbling coping in a few years

Time for another NPT run for tile and ledger stone re pick!
 

Attachments

  • Boulder and coping dry.jpg
    Boulder and coping dry.jpg
    370.6 KB · Views: 31
  • Boulder and coping wet.jpg
    Boulder and coping wet.jpg
    408.9 KB · Views: 32
  • Boulder ready for pick up.jpg
    Boulder ready for pick up.jpg
    305.7 KB · Views: 31
How do you know how much each one weighs? I see some red tape on one so wonder what that means as well.

I REALLY like the one on the right in the first pic. So much character!

Kim:kim:
I had them weigh each one individually. He wrote his numbers down and I kept my own records.

He would take his fork lift looking machine and carefully grab a boulder and place on a pallet. He would then drive to the weigh station and put the pallet down to weigh it.

The red tape was me marking the ones I wanted him to grab from the collection in the yard

That first picture is the sample I grabbed that my wife absolutely fell in love with. I had to agree after ALL THIS TIME I spent driving around researching rock I have to agree jasper looks great and has durability boxes checked off.

We had to decide if we go all in and pay potential overages or keep budget on rock selection. The original budget has already been annihilated and I figure we want what we love...not what we settled for


Speaking of jasper...the same day we grabbed that sample my family (wife and kids) told me they wished we could get a particular giant boulder from the same yard. It had a great flat top and made an ideal seat. At that point we weren't even decided on jasper so I denied everyone and we moved on.

Fast forward to today (2 weeks later) and I went by the yard hoping it was still there. I got lucky and my family will now have the rock they fell in love with

This bad boy is 761 lbs and cost me $282.67 to acquire (will be another $100 for installation labor)

But I agree it is worth it. My PB said he would use it as a jump rock because that top flat surface is so nice. I plan on this being the first "hand rail" boulder when you enter the pool. It is nice and tall (3+ feet) to provide balance when first entering the water. The other purple boulder I acquired (bottom right in the cluster photo) has a medium height and will be handrail #2 as you go deeper into the water and need less support.
 

Attachments

  • Perfect jasper.jpg
    Perfect jasper.jpg
    298.7 KB · Views: 41
  • Jasper.jpg
    Jasper.jpg
    434.3 KB · Views: 39
Last edited:
Our NPT selection round 2 is over.

-Escapes Sequioa tile (this stupid thing is a "premium" tile so I had a surcharge on this...but this will probably be worth it due to our free form curves...don't want the giant 6" tiles with all those curves)
-Multicolored slate ledger (will be on our 14' 18" raised wall that serves as jumping platform in the deep end)

Tile and coping to be done this weekend then landscaping begins Monday

A crew from the PB and a crew from the LS showed up 30 min apart and unloaded their respective supplies in my front yard

Let the chaos begin!!!
 

Attachments

  • Final selections 1.jpg
    Final selections 1.jpg
    383.8 KB · Views: 47
  • Escapes tile.jpg
    Escapes tile.jpg
    329 KB · Views: 46
LOVE, LOVE, LOVE all of your picks!! That is all going to be SO pretty and classic looking! What color grout are you thinking of using? Borrow some grout sticks. NOT white for sure. Thinking maybe a gray? or see if there is a dark cream color.

Kim:kim:
 
There is some drama going on with my project regarding deadlines and the site not being ready for the next phase.

Instead of focusing on that I will share the positive....tile and boulder placement

My natural handrail is in place and IMO perfect. Easy to put your hand on it and walk down the steps

We had another boulder on the coping but decided to remove it....didn't sit right with us

The other boulders are for water feature and grotto area to be done later. If not used they go into the landscaping pile

We popped off a couple of tiles maneuvering these suckers into place but the crew told me it was ok and an easy fix (I was lending a hand moving them around).

And the grout will be grey
 

Attachments

  • Boulder install (1).jpg
    Boulder install (1).jpg
    382.1 KB · Views: 73
  • Boulder install (2).jpg
    Boulder install (2).jpg
    390.5 KB · Views: 84
  • Boulder install (3).jpg
    Boulder install (3).jpg
    356.3 KB · Views: 90
  • Boulder install (4).jpg
    Boulder install (4).jpg
    254 KB · Views: 89
Last edited:

Enjoying this content?

Support TFP with a donation.

Give Support
Missed deadlines is VERY common I am sorry to say :( At least the word is being done VERY well when it happens! THAT is the most important thing in the long run!

I am loving all of the rocks with the tile! Those "handrail" boulders are AWESOME! How are they held in place?

Kim:kim:
 
Missed deadlines is VERY common I am sorry to say :( At least the word is being done VERY well when it happens! THAT is the most important thing in the long run!

I am loving all of the rocks with the tile! Those "handrail" boulders are AWESOME! How are they held in place?

Kim:kim:
Right now they are just sitting naturally and seem like a perfect fit. The boulders are 762 and 450 pounds respectively and have fairly flat bottoms. They don't wobble or move at all. Nice natural fit. I have been testing and pushing and whatever random tests I could think of with no worries.

Contrast that with the boulder we removed...was wobbly the way I wanted installed and didn't look quite right when it was re-positioned to be stable. Decided to remove it all together. The raised wall has ledger stone on the edge and should be good enough.

I asked the crew what comes next and they said once we are happy they will mortar in place and custom cut the coping for a snug fit around the base


Here is what the other side of the handrail boulders look like. We placed a 3rd one to fill empty space. We imagine a planter area right there once landscaping begins
 

Attachments

  • Boulder install (5).jpg
    Boulder install (5).jpg
    308.2 KB · Views: 67
Sounds like a great plan that will really turn out pretty once it is done! Glad to hear they are not going anywhere!!! I bet once the put the coping pieces in there will be a little mortar to really make them stay.

Kim:kim:
 
Sounds like a great plan that will really turn out pretty once it is done! Glad to hear they are not going anywhere!!! I bet once the put the coping pieces in there will be a little mortar to really make them stay.

Kim:kim:

Just snapped some shots for you

They mortared it in place on the bond beam and put coping around the bottom

They also poured extra concrete on the dirt for the complementary rock that is not sitting on the bond beam (without it there would be a gap between the 2 handrail boulders)
 

Attachments

  • Boulder install (8).jpg
    Boulder install (8).jpg
    369.5 KB · Views: 50
  • Boulder install (7).jpg
    Boulder install (7).jpg
    382.3 KB · Views: 51
  • Boulder install (6).jpg
    Boulder install (6).jpg
    334.4 KB · Views: 52
Here is where coping ended for now.

Intentionally left areas near grotto and weeping wall empty for now. Gives us a last chance to decide if we want coping under the weeping wall (we are leaning yes) and room to place larger boulders onto coping.

Did not have ledger stone to finish the raised wall but they know the spacing it will require and left a marker for the hardscape measurements.

Next phase is landscaper and stamped concrete etc.

I am going to miss this view when the new covered patio goes up
 

Attachments

  • Coping install (1).jpg
    Coping install (1).jpg
    330.7 KB · Views: 66
  • Coping install (2).jpg
    Coping install (2).jpg
    329.1 KB · Views: 67
  • Coping install (3).jpg
    Coping install (3).jpg
    311.3 KB · Views: 80
  • Coping install (4).jpg
    Coping install (4).jpg
    276 KB · Views: 77
  • Like
Reactions: Don_TLR
Boulders are looking good... Can't wait to see the Grotto go together. Myself and the wife set all of these babys.
If I had it to do again I would definitely add a small hose with a sprayer inside my grotto and have it hooked up to the pool pump. That would allow me to spray the inside of the Grotto down anytime I was in there to knock down any spiders or other creepy crawling things you might find in a cave (don't show this post to the wife...) as well as wash the walls with chlorinated pool water to keep the green goblin at bay..
IMG_20180825_181248-3024x2268.jpg.
waterfall side.jpgMVIMG_20190505_071100-3024x2268.jpgIMG_20190505_071230-3024x2268.jpgWaterfall.jpg
 
  • Like
Reactions: NorCalX
LS phase has officially started.

Bad news is my concrete will delayed maybe as much as 2 weeks because coping wasn't ready when expected (the drama i mentioned earlier)

After some fire drills and reshuffling we are doing the other work that was scheduled if possible

Pre and post view from above

Partially removed existing patio. Why not the entire thing? Budget...not enough budget to do ALL my pre-existing patio and pour new...this was our compromise that let us put stamped concrete in (approx. 1300 sq ft). The break point separates the area under the covered patio from the new stuff coming in.

My yard is starting to look like a yard again
 

Attachments

  • LS demo concrete.jpg
    LS demo concrete.jpg
    287.1 KB · Views: 66
  • LS trenches filled.jpg
    LS trenches filled.jpg
    299.6 KB · Views: 70
  • Post LS grading.jpg
    Post LS grading.jpg
    331.9 KB · Views: 69
  • Pre LS grading.jpg
    Pre LS grading.jpg
    277.2 KB · Views: 65
Forgot to put these up the other day.

Some close ups of the 2 skimmers after tile/coping
 

Attachments

  • Skimmer detail (1).jpg
    Skimmer detail (1).jpg
    297.5 KB · Views: 87
  • Skimmer detail (2).jpg
    Skimmer detail (2).jpg
    329.4 KB · Views: 89
  • Skimmer detail (3).jpg
    Skimmer detail (3).jpg
    331.2 KB · Views: 85

Enjoying this content?

Support TFP with a donation.

Give Support
Thread Status
Hello , This thread has been inactive for over 60 days. New postings here are unlikely to be seen or responded to by other members. For better visibility, consider Starting A New Thread.