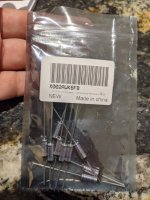
Hi there, so I have a 10 pack of new fuses ordered and will solder on a new one. Was $6 for the 10 pack. However, I need to figure out why the fuse tripped and I supposedly have flame rollout. I assume my vent is clogged, so my question is how do I clean the exhaust? do I unscrew around the top and try and get the top piece off where there is some debris inside. unit is older r336a model. I've had it 4 years now, been good. I never cleaned it, so this is overdue. thank you

Raypak Heater blew it's thermal fuse
- Thread starter meestahmarc
- Start date
You are using an out of date browser. It may not display this or other websites correctly.
You should upgrade or use an alternative browser.
You should upgrade or use an alternative browser.
I unscrewed 6 screws holding on the lid, took it off and saw a lot of leaves on the exhaust vent... cleaned up. I suspect this was the issue. The thermal fuse detects heat in the bottom chamber of the unit, if temp gets too high in there it blows the switch because it knows something is wrong. I do NOT believe its trying to detect if flames are coming out and on the fuse because the fuse housing is plastic. the rayopak part is like $30 - 40 bucks. I'm planning to just cut off the old fuse and solder on a new one. I bought a 10 pack for $6 on amazon. Cleaning 9r covering my heater will now be a regular maintenance item for me. I had not touched it in 4 years.
Attachments


swamprat69
Well-known member
If there was enough of a blockage to cause the rollout switch to melt, I would also check the underside of the heat exchanger from the burner box for sooting,which may also need to be cleaned. If you plan on replacing just the fusible link/ thermal fuse in the existing ceramic housing you need to be sure that the melting point of the replacement is exactly the same as the original. The heater has only been approved with that exact melting point.
how do I access the area between the heat exchanger and the flame? yeah, that might be clogged up too. I got 152 degree fuses, I believe that is either exact, but I don't think a few degrees, like +/- 5, will really be too drastic. It's just kills the unit if that general area starts to get really hot. thanks
swamprat69
Well-known member
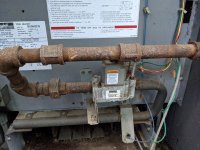
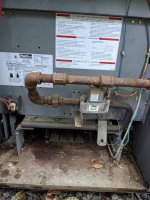
152 degrees C is the correct one. Don't know what your model number your heater is. Usually you would disconnect the gas manifold by disconnecting at the union and remove the burner tray to access the underside of the heat exchanger. Photos of the heater and the front of the heater with the cover off and model number would be helpful.
swamprat69
Well-known member
Hi, so I stand corrected. I replaced the fuse and fires the unit back up, it started, so I pulled the cover off and sure enough a flame was still rolling out and firing over the fuse. I guess my unit is still clogged up. I don't quite understand still how to fix it further, so any specific details would help, like exactly where to disconnect.
Attachments
-
 PXL_20210717_214501489.jpg425.7 KB · Views: 13
 -
 PXL_20210717_214456846.jpg249.6 KB · Views: 13
 -
 PXL_20210717_221354272.jpg271.1 KB · Views: 13
 -
 PXL_20210717_214505462.jpg295.1 KB · Views: 16
 -
 PXL_20210717_222113693.jpg423.1 KB · Views: 19
 -
 PXL_20210717_222209223.jpg547.7 KB · Views: 14
 -
 PXL_20210717_222158434.jpg541.6 KB · Views: 13
 -
 PXL_20210717_222226072.jpg544 KB · Views: 15
 -
 PXL_20210717_222217059.jpg601.9 KB · Views: 15
 -
 PXL_20210717_222416137.jpg408.6 KB · Views: 12
A few comments about swapping the fuse. It's not that easy, the solder they use to attach it, seems to have a higher melt point than my lead solder, which is like 600 degrees. It looked like a copper solder. I too had to cut off the old leads with clippers. then I scuffed up the tabs with sandpaper and soldered on the new fuse. It's a little tricky and then you need to push it back into the white housing piece.
swamprat69
Well-known member
I can see soot under the burners, which makes it very likely that the underside of ther heat exchanger is blocked by soot. In order to possibly give you some directions, I would need you to vacuum out the area below the burners of all debris. Then give me multiple photos showing screws/bolts etc. on both sides of the framework under the burners and a photo of the heater as a whole including the gas piping outside of the heater. We can try to go further from there.
It's working!!! I went out to examine the unit again, yes there is a little soot beneath the burners, but not a ton. It seems the burners are held on with 2 bolts on each side and then kept in place by the gas line connection. After some thinking, I decided I'm definitely not going to mess with the gas line to pull out the burners.
So instead I took off the cover again and was looking down above the heat exchange, it didn't seem too dirty below, as best I could see in . I decided to get out my backpack leaf blower and blow down from above. I understood I might actually blow the spot into the holes of the burner, but I decided to take a chance.
After a good blowout... no more flame rollout. There is a small flame below the fuse, but I was able to leave my hand on the fuse and it was not hot at all. Heater worked for the past few hours.
For good measure I will likely buy the OEM thermal fuse from the pool store.
Hopefully this might help someone else in the future and I will be covering my heater in the fall.
Thanks
Attachments
-
 PXL_20210718_170625564.jpg522.9 KB · Views: 10
 -
 PXL_20210718_170629204.jpg573.8 KB · Views: 9
 -
 PXL_20210718_171726222.jpg494.2 KB · Views: 10
 -
 PXL_20210718_171730098.jpg389 KB · Views: 10
 -
 PXL_20210718_171733756.jpg561.1 KB · Views: 13
 -
 PXL_20210718_173920329.jpg509.4 KB · Views: 14
 -
 PXL_20210718_175010632.jpg583.2 KB · Views: 12
swamprat69
Well-known member
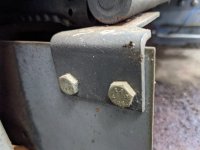
Still can't really see everything. You need to kill power to the heater, then shut off gas at the external valve on the right of the heater ( loosen nut on the valve, then turn the tab with the hole in it 90 degrees and retighten nut). Open the union on the gas line that is the first fitting to the left of gas valve ( Use two wrenches so that you don't disturb any of the threaded conections and have to clean and remake the threaded connections). Mark and remove wiring connections at gas valve and also the blue wire going into the burner tray and the green ground wire attached to the burner tray (be sure you know where they go back to, photos before you remove may also help, but mark them anyway). You will need to remove the screw(s) from the blue wire support bracket and the gas valve/manifold support bracket. It looks like the burner assembly is attached by the screws on either side of the burner tray that attach to the inside bottom of the burner tray supports to the bottom of the heater cabinet (remove them). It looks like the pilot tubing may catch on the gas piping to the manifold as you slide the burner tray out. You may be able to bend the tubing slightly to clear the piping as long as you support the riser (vertical part) of the pilot tubing as you are bending it slightly or you could disconnect the pilot tubing at the gas valve. When you reassemble, check all gas fitting connections between the external gas shutoff and the gas valve ( including the external shutoff after you have loosened the nut, turned the tab 90 degrees and retightened the nut) with soap bubble solution to insure that you have no gas leaks (even on the fitting connections that you didn't touch/disturb??).
Swamprat, thank you for taking your time and effort to help me out with this. I greatly appreciate and find your help very valuable. Thank you again.
swamprat69
Well-known member
If the latest set of photos is showing how the heater is operating now, you still have a problem. It may be firing, but the yellow flame showing in photo #6 indicates that you still have insufficient air to the burners and are creating both carbon monoxcide and soot. You must have this situation corrected for reasons of safety. If you do not feel that you can correct this yourself, have the heater cleaned and serviced by a qualified company/service technician.
Thread Status
Hello , This thread has been inactive for over 60 days. New postings here are unlikely to be seen or responded to by other members. For better visibility, consider Starting A New Thread.