
Pool pump install: here goes nuhtn
- Thread starter Dwiessner
- Start date
You are using an out of date browser. It may not display this or other websites correctly.
You should upgrade or use an alternative browser.
You should upgrade or use an alternative browser.
- May 3, 2014
- 58,934
- Pool Size
- 6000
- Surface
- Fiberglass
- Chlorine
- Salt Water Generator
- SWG Type
- Pentair Intellichlor IC-40
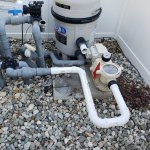
That loop is quite a bit of unsupported pipe. I would be concerned about that.
Check your 90's. They appear to be DWV fittings. Best to not use those.
Check your 90's. They appear to be DWV fittings. Best to not use those.
D,
I agree with Marty about unsupported pipe.. I would just put something under there to take the strain off, like a cinder block or ???
As far at the DWV fitting... In theory you should not use them as they are not schedule 40.. In practice, there are thousands of pools out there with DWV fittings and they all seem to work just fine. It is not really a safety issue, but the depth of the socket, where the pipe and the fitting mate, is only about half as deep. Just make sure your pipe is cut square and pushed all the way in when glued.
Thanks,
Jim R.
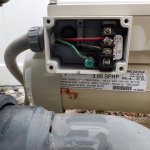
Also keep in mind that the control panel is read from the pump end.. Basically, upside down.. It might make more sense, since you are having to re-plumb anyway, to have panel in a position that you can read.
Jim R.
Jim R.
Not sure what a dwv fitting is. The sign at lowes said "schedule 40 pool sweep". Sounded like the right thing after the pool guy made a big deal about the 90's. I'll happily take them back if they aren't correct, as they were $5.50 each.
On that long loop, should I trim it? Installation guide said to leave 5x the pipe width on both ends. I thought it looked dangerous also, like it could snap if I trip on it. Nothing is glued yet, so I can definitely trim that up.
Good point on the orientation of the pump. Only problem is there is zero slack on that conduit. And im awful at electrical. I'd have to move the filter to get it turned around. I plan on replacing the filter soon also, as the relief valve is currently held together with epoxy, Haha. I'll probably reorient everything then.
Keep it coming! All great advice!
- May 3, 2014
- 58,934
- Pool Size
- 6000
- Surface
- Fiberglass
- Chlorine
- Salt Water Generator
- SWG Type
- Pentair Intellichlor IC-40
OK on the sweeps. Could not tell if they were those or DWV (Drain, Waste, Vent).
You can shorten up the loop considerably. The suction side should not have an issue if the last 90 is pretty close to the pump inlet.
You can shorten up the loop considerably. The suction side should not have an issue if the last 90 is pretty close to the pump inlet.
- Feb 6, 2015
- 6,287
- Pool Size
- 12300
- Surface
- Plaster
- Chlorine
- Salt Water Generator
- SWG Type
- CircuPool RJ-45 Plus
Be sure to hook up the bonding wire also.
If you're going to replace the filter soon and re-orient things, you may want to consider returning the sweep 90's and use standard 90's for now. You really won't notice much - if any - difference, except the $$ amount.
If you're going to replace the filter soon and re-orient things, you may want to consider returning the sweep 90's and use standard 90's for now. You really won't notice much - if any - difference, except the $$ amount.
Brad_C
Well-known member
- Nov 15, 2018
- 188
- Pool Size
- 19000
- Surface
- Fiberglass
- Chlorine
- Salt Water Generator
- SWG Type
- Monarch ESC24 / ESC7000
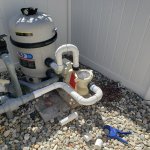
Wires were short, so I had to change the orientation of the pump... and in doing so, ran out of pipe. Here's half, anyway. Just dry fit for now. Look ok?
Surely it would have been easier to put a junction box in and extend the wires?
- Feb 6, 2015
- 6,287
- Pool Size
- 12300
- Surface
- Plaster
- Chlorine
- Salt Water Generator
- SWG Type
- CircuPool RJ-45 Plus
Or run a new, longer piece of liquid tight, new connectors and new wires from the original connection point to the motor.Surely it would have been easier to put a junction box in and extend the wires?
If the OP posted a wider view of the equipment area, we may be able to offer other connection options and pump locations. It would be nice to be able to access the control pad without having to crawl over pipes - not to mention easier access to all sides of the filter.
Last edited:
Or run a new, longer piece of liquid tight, new connectors and new wires from the original connection point to the motor.
If the OP posted a wider view of the equipment area, we may be able to offer other connection options and pump locations. It would be nice to be able to access the control pad without having to crawl over pipes - not to mention easier access to all sides of the filter.
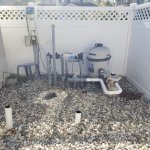
Here is a wider view. You can still easily walk along side the pump to see the panel. Like I mentioned above, electrical intimidates me a bit, so for today, moving the pump was easier.
Once I gain a little more confidence with this project, I may repipe, rewire and reorient everything at the end of summer when I replace the filter.
Attachments
- Feb 6, 2015
- 6,287
- Pool Size
- 12300
- Surface
- Plaster
- Chlorine
- Salt Water Generator
- SWG Type
- CircuPool RJ-45 Plus
It looks like the liquid tight flex conduit is underground - or at least under rock. You can run it above ground and snake it around your plumbing to provide more slack. Looking at your timer, it should be the flex conduit on the right hand side.
When you replace the filter, it may be a good idea to rework all the plumbing. And label all the pipes too.
Whenever you are doing electrical work, be sure to shut off the power at the breaker.
When you replace the filter, it may be a good idea to rework all the plumbing. And label all the pipes too.
Whenever you are doing electrical work, be sure to shut off the power at the breaker.
Cool thanks! When I do, I'll have to come on here and find out what some of these pipes even are. Like that tall capped pipe on the left... no idea what that even is or why it needs to be 5 feet tall, Haha.
- Feb 6, 2015
- 6,287
- Pool Size
- 12300
- Surface
- Plaster
- Chlorine
- Salt Water Generator
- SWG Type
- CircuPool RJ-45 Plus
Do you have a spa? If so, that pipe was probably the airline for the jets. Sometimes - not always - there is a blower attached to the top.Cool thanks! When I do, I'll have to come on here and find out what some of these pipes even are. Like that tall capped pipe on the left... no idea what that even is or why it needs to be 5 feet tall, Haha.
No spa, but maybe the previous owner had intentions?Do you have a spa? If so, that pipe was probably the airline for the jets. Sometimes - not always - there is a blower attached to the top.
- Feb 6, 2015
- 6,287
- Pool Size
- 12300
- Surface
- Plaster
- Chlorine
- Salt Water Generator
- SWG Type
- CircuPool RJ-45 Plus
Hmm.... I see in your signature that you list 'jets'. What are those?
I don't know exactly what that pipe could be. Or where the other end it plumbed to. It looks like there is a coupling near the bottom. Maybe when you replumb, you can carefully dig around the bottom to see where it might go.
I don't know exactly what that pipe could be. Or where the other end it plumbed to. It looks like there is a coupling near the bottom. Maybe when you replumb, you can carefully dig around the bottom to see where it might go.
It's a fiberglass pool. On the deep end, it has a few jets. I can switch from the normal inlets, jets, or water feature by turning a few valvesHmm.... I see in your signature that you list 'jets'. What are those?
I don't know exactly what that pipe could be. Or where the other end it plumbed to. It looks like there is a coupling near the bottom. Maybe when you replumb, you can carefully dig around the bottom to see where it might go.
- Feb 6, 2015
- 6,287
- Pool Size
- 12300
- Surface
- Plaster
- Chlorine
- Salt Water Generator
- SWG Type
- CircuPool RJ-45 Plus
If those are dedicated jets, the capped line might have something to do with them.
Plumbing looks good. Let it dry for at least 4 hours. Then fill the pump basket with water and start it up. Remember, the pump will initially go to full speed to aid in priming.
Consider supporting the suction line - maybe the section that runs parallel to the pump. Span between the two 90's.
Plumbing looks good. Let it dry for at least 4 hours. Then fill the pump basket with water and start it up. Remember, the pump will initially go to full speed to aid in priming.
Consider supporting the suction line - maybe the section that runs parallel to the pump. Span between the two 90's.
Thread Status
Hello , This thread has been inactive for over 60 days. New postings here are unlikely to be seen or responded to by other members. For better visibility, consider Starting A New Thread.
Similar threads
- Replies
- 3
- Views
- 85
- Replies
- 22
- Views
- 334
- Replies
- 2
- Views
- 69
- Replies
- 2
- Views
- 293