- May 23, 2015
- 25,693
- Pool Size
- 16000
- Surface
- Plaster
- Chlorine
- Salt Water Generator
- SWG Type
- Pentair Intellichlor IC-60
So I thought I would share some pictures of what I did here so that there’s a reference to look at. Others have done this in the past, so there’s nothing new here.
Backstory
So at the beginning of the season I noticed that my IC salinity readout from my EasyTouch panel was quite a bit lower than the actual value from my K-1766 kit.
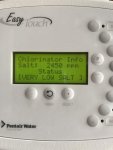
I removed the cell and looked at it but found no scale. I did a quick acid wash (I typically only use diluted MA, 5:1 with distilled water) and noted no bubbling so I did not let it soak. I replaced the cell and ran it but the salinity was still much lower than actual (by more than 800ppm). So I then ran the diagnostic mode to look at cell life and internal thermistor temperature (many thanks to JamesW for posting the diagnostic procedure info). Here is the procedure -
My cell life was only at 4,000 hours BUT my thermistor was showing an LED light at 100% which is a lot higher than the actual water temp. So clearly the thermistor was starting to go bad. However, because it was the beginning of the season, I knew the water was going to get warmer and the cell would function. I also had a busy summer and couldn’t devote the time to messing around with the pool. Over the last few weeks, my local weather has gotten chilly and my water temperature has gotten to the low 70’s. Because of this, the apparent salinity reading of the SWG moved into the VERY LOW SALT error range and my SWG stopped producing chlorine. Also, the diagnostic procedure showed a blinking 100% LED (FAILED thermistor) and all blinking LEDs. So the thermistor was shot at this point. I’m not ready to start jug dumping bleach, so I decided it was a time to fix the thermistor problem.
There are two options when the thermistor starts to go - (1) replace the flow switch assembly (Pentair P/N 520736) OR (2) install an external 10k thermistor and hook it up to the existing SWG wiring. Option #1 is the more expensive route as the Pentair replacement part is fairly expensive for what it actually is (a flow switch and thermistor). I found ther p/n online (Amazon) and paid around $100 for it but I did call around to local shops and ALL of them wanted over $200 for the part. So there’s a lot of markup to a part that probably costs a few dollars to make and is sold by the crate-full from the manufacturer to Pentair. Finding a simple in-pipe 10k thermistor is a lot cheaper (the Pentair air temperature thermistor will work) but it does require you to drill a hole in your plumbing and then “hack” that wiring into the SWG flow switch wiring. It’s not a lot of work but most people probably don’t want to do that. I have an extra air temperature thermistor that I can use if this flow switch replacement part fails prematurely (they have a habit of doing that).
So, here’s the part -
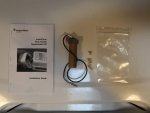
The flow switch assembly is fairly easy to replace and the instructions are written well enough. The kit comes with some 3M wire connectors that don’t require you to splice the end of the wire. Just simply insert similar colors into the connector and use a pair of needle-nose pliers to push the connector closed.
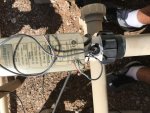
Here’s what the SWG looks like with the flow switch cover removed -
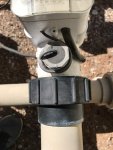
Just cut the wire (nearest the flow switch) and then unscrew the flow switch nut. It only takes a 1/4 turn of wrench to loosen the nut and then it can be backed out by hand the rest of the way. Here are the old and new parts side-by-side -
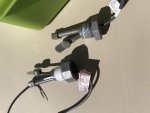
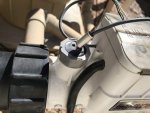
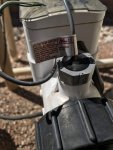
The old flow switch got a little mangled coming out because ther magnet got hung up but the new assembly went in fine. One can see a little bit of corrosion on the metal stem of the flow switch magnet and it’s not uncommon to have those stems fail and the magnet fall off thus causing a flow error. Honestly I think this part (flow switch and thermistor) can be much better engineered but I’m sure Pentair is just going with the lowest cost, commercial-off-the-shelf item they can find. Here’s the new flow switch assembly installed -
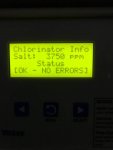
The nut on the new flow switch is about twice as thick as the old one which makes grabbing it with a wrench a lot easier. After putting everything back together, crimping the proper wires together and turning the system back on, I re-ran the diagnostic. This time I got the 60% and 80% LEDs to light up meaning the internal thermistor was reading a temperature between 66F and 75F. The water temp was 71F so that is correct. My salinity finally read closer to actual (actual salinity is 3400ppm) -
With the repair complete, my SWG is now running correctly and I’m free to be lazy and not jug-dump for another two months.....
Future Work - take the old thermistor and measure it’s output resistance at different temps to see how badly failed it is. If this repair only lasts a year or so (many report that these flow switch replacements fail sooner than the OEM part), then I’ll use my spare in-pipe thermistor as others have done.
Backstory
So at the beginning of the season I noticed that my IC salinity readout from my EasyTouch panel was quite a bit lower than the actual value from my K-1766 kit.

I removed the cell and looked at it but found no scale. I did a quick acid wash (I typically only use diluted MA, 5:1 with distilled water) and noted no bubbling so I did not let it soak. I replaced the cell and ran it but the salinity was still much lower than actual (by more than 800ppm). So I then ran the diagnostic mode to look at cell life and internal thermistor temperature (many thanks to JamesW for posting the diagnostic procedure info). Here is the procedure -
IntelliChlor Diagnostic Procedure
Pressing and holding the “More” button launches the System Status Mode. When the lights finish scrolling, the percent lights indicate hours of usage in 1,000s. For example, if the 40% light lights, that indicates 4,000 hours.
Version 3.1 on adds the ability to determine system temperature. Pressing the “More” button after the display shows 1,000s of hours of usage, will show temperature as follows:
Lights……………………Temperature
No LEDs……………………Below 30F
40%...........................36 to 45F
40% and 60%............46 to 55F
60%...........................56 to 65F
60% and 80%.............66 to 75F
80%.............................76 to 85F
80 and 100%..................86 to 95F
100%.............................96 to 99F
100% blinking…………….over 99F
All LEDs blinking…………..Sensor bad
My cell life was only at 4,000 hours BUT my thermistor was showing an LED light at 100% which is a lot higher than the actual water temp. So clearly the thermistor was starting to go bad. However, because it was the beginning of the season, I knew the water was going to get warmer and the cell would function. I also had a busy summer and couldn’t devote the time to messing around with the pool. Over the last few weeks, my local weather has gotten chilly and my water temperature has gotten to the low 70’s. Because of this, the apparent salinity reading of the SWG moved into the VERY LOW SALT error range and my SWG stopped producing chlorine. Also, the diagnostic procedure showed a blinking 100% LED (FAILED thermistor) and all blinking LEDs. So the thermistor was shot at this point. I’m not ready to start jug dumping bleach, so I decided it was a time to fix the thermistor problem.
There are two options when the thermistor starts to go - (1) replace the flow switch assembly (Pentair P/N 520736) OR (2) install an external 10k thermistor and hook it up to the existing SWG wiring. Option #1 is the more expensive route as the Pentair replacement part is fairly expensive for what it actually is (a flow switch and thermistor). I found ther p/n online (Amazon) and paid around $100 for it but I did call around to local shops and ALL of them wanted over $200 for the part. So there’s a lot of markup to a part that probably costs a few dollars to make and is sold by the crate-full from the manufacturer to Pentair. Finding a simple in-pipe 10k thermistor is a lot cheaper (the Pentair air temperature thermistor will work) but it does require you to drill a hole in your plumbing and then “hack” that wiring into the SWG flow switch wiring. It’s not a lot of work but most people probably don’t want to do that. I have an extra air temperature thermistor that I can use if this flow switch replacement part fails prematurely (they have a habit of doing that).
So, here’s the part -

The flow switch assembly is fairly easy to replace and the instructions are written well enough. The kit comes with some 3M wire connectors that don’t require you to splice the end of the wire. Just simply insert similar colors into the connector and use a pair of needle-nose pliers to push the connector closed.
Here’s what the SWG looks like with the flow switch cover removed -

Just cut the wire (nearest the flow switch) and then unscrew the flow switch nut. It only takes a 1/4 turn of wrench to loosen the nut and then it can be backed out by hand the rest of the way. Here are the old and new parts side-by-side -

The old flow switch got a little mangled coming out because ther magnet got hung up but the new assembly went in fine. One can see a little bit of corrosion on the metal stem of the flow switch magnet and it’s not uncommon to have those stems fail and the magnet fall off thus causing a flow error. Honestly I think this part (flow switch and thermistor) can be much better engineered but I’m sure Pentair is just going with the lowest cost, commercial-off-the-shelf item they can find. Here’s the new flow switch assembly installed -


The nut on the new flow switch is about twice as thick as the old one which makes grabbing it with a wrench a lot easier. After putting everything back together, crimping the proper wires together and turning the system back on, I re-ran the diagnostic. This time I got the 60% and 80% LEDs to light up meaning the internal thermistor was reading a temperature between 66F and 75F. The water temp was 71F so that is correct. My salinity finally read closer to actual (actual salinity is 3400ppm) -

With the repair complete, my SWG is now running correctly and I’m free to be lazy and not jug-dump for another two months.....
Future Work - take the old thermistor and measure it’s output resistance at different temps to see how badly failed it is. If this repair only lasts a year or so (many report that these flow switch replacements fail sooner than the OEM part), then I’ll use my spare in-pipe thermistor as others have done.


