Oh let ME pick out your tile!!!!! It will be oh so shiny and blingy!!! Everyone around will have to wear sunglasses!!!

New DIY Vinly Pool Build - (OH)
- Thread starter driyac
- Start date
You are using an out of date browser. It may not display this or other websites correctly.
You should upgrade or use an alternative browser.
You should upgrade or use an alternative browser.
We are trying to find a iridescent tile that is somewhat affordable. As its looking now i need about 150 sqft and that aint going to be cheap.Oh let ME pick out your tile!!!!! It will be oh so shiny and blingy!!! Everyone around will have to wear sunglasses!!!
OUCH! So here is what you can do..............find a pretty 6x6 blue tile then put a BLING row through the middle of it. Something like this for the blue 6x6: Sapphire, 6
Then this for the BLING row: National Pool Tile Equinox 2x2 Glass | Dark Blue | EQX-MIDNIGHT2X2
Kim
Then this for the BLING row: National Pool Tile Equinox 2x2 Glass | Dark Blue | EQX-MIDNIGHT2X2
Kim
Looking good so far. You have a dream lot to build on. I just finished one similar with negative slope and I had to truck NO dirt offsite. First time in years.

I ended up trucking in 10 loads of stone and 6 loads of dirt.... the local builders loved me for saving trucking costsLooking good so far. You have a dream lot to build on. I just finished one similar with negative slope and I had to truck NO dirt offsite. First time in years.
I'm sure they did. It's rare to only need material amd not get rid of it. Helps the budget big time
There’s very little info out here for the DIY. It complicated it from a standpoint of not know exactly what to do. The wall itself is going to end up costing me almost 8-10k depending on the tile and top my wif chooses. About double what I expected. But it is very nice, especially with the led lightsHi there, @driyac the pool looks great. I don't think I've seen DIY sheer wall on this site before. How did that complicate your build? Did you need to put piers in to support the weight? Did it get in the way of your coping?
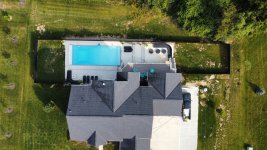
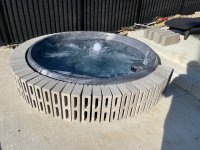
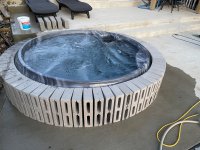
Not to revive a dead thread, but after 2 years we are close to finishing the back yard. Mostly finished deck, fencing, and decorating. Finally ordered the inground spa that will stick up about 24” above ground height. Once that’s in, can start tile as the wife wants tile to match the wall and around the spa. After that, limestone cap needs ordered to go on top of spa and the waterfall wall. I could have never expected this to have taken so much time and effort. To see where the last two years has taken me, the knowledge and research it took, and of course to save $100,000 plus was well worth it!
Attachments
This is YOUR thread. Revive all you want! Especially when it is for updates like this one!!! THAT LOOKS AWESOME!!!!
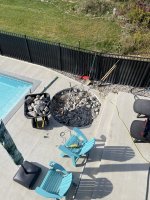
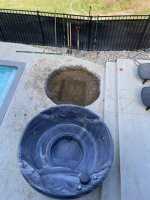
Well I have yet to see a diy hot tub install. And after a lot of research I found even little! So here’s my path to installing one! First wait two years and have the price go up $2k. Second frame the hole too small and need to cut it out. Third, remove far more dirt than you expected. Fourth dig deeper and add a 6” pad of concrete.
Edit: I did forget to mention, this would be much easier if you completed when you initially built the pool. I chose not to, however I did plan it by burying conduit and 2- 2” lines for the spa
Edit: I did forget to mention, this would be much easier if you completed when you initially built the pool. I chose not to, however I did plan it by burying conduit and 2- 2” lines for the spa
Attachments

Last edited:
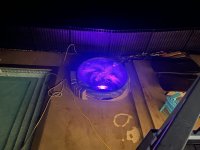
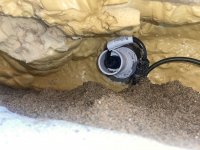
After all that, try and figure out how much sand you need to flow around the spa. Spoiler it’s double what you think. Trick here is getting it level as you can and realize that the fiberglass shell has imperfections as well. Hook up plumbing, then realize that having a wet niche led light is a bad idea. Call CMP and find out the have a life saving dry niche led. Install it! Now on to building around it. I have chosen to go with small 1”x1” tile. I need it “perfectly” round using 4”x8”x16” blocks. I’m still not finished but boy has this been a trial and error install.

Attachments
Last edited by a moderator:
Getting closer, Spa coping then tile!

Last edited by a moderator:
Thread Status
Hello , This thread has been inactive for over 60 days. New postings here are unlikely to be seen or responded to by other members. For better visibility, consider Starting A New Thread.