New DIY Inground pool build - Arkansas (Picture Heavy) - Outdoor Kitchen Complete!!!

duckcmmndr

0
Gold Supporter
Bronze Supporter
May 7, 2014
429
Arkansas
Pool Size
29980
Surface
Vinyl
Chlorine
Salt Water Generator
SWG Type
Hayward Aqua Rite (T-15)
Ok...well I am a little late starting this thread. We decided last spring it was time to take down the above ground pool and put one in the ground. I had been planning to do an IG pool for 5 or 6 years. I had a local pool company give me a bid even though I was 90% sure I was going to do it myself. The bid was way high and they could not even start till October, so that was out the window. I ordered my pool kit from poolwarehouse on June 4th and due to COVID the shipping day was estimated to be 8+ weeks out. We decided on a 18x43x30 true L pool with a full width sun deck across the end of the L. The wait begins.

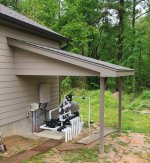
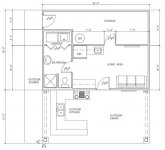
I had planned to build a pool house with a bathroom, kitchen, storage and outdoor kitchen to go along with the pool...so since the pool was going to be awhile, I started on the pool house. The pool house with porch was drawn up and I was ready to start. Ended up being 24x30 with 12' of the 30' being a covered porch.

Here is the layout:
Capture.JPG

I figured out where I wanted the pool and pool house to be located and then figured the elevations on everything to match up to my existing patio. Once I knew the elevations I started building on the pool house.


I was making good progress on the pool house, almost had the outside finished and on August 24th my pool kit arrived. After doing an inventory, I was missing a few items related to the sun deck. It took about 2 weeks to get in the missing parts and another week to get a track hoe lined out to start the dig.


I took a week of vacation the day the dig started so I could get a good jump on it.
Day 1


Last edited:
The deep end was pure heck to shape by hand in the clay. It was literally one of the most labor intensive things I have ever done!


Day 2:


Finally time to do something besides dig and shave dirt.


Day 3:


Days 4-7:

Now it's time to assemble the sun deck and steps. Endless bags of nuts and bolts. It was polymer wall and steel sun deck and steps, so I had to drill holes to fasten the two together. The next several days were spent on the steps and making sure the whole thing was square.


Exactly 1 week after I broke ground...I was ready for the bond beam to be poured...and by sheer luck, I was able to schedule a concrete truck and pumper truck early that morning for around lunch. The first tropical storm of the year was suppose to dump heavy rains on us in 2 days...so I really wanted to get the bond beam poured while everything was square.


As the weather man promised...we got tons of rain. It put 4' of water and a ton of sludge in the deep end and caused some of my walls to wash onto the top of the concrete bond beam. It dried out enough to work again when another round hit a few days later and filled it up again.


It finally dried up enough to start working on the plumbing. I ran 2" for my skimmers and 1.5 for my returns. I put everything on it's own run. It made for lots of plumbing.


I kind of strayed from the normal order of operations next. The guy I wanted to use for the pool krete had an opening and I could not afford not to use him...so the pool krete was done in 1 day, before the backfill was 100% finished and before the pool deck was poured.


Now it is time to get the pool deck done. I was running short on time...getting colder each week, so I ended up paying someone to form up for the pool deck and pour it. I normally do all the forming/plastic/steel for concrete work and just hire the finisher...but with winter coming I hired this out.


Finally, almost exactly 4 weeks from the day I broke ground, it was time to hang a liner and fill it up. Fitting the liner in the tracks on the steps was a royal pain, but it fit as it should.


The finished product was exactly what I was hoping for. The water color was exactly what we wanted.


Over the winter and this spring I have been putting the finishing touches on the outside and inside of the pool house.


I am about to the point where I am going to start on the outdoor kitchen. I owe a lot to this board, I gained the confidence to take on this project as well as the knowledge of specific parts of this from this group. It has been a hard, but very rewarding experience.
 

Enjoying this content?

Support TFP with a donation.

Give Support
WOWZER!!! This is my all time pool shape! Something for everyone! Make sure you get the Watermelon ball game. That pool is made for it!

Kim:kim:

Thanks...I will get a watermelon ball. I had never heard of it till you mentioned it, I looked it up and it looks like fun.
 
  • Like
Reactions: Jmerges
Dang! Very nice. What do you do for a living that you have that kind of all around skill set for a DIY of that magnitude?

Thanks! There were parts of this project that pushed me out of my comfort zone...but that is how we learn how to do new things and I never back away from a challenge.

I am a computer programmer by trade (20+ years). I am also a certified welder. I have always been mechanically inclined and handy at building things. My dad is an electrician and master fixer of all things and thankfully a lot of his skills rubbed off on me over the years.
 
  • Like
Reactions: Jmerges and JamesR
This is awesome and I LOL'd when you said finishing the deep end by hand was hard. I DIY'ed my pool too, and so I can relate to that! and P.S. the pool house rocks. I could live in that thing.

Thanks, the pool house started simple and grew into what is basically a 1 bedroom apartment. It turned out to be super functional and can provide for an additional place for extended family to stay when they are home for a visit.
 
  • Like
Reactions: Jmerges

Enjoying this content?

Support TFP with a donation.

Give Support
Thread Status
Hello , This thread has been inactive for over 60 days. New postings here are unlikely to be seen or responded to by other members. For better visibility, consider Starting A New Thread.