New Construction Started - Willis, TX (north of Houston)

My preference would be to have it vs. not, but only if you can verify that it is working as intended.

The flow switch should ensure that the heater is receiving the correct flow before it allows the heater to operate.

Maybe put a two-way or a three-way valve on the line so that you can open or close the line to verify performance.

For example, you can close the line and calibrate the flow switch and then open the line to see if it causes to switch to open or the pressure to drop.

You can put a Jandy check valve on the line to give you a sight window to see where the flow begins by watching the flapper move.

For example, you can control the flow from the pump by setting a flow rate and you can try 40 gpm and watch the flapper and it should not move until the flow is adjusted to above 40 gpm.

You can install a flowmeter if you want to verify the flow independently of the pump reading.


1656087938020.png


1656088085981.png
 
Last edited:
Maybe put a three-way valve on the line so that you can open or close the line to verify performance.

You can put a Jandy check valve on the line to give you a sight window to see where the flow begins by watching the flapper move.

You can install a flowmeter if you want to verify the flow independently of the pump reading.
I'm not clear on the placement/positioning of the valves and flowmeter:

1656093653930.png
 
In this video, the cavitation begins at about -14" of mercury, which is about 16 feet of head, so it's possible that you could hit cavitation at full pump speed.

34 feet -16 feet = 18 feet of Net Positive Suction Head available.

The pressure required at the impeller is specific to the pump and you would need to know the Net Positive Suction Head Required for the IntelliFlo XF at full flow.
1656094687375.png
The required NPSH of a water pump at rated capacity is 17 ft.

Water Temperature 85° F. Elevation 1000 ft. above sea level.


1656095383891.png

34 feet - 17 feet = 17 feet.

20 inches of mercury is 9.8 psi or 22.7 feet of head (Total Suction head loss including static and dynamic).

So the maximum total suction head loss including static and dynamic = 17 to 22.7 feet.

This also depends on the elevation.

Someone at a high elevation like

22.7 feet (Maximum allowable) - 16 (estimated for 3" PVC at full pump speed) = 6.7 feet margin before cavitation.

34 feet -16 feet = 18 feet of Net Positive Suction Head available.

The required NPSH of a water pump at rated capacity is 17 ft.

So, the NPSHA is only 1 foot more than the NPSHR of 17 feet per the reference.

So, the margin is about 1 foot to about 6.7 feet.

Due to the uncertainty of the calculations, the 4" PVC is definitely a better choice.

34 - 22.7 = 11.3 feet of head for the minimum NPSHR (Net Positive Suction Head Required).


Cities like Alma Colorado would need to significantly derate the suction lift of the pump (8 feet less than at sea level).

1656098609543.png
I would suggest a maximum suction head loss of about 17 feet at sea level and subtract 1 foot per 1,000 feet of elevation.

Elevation.....Maximum suction head loss (Static and Dynamic).

0 feet...........=17
1,000 feet = 16
2,000 feet = 15
3,000 feet = 14
4,000 feet = 13
5,000 feet = 12
 
Last edited:
I would do a regular 3" T (red) and then a Jandy check valve on the bypass so that you can see when the bypass begins to flow water.
You mentioned installing a flow meter to check the pump's output. That would be installed downstream of the Jandy CV and before the spring CV?

Will taking these steps help determine the correct spring rating for the spring CV? Isn't that what the goal is?
 
You can put the Flow Meter on the line going into the heater to verify the actual flow, but you have the flow reading from the pump and the flow switch should indicate that the flow is good as long as the switch is calibrated and installed correctly.

The flowmeter is just an extra verification if you want to be extra sure.

It requires about 14" of straight PVC pipe, so you might not have that much straight pipe with everything going on.

You should be able to adjust the pump's output in GPM by slowly increasing the GPM until you see the Jandy checkvalve flapper begin to move.

For example, you can turn the pump on at 30 GPM and watch to see if the Jandy flap moves, it should not move at 30 GPM.

Then increase to 40 GPM, 45 GPM, 50 GPM etc. until the flap begins to move and then you know where the check valve begins to open.

You can then turn the pump to full speed and see how much flow the pump is putting out from the pump display.

For example the total flow might be 120 GPM at full speed and some flow is going through the heater and some is going through the bypass but you won't know exactly how much is going through the heater and how much is going through the bypass unless you put a flow meter on the line going into the heater.

If you have the flow meter, then you will know how much is going through the heater and how much is going through the bypass.

The flow switch should be able to always ensure that the flow is above 40 GPM.

If the flow drops below 40 GPM, the "Service System" light will illuminate.

1656100920284.png
1656100964756.png


1656101714251.png
 
Last edited:
You can put the Flow Meter on the line going into the heater to verify the actual flow, but you have the flow reading from the pump and the flow switch should indicate that the flow is good as long as the switch is calibrated and installed correctly.

The flowmeter is just an extra verification if you want to be extra sure.

It requires about 14" of straight PVC pipe, so you might not have that much straight pipe with everything going on.

You should be able to adjust the pump's output in GPM by slowly increasing the GPM until you see the Jandy checkvalve flapper begin to move.

For example, you can turn the pump on at 30 GPM and watch to see if the Jandy flap moves, it should not move at 30 GPM.

Then increase to 40 GPM, 45 GPM, 50 GPM etc. until the flap begins to move and then you know where the check valve begins to open.

You can then turn the pump to full speed and see how much flow the pump is putting out from the pump display.

For example the total flow might be 120 GPM at full speed and some flow is going through the heater and some is going through the bypass but you won't know exactly how much is going through the heater and how much is going through the bypass unless you put a flow meter on the line going into the heater.

If you have the flow meter, then you will know how much is going through the heater and how much is going through the bypass.

The flow switch should be able to always ensure that the flow is above 40 GPM.

This all makes sense but I'm still trying to understand the relationship between the Spring Ck Vlv and the Jandy Ck Vlv. Also what spring rating is required or whether it's needed at all.

Regarding the flow meter, I think it's a good idea but as you mentioned, pad space may be an issue.

Speaking of minimum length for piping, I thought I read that there' a minimum length recommended for other lines, perhaps from pad edge and connecting to the pump(s) suction?

The new model does not have a Service System light.
New model = 8/2020 and later?
 
This all makes sense but I'm still trying to understand the relationship between the Spring Ck Vlv and the Jandy Ck Vlv. Also what spring rating is required or whether it's needed at all.
The heater needs 40 gpm.

At 40 GPM, the head loss is about 2 to 3 psi (7 feet of head is 3 psi)..

So, if you have a check valve on a bypass line that opens at 2 to 3 psi, the bypass is automatic.

2 psi cuts it a little close, so you might want a 3 psi check valve on the bypass.

Every piece of equipment has a head loss curve that shows the head loss vs. flow in GPM.

I can’t find the specific one for the Pentair MasterTemp, but they say about 7 feet is average.

The Jandy JXi is a similar design and it shows 4.5 feet or 2 PSI head loss at 40 GPM.

Assuming the MasterTemp has a similar head loss curve, the spring tension should be at least 2 PSI.

For 7 feet of head loss, that is 3 PSI and a 3.5 lb. spring should only open when the flow going to the heater gets to about 48 GPM or higher.

You can ask Pentair for the head loss curve for the MasterTemp if you want to.


1656256346473.png
1656256795575.png


Speaking of minimum length for piping, I thought I read that there' a minimum length recommended for other lines, perhaps from pad edge and connecting to the pump(s) suction?
1656256073372.png
1656256183755.png


New model = 8/2020 and later?
I don't know the exact date where the new heaters are the new model.
 

Enjoying this content?

Support TFP with a donation.

Give Support
Last edited:
  • Like
Reactions: Duffatola
The Jandy JXi is a similar design and it shows 4.5 feet or 2 PSI head loss at 40 GPM.

Assuming the MasterTemp has a similar head loss curve, the spring tension should be at least 2 PSI.

For 7 feet of head loss, that is 3 PSI and a 3.5 lb. spring should only open when the flow going to the heater gets to about 48 GPM or higher.
I think a 3.5 lb has been the educated guess all along. However, I'm concerned about buying one rating to only find I need another one and have to eat the cost.
You can ask Pentair for the head loss curve for the MasterTemp if you want to.
It surprises me that Pentair doesn't provide the heater data like Jandy does. That would certainly make things easier. I sent an email to my PB last week advising I had tried to contact Pentair to find out more about the spring rating. They, in turn, forwarded it to their rep. We'll see if anything comes to fruition.
 
Think about it like this, if you have a variable speed pump sending water to a heater and there is a pressure gauge before and after the heater and you begin to send flow through the heater, the head loss curve shows the pressure differential expected at every flow rate.

GPM...........Pressure differential

30...................0.2167 psi

40...................2.0 psi

48...................3.5 psi

50...................3.7 psi

58...................5.0 psi

60...................5.2 psi

70...................6.3 psi

80...................6.8 psi.

Since the bypass is in parallel, the pressure differential is the same for the check valve and the heater regardless of the pressure elsewhere in the system.

The check valve rating is where it begins to open.

So, a 3.5 lb check valve begins to open at 3.5 lb (psi), which means that the check valve remains closed until the flow going through the heater gets to 48 GPM and the pressure hits 3.5 PSI.

You can choose the flow where the bypass opens based on the spring tension.

If you wanted 58 GPM, you would choose a 5 lb spring etc.
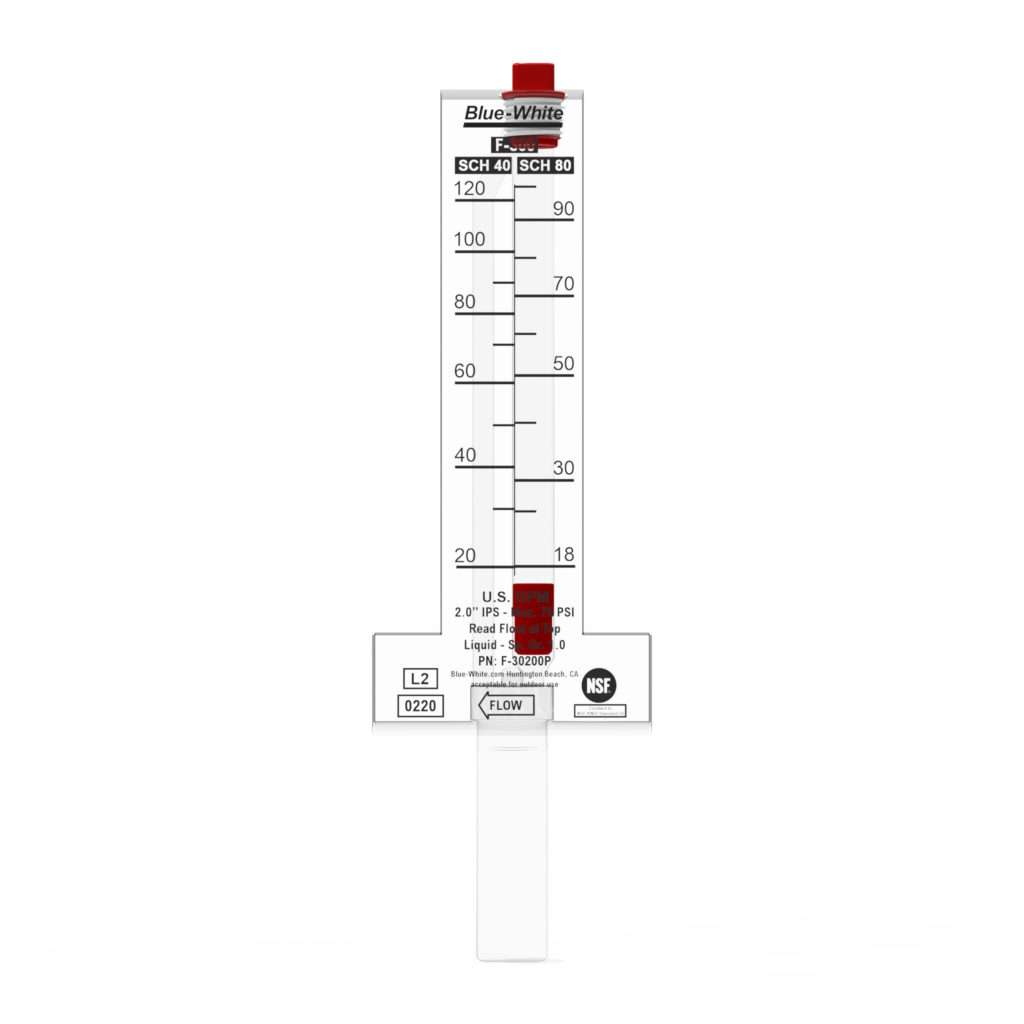

PART # 9431A

MANUFACTURER CODE 1095-20

ALTERNATE PART #'S 109520, 26-350-1002

Product Description

INYO # 9431A FLO CONTROL # 1095-20 GENERAL DESCRIPTION: THIS IS A BYPASS CHECK VALVE THIS IS NOT USED TO PREVENT BACKFLOW LIKE MOST CHECK VALVES THIS IS USED TO ALLOW WATER TO GO AROUND A FILTER OR OTHER EQUIPMENT BY GOING THRU ANOTHER PLUMBING PATH THAT MEETS THE FILTER PLUMBING PATH DOWNSTREAM VALVE TYPE: SPRING OR SWING SPRING TYPE SPRING STRENGTH: 5 LBS. OPENS AT 5 LBS PRESSURE AND IS FULLY OPEN AT 17 LBS OF PRESSURE MATERIAL: WHITE SCHEDULE 40 PVC PIPING CONNECTIONS: 2" SLIP (ACTUAL INSIDE DIAMETER IS 2-3/8" FOR 2" SLIP) DEPTH OF PLUMBING CONNECTION: 1-3/8" (THIS IS HOW FAR THE PIPE WILL EXTEND INTO THE 2" SLIP) TOTAL LENGTH: 5" MAXIMUM OUTSIDE DIAMETER: 2-3/4"

1656259439273.png

1656259581370.png
1656259617855.png
1656259891332.png
1656259971884.png
1656260089916.png

1656260305919.png


1656260422215.png
1656260500803.png

Check Valve – The check valve in the Manifold allows all water flowing through the plumbing at a rate greater than 20 gallons per minute to by-pass the production cell to maximize the production of chlorine.

AutoPilot’s patented Bypass Manifold is a pre-assembled unit designed to control the flow rate delivered to our cell. The spring check valve in the manifold allows excess flow, over 20 gpm, to bypass the cell.

39 R172305 WATER BYPASS CHECK VALVE

You can see the same design in the Autopilot that uses a 3 or 5 lb spring and the Pentair Ultratemp that uses a 12 lb spring.

The 12 lb spring makes no sense because the pressure never gets to 12 PSI based on the head loss diagram.

A 5 lb to 7 lb check valve would make sense, but not 12 lb.
 
  • Like
Reactions: Duffatola
You can go to a 5 lb spring or maybe just not use a check valve bypass, whichever you prefer.

The Pentair literature says 7 feet is average, which is 3 psi.

I think that 5 lb would definitely be ok.

The only time it will make a difference is when you are using spa jets and heating where you need high flow and the heater might be on.

This 5 lb check valve is clear and you will be able to see if it is open or closed.


1656268834536.png

1656269670045.png

1656269582858.png
 
Last edited:
  • Like
Reactions: Duffatola
I would go with the 5 lb clear so that you can see it working.

I think that the 3.5 lb would probably work fine and it would also be an acceptable choice as long as you verify performance and you have the flow switch to protect the heater.

I would put unions on both ends of the check valve and have a replacement with the same unions just in case the original ever fails.


For all Jandy check valves, I would get one spare for each size so that you can have a replacement ready to go if one fails, which will probably happen.
 
Last edited:
  • Like
Reactions: Duffatola
This heater does not have a bypass and the internal bypass has already failed in less than a year, probably due to excessive flow.

Well, I took the cell out and this fell out. It was big enough to block approximately 80% of the inlet to the cell. Its bee there for some time too as I was immediately able to reduce the rpm of the pump from 1500 to about 1050 and my filter pressure dropped from about 5 psi to 1 or 2 psi prior to bumping the rpm.

It looks like similar material to the heater inlet outlet manifold where the piping connects and it has a broken spot in the center of the back. Any ideas what it is or where it came from. Everything works fine and that's been there for some time. So at least there's that.

Everything is less than a year old and the PB is coming to look tomorrow.


1656272129619.png
1656272062022.png
 
  • Wow
Reactions: Duffatola
The distance from the elbow to the pump should be 15" based on the 3" pipe X 5.
Assume the distance (5x pipe i.d.) is based on an industry standard/best practices? Are there other standards/best practices with regards to minimum distances for the equipment pad for equipment or piping in general?
 

Enjoying this content?

Support TFP with a donation.

Give Support
Thread Status
Hello , This thread has been inactive for over 60 days. New postings here are unlikely to be seen or responded to by other members. For better visibility, consider Starting A New Thread.