New Build - Las Vegas NV - Owner/Builder

Ok, we have a stockpile of parts and equipment, time to get digging I suppose. The area of the lot the pool is going slopes up, so I used the backhoe to loosen up the dirt and grade it down about 7".

20230125_140048.jpg

All scraped and ready to grade -

20230125_144941.jpg

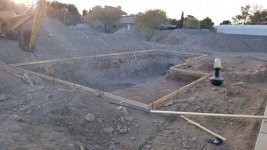
Roughly laid out with 1x4's -

20230127_121858.jpg

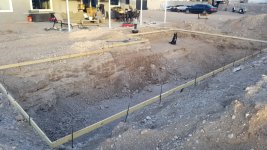
Forms set... I have 1/4" per foot drop to my porch from 4" above forms. Forms are top of bond beam. Water depth will be measured from 3" below top of forms which should be roughly middle of skimmer.

20230128_163022.jpg

First scoops... no turning back now!

20230201_163752.jpg

Didn't take long to hit some extremely hard rock... I don't think it is caliche, but it really made my backhoe work. The Cat 426 is 15,000 lbs, and it took every pound of it to break through.

20230204_112520.jpg

A couple areas needed the jackhammer to assist, but eventually we hit 6'3" depth from top of forms which gets us to 5'6" water depth -

20230205_163642.jpg

We got the deep end pretty much done other than the benches. We started the transition from 5'6" depth to 4'. With this hard rock, its more like carving out a pool rather than digging!

My wife ran the skid steer all day while I scooped out rock and dirt. Callie the puppy was curious about the project... if only she knew what it was going to be!
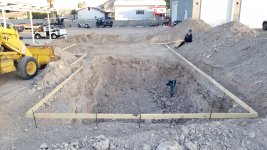
20230205_163719.jpg

That's the progress after 1.5 days of digging! Slower than I wanted but the base for the pool is literally going to be carved out rock, which I feel good about. The other nice thing is we can get the walls pretty much vertical without dirt falling back in. I'm curious how much more an excavation company would have charged once they hit the rock....

Hoping to have the shallow end and baja shelf dug tomorrow. We'll then use the jackhammer and hammer drill to carve away the last few inches on the walls and around the benches and stairs. I'm shooting to be ready for plumbing next weekend.
 
Last edited:
Let the DIRT begin! Can't say mud on this one that is for sure!

The digging of the rock could have cost you anywhere from $3000 to $5000 extra depending on how the charge it. Some do by the job and some do by the hour. Either way OUCH!

Is the wife saying "are we done yet?" LOL Callie is more play time for me!!!

Kim:kim:
 
  • Like
Reactions: jetranger
Most excavation companies charge by the hour but also charge for any extra equipment needed such as a backhoe with a breaker attachment.
One particular job a rock was un earthed and was so large that the layout of the pool had to flipped deep end to shallow end.014811A5-9BA4-4589-BD22-EADF2F71A4C0.jpegThis wasn’t that job.
 
  • Wow
Reactions: kimkats
In your last picture, the grade of slope is higher on the right side of the excavation than the pool at 0. How are you going to keep that earth away from the pool? Block wall? At times it’s cheaper and more convenient to have that area of the pool at a raised BB.
 
In your last picture, the grade of slope is higher on the right side of the excavation than the pool at 0. How are you going to keep that earth away from the pool? Block wall? At times it’s cheaper and more convenient to have that area of the pool at a raised BB.
Yes sir, the right side of the pool in that occur gets a raised BB... 12" toward the sides, 24" in the middle.

Thank you for asking.
 
Sorry but two more questions, were the forms laid out wider than the water requirement? The your skimmer location is not yet set in the form work and at times it may be easier to cut before the wall gets to deep in front of its location.
Please don't apologize for asking questions, I value your time and input.

Yes, the forms are set 1 ft in all directions wider than water, and I dug up to 6" within the forms leaving about 6-7" for shotcrete.

Correct, skimmer not in yet. My neighbor had his pool excavated last week and the skimmer was dug out by the plumbing crew, so that's what I was basing my work off of... I've been trying to duplicate everything they did (fortunately, they didn't hit any hard rock!)

Thanks again
 

Enjoying this content?

Support TFP with a donation.

Give Support
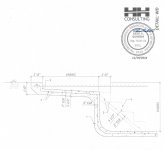
In my area they shoot 9” on reef steps, that would put you at 28”, don’t know what the steel engineering plans are requiring you have.
Pool Detail.jpg

Here's my WD detail...

Wed Deck.jpg

I'm seeing 5.5"... but I sure don't mind adding some extra. Do you typically see any failures from a thinner shelf?
 
No I have not seen any failures but in my experience they are all shot at 9”, can’t say if that’s the reason why or not. All this is due to soils conditions and expansive soil is common in my area.
I noticed that the date below the wet stamp is from 2018, is that when the plans were approved?
One more note, be sure that the deep end seat has a steel cage forming it or it will have a high likelihood of collapsing during the application if it’s shot free form.
 
The other nice thing is we can get the walls pretty much vertical without dirt falling back in. I'm curious how much more an excavation company would have charged once they hit the rock....

The digging of the rock could have cost you anywhere from $3000 to $5000 extra depending on how the charge it. Some do by the job and some do by the hour. Either way OUCH!

Most excavation companies charge by the hour but also charge for any extra equipment needed such as a backhoe with a breaker attachment.
For my build, yes, the excavation company charged $250 hr with a 2 hours free. They did change out the head of the excavator to the hammer attachment. In my build thread see post 16 for the images. Total hammer time, 10 hours.
 
No I have not seen any failures but in my experience they are all shot at 9”, can’t say if that’s the reason why or not. All this is due to soils conditions and expansive soil is common in my area.
I noticed that the date below the wet stamp is from 2018, is that when the plans were approved?
One more note, be sure that the deep end seat has a steel cage forming it or it will have a high likelihood of collapsing during the application if it’s shot free form.

Thanks, I will go for 9" on the wet deck just to be safe. 5.6" doesn't seem like enough, honestly.

The plans were engineered in November, so just a few months ago. Maybe that's when the engineer himself got certified? Not quite sure...

Regardless, they were approved by the city and I have my permit so I think I'm good to go.

I will make sure there's a cage around the bench area.

Thanks again!!!

For my build, yes, the excavation company charged $250 hr with a 2 hours free. They did change out the head of the excavator to the hammer attachment. In my build thread see post 16 for the images. Total hammer time, 10 hours.

Thanks! I guess I dodged a bullet... But I do feel bad for my backhoe!
 
@AQUA~HOLICS I have two plumbing questions for you -

I noticed on my neighbors plumbing, the returns, laminars, and bubbler pipes are all pretty much set in the BB. Obviously it was all pressure tested, but there are now dozens of joints that are now covered in shotcrete.

Question 1 - if you have the space available, do you like to run plumbing outside of the BB to make it easier to find/fix a leak?

Here is a picture of the neighbor's plumbing in the BB -

20230122_125740.jpg

Question 2 - In the picture above looking at the returns, what is the reason for the 'T', down to a street 90, then out into the pool? It seems easier to just aim each 'T' directly out into the pool without the 90, but I figure there has to be a reason.

Thanks!!
 
#1 If the space is available I like the plumbing outside the BB. In the pictures provided, even in tight areas they can be trenched. Running the pipes inside the BB takes away from Shotcrete material that is the strength of the shell. Your ground has rocks as you found out so most likely the plumber did not want to trench, I have had plumbers walk off jobs due to this exact reason. Most spas are RBB so they are inside.

#2 This seems to be something that all plumbers have in common and I don’t know the answer.

A few things on your neighbors pool, swim lane next to the sun shelf, the return line need to be lower, he has engineered a dead spot in that corner with it being so high on the wall.
When time for inspection, have the tee on the main drain exposed for the inspector to see the fitting.
At the time of the picture, I don’t see any plumbing for lights?0BEB8B7C-6D54-4237-AE66-C0B881683328.jpegEF0C7ABC-4FB2-41E9-96BE-1EE769B6338D.jpegFC3C6615-59C2-4EC3-BBE4-35B3C5AAE9A2.jpegD0F572CD-483B-43D8-876E-60AEFD6BD73E.jpg
 
@AQUA~HOLICS Those are some clean plumbing installs for sure! Thanks for the pictures... I love the drone shot!

I'd love to get my pluming away from my BB... I don't mind doing a perimeter trench. I think that's best.

His pool is now shotcrete, so no moving the returns. How low would you have gone with that one? Like midway up the wall?

He has 6 nicheless LED's, and the conduit was added shortly after I took that picture.

Thank you for your time
 
Almost done digging... I have rebar scheduled for 8 days from now. The baja shelf is carved out and ready to go. Now I have to go around to the walls with a jackhammer and make them all plumb. Luckily it goes pretty quickly just shaving an inch or so at a time.

20230210_164102.jpg

20230210_164117.jpg

20230210_164205.jpg

20230210_164215.jpg


Quick question for the plumbers out there .... on my neighbors plumbing, I'm curious what type of pipe (gray) is used on the bottom of the skimmer, and what type of thread sealant should be used. Just a typical teflon? I ask because it didn't really look life teflon - more of a clear epoxy or silicon.

20230125_101538.jpg

20230125_101543.jpg
 

Attachments

  • 20230210_164256.jpg
    20230210_164256.jpg
    399 KB · Views: 8

Enjoying this content?

Support TFP with a donation.

Give Support
Thread Status
Hello , This thread has been inactive for over 60 days. New postings here are unlikely to be seen or responded to by other members. For better visibility, consider Starting A New Thread.