New build in CA

So day 1 install hydrazzo... day 2 come back polish and fill pool... and the startup process begins?

yup, I brought in four water trucks to quickly fill my pool after the polishing was complete.

Then it is normal plaster startup process.
 
  • Like
Reactions: tomas21
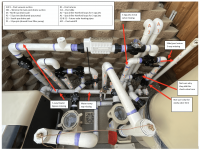
Any ideas why the horizontal check valve between P1 (3 spa jets) & R1 (pool return) and jandy valve on our pool return (R1) that is shared on the primary filter pump?
There is some corrections to be made for the 3 way parts that were missing for the slide and a 3-way to bypass the heater.
We will be running a fully automated system with the Intellicenter i10ps.
1630042886785.png
 
Last edited:
The pipe between P1 and R1 with the CV will run your spa spillover all the time you are in POOL mode. You have no way to turn off your spa spillover.

You want a diverter valve in the crossover pipe with the CV so you can turn off the spillover.

Then you use the SPILLOVER mode on the IntelliCenter to schedule when your spillover will run.
 
@ajw22 Hmm... that is what I was afraid of.
1. Wonder why they would do that and what was the purpose.... so they could ensure the spa is sanitized if it was shut off from the 3 way above, and they didn't understand when I said it is a fully automated system with spillover built into the panel.
2. Given our space, I'm trying to figure out how I would tell them to redo it since they were adimant that horizontal had to be there.. I want full automated control of my spillway.
  • Is the horizontal even necessary - can we completely eliminate it?
  • Could we put a check valve like I have in the drawing and completely eliminate the horizontal altogether, or is good to have just include a diverter valve and where exactly?
  • I'm all ears since they have to come back and add 3-ways missed for heater bypass and the slide pipe (btw: 3-way jandy valves are no where to be found in southern california right now for those building pools) : )

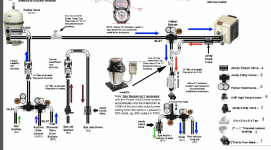
Here is the original plumbing drawing we reviewed with them but seems like they missed or ignored the return area.

1630072660388.png
 
Last edited:
They are clueless about how an automated spillover work.

A spa will stay sanitary for a day without water flowing through it. if you run the spillover cone a twice a day for 15-20 minutes you refresh the water and it's chlorine level. That is all it takes.

Replace the CV with a Diverter valve. A 2 way diverter fits into the same housing as a Jandy CV. Just unscrew one an screw in the other. So you don't need to cut it out. You will never want to run your pool with that line open and your spillover running.

Your diagram shows a CV in the P1 vertical line. It looks like they got confused and installed it in the R1 instead. You can have them put a CV in the vertical P1 line to replace the CV you will have removed. But that will take a lot of pipe cutting and fixing and you don't need it if you never open that crossover pipe and then turn off your pump for any length of time. I would not bother but wanted to point it out.
Thanks... So based on our situation you would propose the following and to limit replumbing
  1. Convert the horizontal check valve to a 2 way diverter (just unscrew lid, remove check valve components, and add in 2 way diverter components (just be sure to leave it always closed since we have IntelliCenter running full automation for pool mode, spa mode, spillway mode)
  2. Optional - to add check valve to P1 - The check valve that is missing on P1 (3 spa jets) is unnecessary as long as we keep the horizontal 2-way diverter closed between P1 & R1... What would be the benefit if I had them add a check valve to P1?
  3. What is the point of the 2-way diverter that they added towards the bottom of R1?

This forum is awesome to help better educate us first time pool builders / customers having pools built
 
  1. Convert the horizontal check valve to a 2 way diverter (just unscrew lid, remove check valve components, and add in 2 way diverter components (just be sure to leave it always closed since we have IntelliCenter running full automation for pool mode, spa mode, spillway mode)

Yes

  1. Optional - to add check valve to P1 - The check valve that is missing on P1 (3 spa jets) is unnecessary as long as we keep the horizontal 2-way diverter closed between P1 & R1...

Correct.

  1. What would be the benefit if I had them add a check valve to P1?

If you ever have that crossover valve open, and you turn off your pump, it prevents the spa from draining back into the pool.

Not that big of a deal if it did. The spa will refill the next time the IntelliCenter runs the spillover.

  1. What is the point of the 2-way diverter that they added towards the bottom of R1?

No idea.
 
  • Like
Reactions: tomas21
Thanks Allen! .. guess our plumbers need to be made aware of the updated version of the spa bypass that utilizes the valve actuator to ensure spa is sanitized vs. what was installed on our system... old school spa bypass utilizing a check valve between pool and spa return from shared pump.
 
If you want to save a few bucks...
  • unscrew the CV from the crossover pipe
  • unscrew the diverter valve in R1
  • Screw the diverter assembly into the crossover pipe
  • Remove the flapper and spring from the CV you removed
  • Screw the CV cover onto the R1 pipe
  • Save the CV flap and spring as a replacement part for when one of your other CVs breaks
  • Do not overtighten any of the screws and crack the screw holes
All is now the way it should be.
 
  • Like
Reactions: tomas21
If you want to save a few bucks...
  • unscrew the CV from the crossover pipe
  • unscrew the diverter valve in R1
  • Screw the diverter assembly into the crossover pipe
  • Remove the flapper and spring from the CV you removed
  • Screw the CV cover onto the R1 pipe
  • Save the CV flap and spring as a replacement part for when one of your other CVs breaks
  • Do not overtighten any of the screws and crack the screw holes
All is now the way it should be.
Amazing and seems like an easy fix (Swap insides of both and save CV flapper & spring) to do this weekend prior to next week getting all equipment wired up and Hydrazzo installed on tues/weds. ; ) Is there a preferred lubricant I should put around the plastic when i swap the components or because they are brand new just swap and hand screw down snug?
 
Last edited:

Enjoying this content?

Support TFP with a donation.

Give Support
@ajw22 Do I still need to have them install a CV on P1 since it was never installed and if so above or below where I will be converting the horizontal CV to 2-way valve?
 
My spa standpipe just uses two 90's to point down. Never put anything over it. Not many critters here in the desert.
 
@ajw22 Do I still need to have them install a CV on P1 since it was never installed and if so above or below where I will be converting the horizontal CV to 2-way valve?


If you ever have that crossover valve open, and you turn off your pump, it prevents the spa from draining back into the pool.

Not that big of a deal if it did. The spa will refill the next time the IntelliCenter runs the spillover.
 
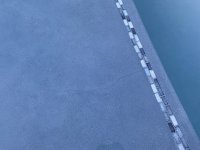
Hydrazzo Mediterranean Blue installed but noticed after day 2 of startup some interesting areas on the baja... any reason why the spidering look patterns in various areas of the top of the baja and possible ways to improve?

@ajw22 and others any thoughts?
1-2021-09-15_06-31-38_IMG_7114.JPG1-2021-09-15_06-31-53_IMG_7115.JPG1-2021-09-16_06-43-45_IMG_7129.JPG
 
Last edited:
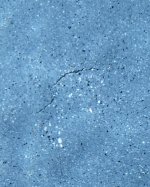
Going to call CLI tomorrow but any ideas regarding this cracks I just noticed on the baja in 2 -3 spots to see what they suggest can be done to remediate... not sure if these are just on the surface or deeper and ~2-3 in length

1-2021-09-17_09-22-27_IMG_7134.JPG2-2021-09-17_09-22-36_IMG_7135.JPG3-2021-09-17_09-52-26_IMG_7142.JPG4-2021-09-17_09-52-29_IMG_7143.JPG
 
Thread Status
Hello , This thread has been inactive for over 60 days. New postings here are unlikely to be seen or responded to by other members. For better visibility, consider Starting A New Thread.