looks awesome, fantastic work. question. looks like you're using 2x8 (maybe 6) doubled up on 6x6 for the deck and supports are so far apart. why? I've never seen this type of deck build, interesting.

My AquaSport 52 Build
- Thread starter mgmercurio
- Start date
You are using an out of date browser. It may not display this or other websites correctly.
You should upgrade or use an alternative browser.
You should upgrade or use an alternative browser.
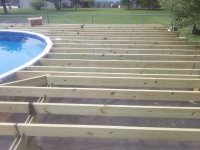
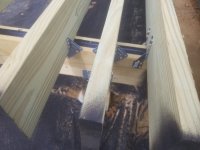
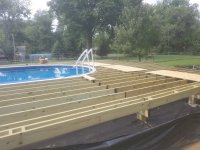
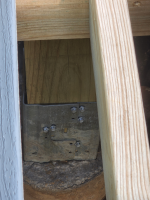
yes I am using 2 - 2x8's sandwhich together to make the beams. Also as a side note...if I had to do it over..I would use 1 - single 4x8 beam. I am finding out that "sandwhiching" two 2x8's together to make a 2-ply beam is not the preferred method as water can potetenially work its way down the seam and cause the wood to rot. However with that said, I did run a bead of calking down the seams and cover with deck joist butyl tape to prevent the water from entering the seams.looks awesome, fantastic work. question. looks like you're using 2x8 (maybe 6) doubled up on 6x6 for the deck and supports are so far apart. why? I've never seen this type of deck build, interesting.
")
To answer your question...the beam is resting on concrete piers that are buried down to 40". (frost line in Louisville, KY is 36")
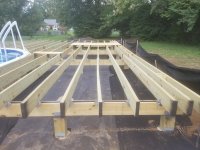
and the concrete piers are no further than 5'9" apart. For a 2x8 2-ply beam, beam supports can be up to 6' if your joists are on 16" centers...which all my joists are. The joists will be 2x8's as well (pics are forthcoming in a few days) and the largest span of any of my joists over the beam is 10'2". According to deck joist span tables - a 2x8 joist can span 1.5 times in feet, the width of the board in inches. In this case, the width is 8" ... so the span can be up to 12' between beam supports.
Thanks for the kind words! I hope this helps and like I said...I have many pics forthcoming as I have made some considerable progress on laying the deck joists.
-mgm
In the photos, it looks much further, thanks for clarifying. I wouldn't worry about rot, I have 2x6 buried and it's still not rotted after 11 years. This is also untreated so, you'll be fine. Maybe lvl would have been cheaper and easier? But in any event, high five, looking forward to seeing it completed.
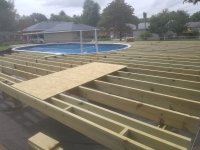
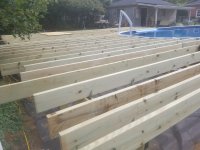
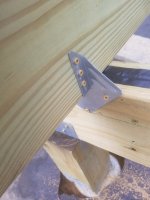
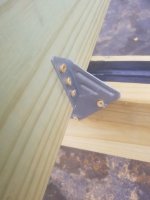
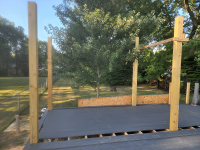
So I made some really good progress on installing the joists...I still have many more to go ... Also, I had to retrofit a few more deck posts to accommodate the framing around the curved ends of the pool...I will upload those pics in a couple days. I gotta say...I was extremely impressed with the Titan Deck Post Anchors...they are the real deal.... Like I said...i will get a couple of pics of them to show you what I am talking about...
In the meantime...check out the joist install....
-mgm
p.s. Look at pic number 71. Look at the joist 5th from the right hand side. See how bowed that is? I promise, it was straight as an arrow the day I installed it. I haven't installed the blocking yet and it has been there for about two weeks out in the weather. It rained heavily for about 5 days in a row. That joist became bowed sitting there like that..... crazy! I hope the blocking will straighten it out
Also, I had to retrofit a few more deck posts to accommodate the framing around the curved ends of the pool...I will upload those pics in a couple days. I gotta say...I was extremely impressed with the Titan Deck Post Anchors...they are the real deal.... Like I said...i will get a couple of pics of them to show you what I am talking about...In the meantime...check out the joist install....
-mgm
p.s. Look at pic number 71. Look at the joist 5th from the right hand side. See how bowed that is? I promise, it was straight as an arrow the day I installed it. I haven't installed the blocking yet and it has been there for about two weeks out in the weather. It rained heavily for about 5 days in a row. That joist became bowed sitting there like that..... crazy! I hope the blocking will straighten it out
Attachments

Last edited:
Looking good. Yeah, all the rain and humidity would have done that, should easily straighten out when you block it in. You could always soak it with the hose if needed. I ran into similar issues, rain/hot/hot/sun and I had a few bow out like a whale rib. So on my last deck I immediately staggered blocks to keep em straight. Not that it really matters with a little bow here or there.
You should see the studs of my interior walls. Lots of plaster on missed screws.
lmao
Great update, keep em coming.
You should see the studs of my interior walls. Lots of plaster on missed screws.
lmao
Great update, keep em coming.
Check the ends for the grain pattern. I wonder if that one is considerably different as no two planks are the same. You can usually tell from the rings which ones will cup / warp. And when you get a bundle dropped off, guaranteed a few of them will be prone to it.
Blocking will fix it for sure, and either way it’ll be good for 2+ decades, but it is always nice when they just look perfect for all the effort you put in.
Blocking will fix it for sure, and either way it’ll be good for 2+ decades, but it is always nice when they just look perfect for all the effort you put in.

Hi, I have been following this build for a while from the sidelines and I would like to say awesome job! I got delivery on the same exact Aquasport 52 in early July this year and spent the summer building it. I wanted to say THANK YOU for posting all of the pictures and information that you did...it was very helpful. A friend and I took a few days working when we could to complete the pool. I am also looking to eventually build a deck so, I am back checking these more recent photos. Thanks again for taking the time to explain your build. After finding areas around my pool where water sits after heavy rain I am going to install a french drain like yours.
-Frank
-Frank
I wish you MANY years of enjoyment, but I can attest that my wishes are for goodwill alone. That pool is a TANK and it was everything I could do to take it apart with power tools 17 years later. The parts buried in the mud came out as clean as the day they were installed and laughed at me trying to remove them. Every inch of it laughed at me.I got delivery on the same exact Aquasport 52 in early July this year and spent the summer building it
Hi FrapHi, I have been following this build for a while from the sidelines and I would like to say awesome job! I got delivery on the same exact Aquasport 52 in early July this year and spent the summer building it. I wanted to say THANK YOU for posting all of the pictures and information that you did...it was very helpful. A friend and I took a few days working when we could to complete the pool. I am also looking to eventually build a deck so, I am back checking these more recent photos. Thanks again for taking the time to explain your build. After finding areas around my pool where water sits after heavy rain I am going to install a french drain like yours.
-Frank
Thank you for the kind words I really appreciate your comments. I am very glad my posts have helped as I too...have scoured the Internet and poured over countless hours of YouTube videos, teaching myself how to do everything you have seen so far. Even though I am Union Plumber by trade (although retired from the industry over 20 years) with many years of construction experience, this is my first Pool / Deck build. If it wasn't for all the good folks within this forum and all the generous folks on the Internet with their knowledge, I would not have made it this far.
For that, I too am extremely grateful. I will keep posting pics and real-life experiences with my build until it is complete. Which by the way...I will be uploading more pics any day now as I have made some real progress. I have the deck boards to lay, the tiki bar to build, run all the electric, water, and drain lines and then I am going to install a bathroom off the back of the garage. So this project will be going on well into 2022. My original goal was to have a grand opening and a Derby party next spring, but I am not sure I am going to make it in time.
Anyway, if I could, I would have all you guys over for a drink to help me celebrate and open the deck when it was completed.
Good luck with your build and please do not hesitate to reach out if I can help in any way.
-mgm
Thank You, that is good to know! I hope it lasts me a long time!I wish you MANY years of enjoyment, but I can attest that my wishes are for goodwill alone. That pool is a TANK and it was everything I could do to take it apart with power tools 17 years later. The parts buried in the mud came out as clean as the day they were installed and laughed at me trying to remove them. Every inch of it laughed at me.
Thanks for the reply, I will keep an eye on this build in the coming months. I would like to eventually get around to posting my build!Hi Frap
Thank you for the kind words I really appreciate your comments. I am very glad my posts have helped as I too...have scoured the Internet and poured over countless hours of YouTube videos, teaching myself how to do everything you have seen so far. Even though I am Union Plumber by trade (although retired from the industry over 20 years) with many years of construction experience, this is my first Pool / Deck build. If it wasn't for all the good folks within this forum and all the generous folks on the Internet with their knowledge, I would not have made it this far.
I will keep posting pics and real-life experiences with my build until it is complete. Which by the way...I will be uploading more pics any day now as I have made some real progress. I have the deck boards to lay, the tiki bar to build, run all the electric, water, and drain lines and then I am going to install a bathroom off the back of the garage. So this project will be going on well into 2022. My original goal was to have a grand opening and a Derby party next spring, but I am not sure I am going to make it in time.
Anyway, if I could, I would have all you guys over for a drink to help me celebrate and open the deck when it was completed.
Good luck with your build and please do not hesitate to reach out if I can help in any way.
-mgm
Mark Piccione
New member
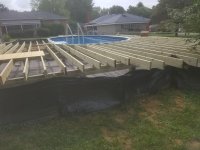
Hi, in regards to the bonding, Is the paint on the pool enough to keep oxidation from taking place and breaking the ground connection? I notice in your pic that you have the copper connector right against the aluminum. I'm about to ground my pool as well and have been looking on how to do it.ok construction has resumed...weather has been KILLING ME! .... anyway...I have installed the French drain and the bonding wire...pics attached....backfill is this week.
Next comes pool floor, liner, skimmer, and WATER!
Hi MarkHi, in regards to the bonding, Is the paint on the pool enough to keep oxidation from taking place and breaking the ground connection? I notice in your pic that you have the copper connector right against the aluminum. I'm about to ground my pool as well and have been looking on how to do it.
I'm sorry, I'm just now replying to your question. For some reason...I'm not notified when someone posts a question on my post. It's probably something wrong in my settings.
But regardless, in case you are still in need of the info, two things...1. First, I "redid" the bonding after I backfilled. The pics I posted were before I backfilled it and it occurred to me that the bond wire would be almost 20 inches in the ground. So I pulled it out..backfilled, then re-attached it to the buttresses in the same exact fashion, only this time just 6 inches below grade. Everything I have seen on bonding has always said the wire should not be more than 6 inches below grade.
2. To answer your question, I used stainless steel screws to attach the copper clips to the aluminum pool. Again, everything I have read told me to NOT use aluminum screws and make sure they are stainless screws so as to make sure to not lose any conductivity. As far as corrosion or oxidation is concerned, everything that I have read is that "air" is the catalyst to start the oxidation process between aluminum and copper...therefore burying the cable as well as the connections clamps under the soil by a minimum of 6 inches, the air is greatly reduced and the oxidation process is slowed waaaaaay down to a crawl. Almost to a point where it becomes negligible.
I hope this helps.
Again, sorry for the late response.
By the way...I have a ton more progress pics headed this way....
Matt
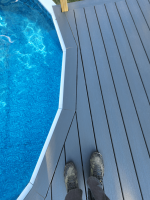
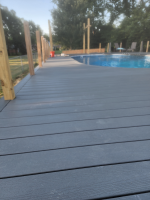
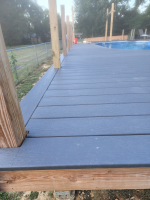
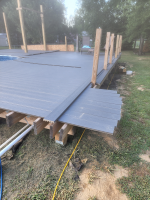
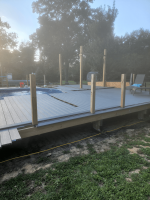
Sorry, it's been so long since I made an update. I was trying desperately hard to wait until lumber prices came down a bit more before I bought the Trex Decking package. I waited a few months but couldn't wait any longer. I am sure my neighbors are like "come on...please get that eyesore finished!" LOL LOL Anyway, the following are some pics of the Trex decking and the installation process. I hope you enjoy!
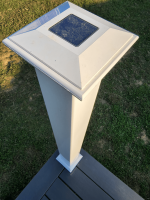
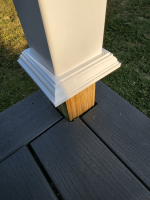
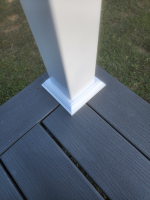
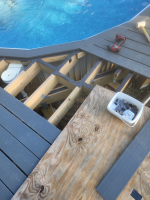
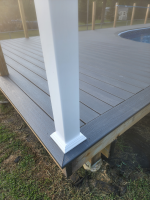
p.s. Pics 82 thru 85...I'm showing the notching I made around each individual post with the thought of buying the post sleeves with solar lights. As you may be able to tell in some of the pics..my notches didn't all turn out to be tight, but the post base saved me in all those circumstances I bought one entire post sleeve, cap, and base from Home Depot as a test sleeve to see what the end product will look like...sleeve = 14.00 post base=7.00 solar post light 11.00 NOTE- I am trying to find charcoal or grey sleeves but the only ones I can find or from Trex and they cost about 60.00 a piece! The one I got here from Home Depot is made of vinyl / plastic and only costs 13.00...but I can only find it in white
p.s. Pics 82 thru 85...I'm showing the notching I made around each individual post with the thought of buying the post sleeves with solar lights. As you may be able to tell in some of the pics..my notches didn't all turn out to be tight, but the post base saved me in all those circumstances
I bought one entire post sleeve, cap, and base from Home Depot as a test sleeve to see what the end product will look like...sleeve = 14.00 post base=7.00 solar post light 11.00 NOTE- I am trying to find charcoal or grey sleeves but the only ones I can find or from Trex and they cost about 60.00 a piece! The one I got here from Home Depot is made of vinyl / plastic and only costs 13.00...but I can only find it in white Attachments

More pics...
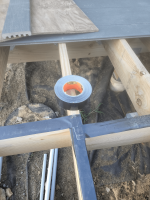
you will see in pic 87 the water and drain pipes I am running out to the tiki bar which is shown in pic 77 above
you will see in pic 87 the water and drain pipes I am running out to the tiki bar which is shown in pic 77 above
Attachments
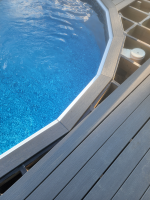
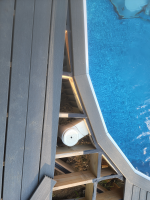

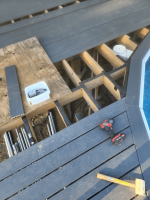
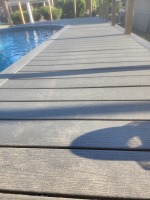
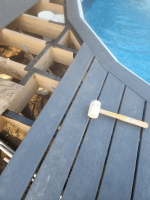
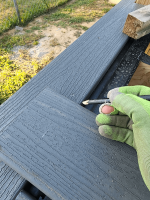
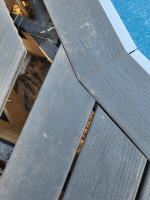
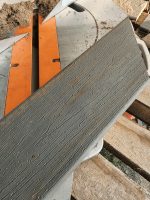
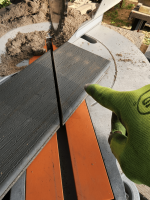
In this set, you will see how I came up with the miter cuts around the pool. Note - It was a LONG process trying to figure out how to get each miter correct. The oval ends swing between 10.5 degrees to 47.5 degrees. So I ended up placing a scrap piece of Trex along the inner picture frame board on the railing of the pool and then placed the actual decking board under it. I then scribed a line from the scrap guide and transferred the exact miter onto the deck board. After I made the cut and tested to make sure the fit was correct, I then used the cut-off piece from the miter cut (pic 99) to use as a template for the next cuts. Each oval section (there are 20 sections - 10 on each end) has between 4 and 5 trex boards (5.5 inches wide) along the edge. Needless to say, it was a lot of miter cutting and I am still not finished. lol I hope all that makes some sort of sense. LOL anyway...it worked!
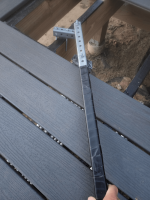
One note - look at pic 100. Can you see that brown ish looking stain on the grain of the board? I am wondering if anyone can tell me what that is? Let me explain...
When I bought the boards and had them delivered, they came bundled with straps. So I cut off the straps and stack the boards in the storage spot out in my yard under a tent and on several 2x4's to keep them up off the ground. Over time, that brownish looking material came up...and it looks and feels like it is some kind of oil residue that just weeped out of the trex material. It does come off, but I have to scrub it pretty hard to remove it. I am just wondering if anyone has seen this before or knows what it is?
Attachments

This is the last set of uploads for now. I am going to upload some pics of the Tiki Bar supports in the next day or so and go into more detail of the bar Anyway so I am going to go ahead and say...I KNOW the deck installer community is going to blast me for doing this...but I just couldn't justify the expense. Let me explain...
In pic 105 you will see a roll of Gorilla tape. This is the tape that I used for "Deck Joist Tape." The reason is because Deck Joist Tape costs about 13.00 a roll for only 50 linear feet! It is very expensive and on a deck this size, I would have spent well over 1500.00 just on Deck Joist Tape! So I decided to cut a corner and use Gorilla Tape. For 10.00 I get 250 linear feet! Now granted, I will probably still spend around 1000.00 on this tape...but it is cheaper and to me...I think it serves just the same purpose...which is to keep water from seeping into the joist. I could be wrong..but I think it will last way over 20 years or so...and at age 57...I am sure I will be long gone before the deck will be
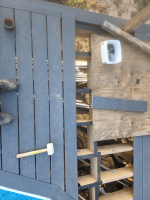
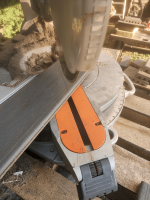
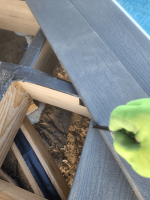
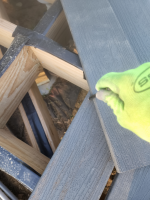
Finally, in pics 106 and 107 ...you will see my home made "Deck Board Sandwhicher" lol actually the technical term is Deck Cinching Tool." I made this tool to help me cinch the deck boards together nice and tight.
Anyway so I am going to go ahead and say...I KNOW the deck installer community is going to blast me for doing this...but I just couldn't justify the expense. Let me explain...In pic 105 you will see a roll of Gorilla tape. This is the tape that I used for "Deck Joist Tape." The reason is because Deck Joist Tape costs about 13.00 a roll for only 50 linear feet! It is very expensive and on a deck this size, I would have spent well over 1500.00 just on Deck Joist Tape! So I decided to cut a corner and use Gorilla Tape. For 10.00 I get 250 linear feet! Now granted, I will probably still spend around 1000.00 on this tape...but it is cheaper and to me...I think it serves just the same purpose...which is to keep water from seeping into the joist. I could be wrong..but I think it will last way over 20 years or so...and at age 57...I am sure I will be long gone before the deck will be
Finally, in pics 106 and 107 ...you will see my home made "Deck Board Sandwhicher" lol actually the technical term is Deck Cinching Tool." I made this tool to help me cinch the deck boards together nice and tight.
Attachments

Thread Status
Hello , This thread has been inactive for over 60 days. New postings here are unlikely to be seen or responded to by other members. For better visibility, consider Starting A New Thread.