my pools toilet style float (fluidmaster)went bad, when I replaced it, I over tightened the new fluidmaster float and cracked the inlet on the autofill where it screws on, causing some hairline cracks that now leak. I put water weld on the cracks, they hold but then start leaking again under pressure. I am contemplating what to do and hopefully avoiding ripping up the concrete deck to replace the fill. I live in California, very dry climate. my idea is to put a solenoid valve at the equipment, where the autofill connects to the water source, then open and close that valve via my rachio system. my question, is there a way to reduce the amount of pressure at the autofill in the deck? can I keep the fluidmaster valve in the open position (always filling water) somehow so when the solenoid valve opens, it fills and when it closes it stops filling? If I take the fluid master off, the water just shoots 5 feet in to the air obviously. Just curious if this could be accomplished?

Leaky Autofill
- Thread starter Oriluv
- Start date
You are using an out of date browser. It may not display this or other websites correctly.
You should upgrade or use an alternative browser.
You should upgrade or use an alternative browser.
- Jul 21, 2013
- 52,504
- Pool Size
- 35000
- Surface
- Plaster
- Chlorine
- Salt Water Generator
- SWG Type
- Pentair Intellichlor IC-60
You can reduce the pressure coming out of the solenoid you will install.
I am sure @Dirk will have some ideas on this.
I am sure @Dirk will have some ideas on this.
- Nov 12, 2017
- 11,852
- Pool Size
- 12300
- Surface
- Plaster
- Chlorine
- Salt Water Generator
- SWG Type
- Pentair Intellichlor IC-40
I'm a little unclear on what is leaking. If you can control the flow to the autofill, and there is no "toilet valve," I understand it shoots up too high, but with that setup, is there otherwise no leaking? Or are you saying there is leaking, but only when there is water pressure flowing to the auto-fill? And you're willing to live with that if the pressure to what is leaking can be turned on and off upstream of it? I'll assume the latter. (Though it seems if there are cracks where I'm picturing, the pool water would leak through them, no? Even when the auto-fill is not under pressure?)
If I'm understanding correctly, you don't need the "toilet valve" at all, in fact it's better that it's not there. Plumb a solenoid sprinkler valve anywhere in the line feeding the auto-fill, wire that to a 24V power supply, and plug the power supply into whatever device you need to control it with rachio (what is that, some sort of home automation tech?). That's all you need. You can use the sprinkler valve's manual control to dial down the pressure. If it's still too much, you can use some PVC to install an elbow where the toilet valve was, to divert it sideways. The sprinkler valve needs to be located well above the pool's water level. It needs to be anti-siphon, like this:

If you keep the toilet valve inline, then you have to use a much more expensive setup to achieve proper backflow prevention. But if you do away with the toilet valve, then you can use an inexpensive sprinkler valve (the reason for that is a long-winded explanation, that'll I'll go into if you gotta know).
This, of course, would eliminate the auto-flow based on water level, but you could use your automation to dispense water X minutes a day that should get you pretty close. You'd have to vary it for the seasonal temps, but it'll be better than a hose! I think that's what you are wanting to do, yes?
But to answer your actual question: to get the existing toilet valve to stay open all the time, it's a simple modification. I'd have to see a pic of it, but if it's typical, you can modify it in a couple of ways. You can try just adjusting it so that the float is positioned such that it never closes the valve. It that's not possible, you can just zip tie the flow control lever in the open position. If you can get a pic of it posted here, I can explain it better. But again, if you leave the toilet valve in place, you shouldn't use a cheapie anti-siphon sprinkler valve in that application.
If I'm understanding correctly, you don't need the "toilet valve" at all, in fact it's better that it's not there. Plumb a solenoid sprinkler valve anywhere in the line feeding the auto-fill, wire that to a 24V power supply, and plug the power supply into whatever device you need to control it with rachio (what is that, some sort of home automation tech?). That's all you need. You can use the sprinkler valve's manual control to dial down the pressure. If it's still too much, you can use some PVC to install an elbow where the toilet valve was, to divert it sideways. The sprinkler valve needs to be located well above the pool's water level. It needs to be anti-siphon, like this:
If you keep the toilet valve inline, then you have to use a much more expensive setup to achieve proper backflow prevention. But if you do away with the toilet valve, then you can use an inexpensive sprinkler valve (the reason for that is a long-winded explanation, that'll I'll go into if you gotta know).
This, of course, would eliminate the auto-flow based on water level, but you could use your automation to dispense water X minutes a day that should get you pretty close. You'd have to vary it for the seasonal temps, but it'll be better than a hose! I think that's what you are wanting to do, yes?
But to answer your actual question: to get the existing toilet valve to stay open all the time, it's a simple modification. I'd have to see a pic of it, but if it's typical, you can modify it in a couple of ways. You can try just adjusting it so that the float is positioned such that it never closes the valve. It that's not possible, you can just zip tie the flow control lever in the open position. If you can get a pic of it posted here, I can explain it better. But again, if you leave the toilet valve in place, you shouldn't use a cheapie anti-siphon sprinkler valve in that application.
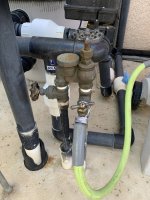
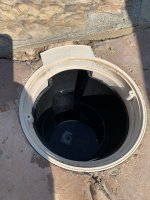
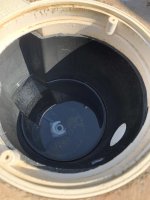
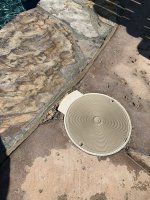
@Dirk thank you so very much, great information! Take a look at the pics I’ve attached. The autofill cracked at the inlet/threads where the toilet valve connects/screws in to the autofill. I used water weld on the outside of the inlet, not in the threads as I was afraid I wouldn’t be about to screw the toilet valve back in. You can see the water weld in the pic of the autofill pot without the toilet valve installed. Obviously nothing is leaking when I turn off the water to the autofill, but it does leak from the threaded section of the inlet when the water is on. It’s a very slow leak. So I am assuming that as long as the solenoid turns off the water source to the autofill line, there won’t be a leak like when the water is always on with the toilet valve. I would like to do away with the toilet valve so I like the idea of using a pvc elbow to angle the water towards the pool. I’d assume I would need to drain some water out of the pool to accomplish this? If I were to go this route, what type of solenoid and sprinkler valve would you recommend? Rachio is an automated device for landscape drip applications and I have seen people using it to fill there pool in the way I’m attempting to do. Thanks again for the help
Attachments
- Nov 12, 2017
- 11,852
- Pool Size
- 12300
- Surface
- Plaster
- Chlorine
- Salt Water Generator
- SWG Type
- Pentair Intellichlor IC-40
OK, you're mostly there already. If you want to get rid of the toilet valve, then the pic of the Orbit sprinkler valve above is what you need. It's got the manual handle to adjust the pressure/flow, the solenoid and the anti-siphon component (backflow preventer) all built in, about 20 bucks at Lowes. You'd replace your existing brass valve (the one in the first pic) with the new Orbit and you're good to go at the pad. Just wire that to your existing rachio sprinkler controller and if it is the standard 24V output you're all set with that, too.
I cannot now remember how my toilet valve connects to the auto-fill well. If that is just a standard thread, then you won't need to drain the pool down. There looks to be enough clearance to use threaded parts. Just take your toilet valve with you to Lowes and match the threads. This guy might work, a PVC male-threaded elbow:

But if the elbow doesn't allow the threads to seat all the way in, then use a straight 2" nipple first (or whatever length you want), then a female-threaded elbow, these guys:
 and
and

You'll find PVC nipples in all sorts of lengths in the sprinkler dept next to the Orbit sprinkler valves. Use teflon tape on all the threads, no gluing or draining required.t n
You don't need to plumb the auto-fill well's inlet to its outlet, you're just using the elbow as a diverter.
FYI: your existing brass valve has an anti-siphon component, but technically that was not the right type to use, because your toilet valve was down stream of it. You shouldn't have a second valve downstream of that type of anti-siphon valve because that keeps constant pressure on the anti-siphon spring, which it is not rated for. That anti-siphon valve could eventually fail. That should have been a pressure vacuum breaker valve, like below. That's a "mistake" (a money-saving one) that pool builders commonly make. But since you're eliminating the downstream valve (the toilet valve), a much-less expansive anti-siphon sprinkler valve is suitable. Just be sure to locate the new sprinkler valve well above your pool's water line. If your pad is the same level as your pool deck, then where your existing brass valve is located is just about perfect for the new valve.

I'm not sure why that other valve is there, the one downstream of the brass sprinkler valve, that seems like overkill to me. You can leave that out of the new plumbing, as the Orbit has its own shutoff valve built in.
You can leave that existing hose bib in place, along with the tee it's screwed into, cut the PVC pipe leading to the pool and then just unscrew the existing brass valve and nipple above the tee and replace the nipple with a PVC male-thread-to-slip adapter. Screw another adapter on to the Orbit, and a third adapter onto the other side of the Orbit. Extend the pipe leading to the pool with a PVC coupler and a short length of PVC, and with luck the Orbit will align just right. Use teflon tape on all the threads and then glue the slips together. EZPZ.
I'm sure you can figure all that out, or just ask and I'll give you a parts list.
Just be sure when mating PVC threads to anything metal, that you use male PVC into female metal. You never thread male metal into female PVC. That's why you'll replace that metal nipple coming off that tee, don't screw the Orbit onto that, as tempting as that would be.
I cannot now remember how my toilet valve connects to the auto-fill well. If that is just a standard thread, then you won't need to drain the pool down. There looks to be enough clearance to use threaded parts. Just take your toilet valve with you to Lowes and match the threads. This guy might work, a PVC male-threaded elbow:
But if the elbow doesn't allow the threads to seat all the way in, then use a straight 2" nipple first (or whatever length you want), then a female-threaded elbow, these guys:
You'll find PVC nipples in all sorts of lengths in the sprinkler dept next to the Orbit sprinkler valves. Use teflon tape on all the threads, no gluing or draining required.t n
You don't need to plumb the auto-fill well's inlet to its outlet, you're just using the elbow as a diverter.
FYI: your existing brass valve has an anti-siphon component, but technically that was not the right type to use, because your toilet valve was down stream of it. You shouldn't have a second valve downstream of that type of anti-siphon valve because that keeps constant pressure on the anti-siphon spring, which it is not rated for. That anti-siphon valve could eventually fail. That should have been a pressure vacuum breaker valve, like below. That's a "mistake" (a money-saving one) that pool builders commonly make. But since you're eliminating the downstream valve (the toilet valve), a much-less expansive anti-siphon sprinkler valve is suitable. Just be sure to locate the new sprinkler valve well above your pool's water line. If your pad is the same level as your pool deck, then where your existing brass valve is located is just about perfect for the new valve.
I'm not sure why that other valve is there, the one downstream of the brass sprinkler valve, that seems like overkill to me. You can leave that out of the new plumbing, as the Orbit has its own shutoff valve built in.
You can leave that existing hose bib in place, along with the tee it's screwed into, cut the PVC pipe leading to the pool and then just unscrew the existing brass valve and nipple above the tee and replace the nipple with a PVC male-thread-to-slip adapter. Screw another adapter on to the Orbit, and a third adapter onto the other side of the Orbit. Extend the pipe leading to the pool with a PVC coupler and a short length of PVC, and with luck the Orbit will align just right. Use teflon tape on all the threads and then glue the slips together. EZPZ.
I'm sure you can figure all that out, or just ask and I'll give you a parts list.
Just be sure when mating PVC threads to anything metal, that you use male PVC into female metal. You never thread male metal into female PVC. That's why you'll replace that metal nipple coming off that tee, don't screw the Orbit onto that, as tempting as that would be.
Last edited:
@Dirk this is amazing! Thank you so much. It all makes sense for the most part but if you have time to put together a parts list to dumb everything down for me even more, I’d appreciate it.
I have never understood the additional valve either, during this current situation I’ve just closed both off even though once the one on the brass sprinkler valve is closed, water is off. I bought the house with the pool so I wasn’t part of the construction process. It is 18 years old, so maybe there was something in California code in those days. Who knows.
I have never understood the additional valve either, during this current situation I’ve just closed both off even though once the one on the brass sprinkler valve is closed, water is off. I bought the house with the pool so I wasn’t part of the construction process. It is 18 years old, so maybe there was something in California code in those days. Who knows.
- Nov 12, 2017
- 11,852
- Pool Size
- 12300
- Surface
- Plaster
- Chlorine
- Salt Water Generator
- SWG Type
- Pentair Intellichlor IC-40
Hopefully you can make this out. The only thing I can't be sure of is the various pipe sizes. I think the Orbit will be 3/4". If your existing plumbing is something else, you'll need to use reducers to go from 3/4" to whatever. You can usually buy 2' lengths of PVC, so you don't need a whole 10' stick. You'll take the old toilet valve with you to match that thread. The PVC primer and glue come in a kit. You'll need a length of wire to get from the Orbit's solenoid to your Rachio. Use outdoor or "irrigation" wire nuts to connect to the solenoid. They have some waterproof goop inside them that helps resist corrosion. They'll probably be near the Orbit shelf. Use teflon tape on all the threads. That might even help with the leak in the well. When I build this type of thing, I lay out everything on the floor at Lowes as I'm finding the various parts, so I can visualize I have everything and everything fits and connects correctly.
Let me know if you can't read my fat-penned writing!
I'm expecting a pic later today of the finished work, so you'd better get to it!!")

Let me know if you can't read my fat-penned writing!
I'm expecting a pic later today of the finished work, so you'd better get to it!!
- Nov 12, 2017
- 11,852
- Pool Size
- 12300
- Surface
- Plaster
- Chlorine
- Salt Water Generator
- SWG Type
- Pentair Intellichlor IC-40
You first screw in the two adapters into the Orbit. Set that assembly aside. Then thread and glue everything else together, so you end up with two PVC pipes sticking up. Then you prime the two adapters in the Orbit, and the two pipes. Then apply glue to all four (two adapters and two pipes), then push the Orbit assembly down onto the pipes.
If you try to screw the Orbit on to the tee first, you probably won't be able to assemble everything else the rest of the way. Do a dry run of everything before you break open the glue, and this will all make more sense.
If you try to screw the Orbit on to the tee first, you probably won't be able to assemble everything else the rest of the way. Do a dry run of everything before you break open the glue, and this will all make more sense.
- Nov 12, 2017
- 11,852
- Pool Size
- 12300
- Surface
- Plaster
- Chlorine
- Salt Water Generator
- SWG Type
- Pentair Intellichlor IC-40
Oops! I drew that Orbit valve backwards. The part with the manual handle goes over the supply pipe, not the pipe to the pool! It'll be marked which is in and out, or there will be an arrow or other indicator of flow direction. Something like this:

Last edited:
- Nov 12, 2017
- 11,852
- Pool Size
- 12300
- Surface
- Plaster
- Chlorine
- Salt Water Generator
- SWG Type
- Pentair Intellichlor IC-40
More VERY important notes! Giving this some more thought: I'm not sure a typical toilet valve has NPT threads, the kind you'd find on PVC threaded fittings. You really need to take that valve with you, and make sure the threads match. Because if you try to thread an NPT fitting into your well, and that well fitting is not NPT, you could easily make things worse.
Take the valve with you, find a female fitting that threads correctly onto the valve's threads, THEN select a nipple and see if that fits correctly into the female fitting. That's how you'll know for sure. Hope that makes sense.
Take the valve with you, find a female fitting that threads correctly onto the valve's threads, THEN select a nipple and see if that fits correctly into the female fitting. That's how you'll know for sure. Hope that makes sense.
Toxophilite
Silver Supporter
Pretty sure they are pipe-straight, not tapered, with locking nut and washer to allow height adjustment.More VERY important notes! Giving this some more thought: I'm not sure a typical toilet valve has NPT threads, the kind you'd find on PVC threaded fittings. You really need to take that valve with you, and make sure the threads match. Because if you try to thread an NPT fitting into your well, and that well fitting is not NPT, you could easily make things worse.
Take the valve with you, find a female fitting that threads correctly onto the valve's threads, THEN select a nipple and see if that fits correctly into the female fitting. That's how you'll know for sure. Hope that makes sense.
- Nov 12, 2017
- 11,852
- Pool Size
- 12300
- Surface
- Plaster
- Chlorine
- Salt Water Generator
- SWG Type
- Pentair Intellichlor IC-40
Yah, I started thinking about them in a toilet, and they're held in place to the toilet with a nut and washer, and then those same threads connect to the supply line, so that can't be NPT. I just don't know if that's the same type that is used in an auto-fill tank. The OP just needs something that'll thread into the tank that will divert the water so that it is not blasting against the underside of the tank's lid. He could use the original valve for that, if he can defeat that valve's shutoff feature. Either remove those parts if possible, or somehow fix the shut-off/float/lever assembly in the open position.Pretty sure they are pipe-straight, not tapered, with locking nut and washer to allow height adjustment.
I had suggested the elbow because that eliminates all the mechanics of the old valve, which could just be messy or a future failure point if that valve shuts off somehow.
He could cut the threads of the old valve off, leaving a few inches of the shaft, and then just attach a loose-fitting PVC cap over the end of that shaft (drill a hole through cap and shaft and run a nylon bolt or plastic zip tie through them). Then screw that into the well. I can picture it in my head.
So worse case, if he can't find and fashion a diverter fitting that'll thread into the well, he could make one out of the old valve, one way or another.
- Nov 12, 2017
- 11,852
- Pool Size
- 12300
- Surface
- Plaster
- Chlorine
- Salt Water Generator
- SWG Type
- Pentair Intellichlor IC-40
If the google machine can be trusted, and the old valve is a standard toilet type, then what you have is a "7/8 in. Ballcock Thread" and there isn't going to be a PVC fitting that'll mate to that. You'll need to modify the old valve to stay open, or cut off the bottom three or four inches of it and modify that piece into a diverter. I described above how I would use an oversized PVC cap to do that. It'd be pretty simple to do, either way.
@Dirk this is great and so very helpful! If I leave the toilet valve in place and keep it open, how does that now change everything at the equipment pad as far as the orbit valve, etc? It sounds like the idea of the elbow in the autofill well won’t work?
Toxophilite
Silver Supporter
Yeah, and since the thread boss is already cracked and will be a source of leakage, if it's 3/4" straight and you screwed in a tapered pipe PVC, it should tighten down and drip leakage is no issue I believe. I think on the tying to pool that such will need to either be hard plumb to can outlet or have another pipe that runs as far as possible into opening. That is going to be a delicate balance of water fill rate. The can is gravity feed to pool so it fills fast and drains slow.Yah, I started thinking about them in a toilet, and they're held in place to the toilet with a nut and washer, and then those same threads connect to the supply line, so that can't be NPT. I just don't know if that's the same type that is used in an auto-fill tank. The OP just needs something that'll thread into the tank that will divert the water so that it is not blasting against the underside of the tank's lid. He could use the original valve for that, if he can defeat that valve's shutoff feature. Either remove those parts if possible, or somehow fix the shut-off/float/lever assembly in the open position.
I had suggested the elbow because that eliminates all the mechanics of the old valve, which could just be messy or a future failure point if that valve shuts off somehow.
He could cut the threads of the old valve off, leaving a few inches of the shaft, and then just attach a loose-fitting PVC cap over the end of that shaft (drill a hole through cap and shaft and run a nylon bolt or plastic zip tie through them). Then screw that into the well. I can picture it in my head.
So worse case, if he can't find and fashion a diverter fitting that'll thread into the well, he could make one out of the old valve, one way or another.
Without a float assembly, it can't handle more than a medium trickle without overflowing the can, and I don't know if a sprinkler valve can be set that low. But, if the water can be directed more into the opening and closer to pool outlet, it might help. Of course, a hard connection inside the can would guarantee it all going to pool.
Toxophilite
Silver Supporter
If you keep the float assembly blocked open it can't control the amount of fill to the can. Since the can fills with pressure but drains by siphon through equalizer tube and ports, the can will overflow without a float shutoff till the can's drain is finished. With pressurized and continuous fill, you need to get the water to the pool and as little as possible into the can.If I leave the toilet valve in place and keep it open, how does that now change everything at the equipment pad as far as the orbit valve, etc? It sounds like the idea of the elbow in the autofill well won’t work?
You stop float assemblies from hard cycling by restricting the flow from the source to where it stays more open by only slowly filling the can, allowing the equalization to be a closer rate to fill, and I guess the question will be if you can slow it down enough for that and still have enough flow to operate the irrigation valve, as they work on opening and closing through pressure changes on the diaphragm..
Last edited:
- Nov 12, 2017
- 11,852
- Pool Size
- 12300
- Surface
- Plaster
- Chlorine
- Salt Water Generator
- SWG Type
- Pentair Intellichlor IC-40
As long as you modify the toilet valve to stay open such that it cannot inadvertently revert back to closed, then you don't need a pressure vacuum breaker and the anti-siphon sprinkler valve will be fine.@Dirk this is great and so very helpful! If I leave the toilet valve in place and keep it open, how does that now change everything at the equipment pad as far as the orbit valve, etc? It sounds like the idea of the elbow in the autofill well won’t work?
@Toxophilite brings up some excellent points I hadn't considered. Let me ask you this first, before I decipher his thoughts. Your well is different from mine, in several ways. The water source in mine comes in from the bottom. Yours must be the same. My outflow port is also in the bottom, and connects to my pool through an equalizer tube that returns to the pool a few feet below the surface. What is the path of your well's outflow? Does it exit the well below the surface of the water? I can't see how it gets out in the pic.
Last edited:
- Nov 12, 2017
- 11,852
- Pool Size
- 12300
- Surface
- Plaster
- Chlorine
- Salt Water Generator
- SWG Type
- Pentair Intellichlor IC-40
Can you post a pic of the toilet valve?
And can you try something with it? If it's like mine, the bottom twists such that you can change its height. Can you twist the entire top portion completely off the bottom portion?
And can you see any branding on it? Is it a Fluid Master?
And can you try something with it? If it's like mine, the bottom twists such that you can change its height. Can you twist the entire top portion completely off the bottom portion?
And can you see any branding on it? Is it a Fluid Master?
Thank you both for your help with this. Much appreciated. I am out of town but will send some pics when I get back. It is a fluidmaster and the float portion will remove from the ‘base/post’ by unclipping it. This also allows for up and down adjustments. My autofill does fill from the bottom from the water source. There is no outflow port at the bottom, there is a output hole in the side of the autofill well, that then exits through my pool side wall. If that makes sense? I will send pics when I’m back at home but I don’t think there is any such equalizer. The brand of the autofill is letro if that helps at all.
Attachments
- Nov 12, 2017
- 11,852
- Pool Size
- 12300
- Surface
- Plaster
- Chlorine
- Salt Water Generator
- SWG Type
- Pentair Intellichlor IC-40
I may have to take this up on Tuesday, as I'm heading out, too. Stand by, I have some ideas for you. Don't install the Orbit yet, that might not be the way to go.
Thread Status
Hello , This thread has been inactive for over 60 days. New postings here are unlikely to be seen or responded to by other members. For better visibility, consider Starting A New Thread.