Jandy & Ortega Valve Dilemma, please help! *Pics included* TX DIY

TheTamales

New member
Apr 26, 2020
4
DFW
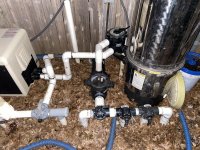
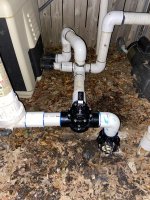
I have a cracked 3-way Jandy diverter valve that needs to be replaced. It is cracked on the bottom and leaks water when I turn the pump on. I watched a video on youtube and it looks like I just need to saw off the white pipes and attach straight connectors and another short pipe when placing a new 3-way diverter valve. However, I am stuck on what to do about the side where the Ortega valve is connected. There also appears to be a check valve under the Ortega valve. If I remember correctly, in the past my pool guy wasn’t able to find parts for the Ortega valve, so he redid the plumbing and replaced it with a Jandy check valve. So it appears that the Ortega valve may possibly be serving as a connector pipe. My questions are:

1. What size Jandy 3-way diverter valve do I need to get?
2. When I replace the 3-way diverter valve, would I need to saw off a portion of the Ortega valve or completely replace it with another Ortega valve?
3. It may be hard to find another Ortega valve, if I cannot find one, what type of valve could I replace my Ortega valve with?
4. If the Ortega valve is serving only as a connecting pipe, would I just need to replace it with connectors and short pipes to connect the diverter valve to the check valve?

I have included 3 photos showing the below:
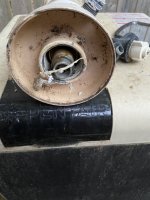
  • Before the check valve was installed under the Ortega valve
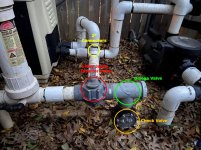
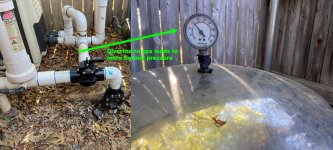
  • Diagram labeling the parts
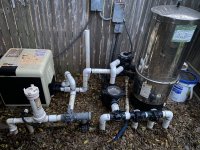
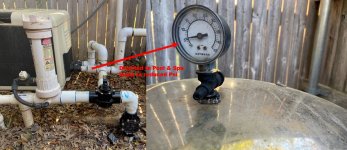
  • Zoomed out view of the pump system for reference
I hope my explanation makes sense; I appreciate any help I can get. I live in Texas and all the pool companies are backed up, so I am attempting a DIY!
 

Attachments

  • Before Check Valve Installed.jpg
    Before Check Valve Installed.jpg
    590.2 KB · Views: 57
  • Diagram.JPG
    Diagram.JPG
    142.8 KB · Views: 56
  • Zoomed Out View.jpg
    Zoomed Out View.jpg
    634.4 KB · Views: 54
The Ortega valve is a spring loading check valve so when your pool guy couldn't find a part he just added another check valve below it. He really should have cut it out then but it was probably easier for him just to cut the pipe below and add the Jandy Check Valve. He most likely took the insides out of the Ortega valve
I would dig out around the Jandy check valve and cut below that (there does not seem to be any room between the Ortega Valve and the Jandy CV to make a cut and be able to reconnect to). Then cut your diverter valve and replumb with a new diverter valve a new Jandy CV (not sure you can salvage the one you cut out) and connect back to the pipe you dug out around . No need for the Ortega Valve as it is just a piece of pipe as it is now.
It looks like you have 2" pipe. You can measure it. The diameter of 2" PVC is 2.4inchs and the diameter of 1.5" is 1.9 inches.
Another way - depending if you are man or women - my hand can grasp a 1.5" pipe completely around but on a 2" my fingers can barely touch my thumb. Now this is on pipe - not the coupling or elbow or tee that have larger diameters.
 
  • Like
Reactions: TheTamales
That is not going to be an easy replumb. You need to take out the circled Jandy valve and everything to the right of it down underground and redo that all. That is the easy part. You don't have enough room on the left of the valve to sneak a coupler piece in there. So all of that on the left may need to be redone. There are tools to ream out the remnants of the old pipes but they are hit and miss as to whether you will be successful with it. If it was me, I would take the opportunity to re-plumb it all and add a SWG while I was at it.

Why do you have that check valve at all? Unless your pool is above the level of the equipment, it doesn't really serve any purpose. It should have been before your puck dispenser to prevent backflow into your heater.
 
The Ortega valve is a spring loading check valve so when your pool guy couldn't find a part he just added another check valve below it. He really should have cut it out then but it was probably easier for him just to cut the pipe below and add the Jandy Check Valve. He most likely took the insides out of the Ortega valve
I would dig out around the Jandy check valve and cut below that (there does not seem to be any room between the Ortega Valve and the Jandy CV to make a cut and be able to reconnect to). Then cut your diverter valve and replumb with a new diverter valve a new Jandy CV (not sure you can salvage the one you cut out) and connect back to the pipe you dug out around . No need for the Ortega Valve as it is just a piece of pipe as it is now.
It looks like you have 2" pipe. You can measure it. The diameter of 2" PVC is 2.4inchs and the diameter of 1.5" is 1.9 inches.
Another way - depending if you are man or women - my hand can grasp a 1.5" pipe completely around but on a 2" my fingers can barely touch my thumb. Now this is on pipe - not the coupling or elbow or tee that have larger diameters.
Hi HermanTx, thank you so much for your advice, I was able to re-plumb it and it seems to be working fine! The only problem is that I am now, experiencing low PSI (about 5PSI) when I run the pump. I'm not sure what could be causing this? I didn't feel any leaks around the new plumbing.
 

Attachments

  • Re-plumb.jpg
    Re-plumb.jpg
    709.3 KB · Views: 18
That is not going to be an easy replumb. You need to take out the circled Jandy valve and everything to the right of it down underground and redo that all. That is the easy part. You don't have enough room on the left of the valve to sneak a coupler piece in there. So all of that on the left may need to be redone. There are tools to ream out the remnants of the old pipes but they are hit and miss as to whether you will be successful with it. If it was me, I would take the opportunity to re-plumb it all and add a SWG while I was at it.

Why do you have that check valve at all? Unless your pool is above the level of the equipment, it doesn't really serve any purpose. It should have been before your puck dispenser to prevent backflow into your heater.
Hi PoolGate,

It took a few hours to re-plumb it. Was not easy, but it was not impossible. It seems to be working now, except it has a low PSI now. The check valve was installed by my pool guy to keep the water from the spa draining whenever it was shut off.
 
Great job on the replumbing.
What was your filter pressure before you did the re-plumbing? Also, was it different when you had valve set to pool return or to spa return? Do you keep your diverter valve open to both pool and spa at all times?
Do you have a variable speed pump?
Did you keep the check valve that was directly before your inline chlorinator? It looks different from the original picture.

Please Create Your Signature to help us understand what your current setup is
Thanks, my father helped me out, so I cannot take all the credit!

Filter pressure before the replumbing was at 0 since the diverter valve was cracked. Prior to the damage it averaged anywhere between 10-20 psi.

Yes, I keep my diverter valve open to both pool and spa at all times.

I do not have a variable speed pump that I am aware of.

The check valve is also new. I had to replace the old one, because there was no room left to cut between the Ortega valve and old check valve.

I noticed my Psi tends to increase when I divert the water to the spa (Diverted to spa pic 15psi) and decrease when diverted to both pool and spa returns (Diverted to pool & Spa 5psi pic). This led me to believe there was a flow issue with the pool return. So, I started looking near the inline pool chlorinator and noticed that water was slowly dripping from it. So, I unscrewed it and noticed that the O-ring looks worn out. I then screwed it back on tighter and the psi seems to be running more normal now at about 10psi when diverted to pool and spa.

So, for now everything seems to be running fine which is what I was hoping to accomplish. I will probably have to eventually replace the inline chlorinator with a newer one. I also plan to get the pool tested for leaks as I believe some air may be getting sucked in because sometimes one of the jets bubbles (bubbles pic) … unless that is normal. Sorry there is a vacuum hose in the pic, but there is a jet under there!

From one Texan to another, thank you so much for your help! Because of your response I knew exactly what to get and what to cut in order to make the replumb possible. I also learned a lot about my valves and water flow in the process.
 

Attachments

  • Diverted to Spa.JPG
    Diverted to Spa.JPG
    135.9 KB · Views: 7
  • Diverted to Pool & Spa.JPG
    Diverted to Pool & Spa.JPG
    136.3 KB · Views: 7
  • Chlorinator worn out o-ring.jpg
    Chlorinator worn out o-ring.jpg
    440.8 KB · Views: 7
  • bubbles.jpg
    bubbles.jpg
    348.7 KB · Views: 7
I noticed my Psi tends to increase when I divert the water to the spa (Diverted to spa pic 15psi) and decrease when diverted to both pool and spa returns (Diverted to pool & Spa 5psi pic). This led me to believe there was a flow issue with the pool return.
This is normal. Your spa has small diameter jets in it (about 6 inches back from the return nozzle you see in the spa). These small diameter jets cause increase back pressure on the system, therefore your filter pressure should increase when you have it only on spa mode. When in pool mode, your return is through larger return nozzles, thus the lower pressure drop (back pressure) on the system.

So, I unscrewed it and noticed that the O-ring looks worn out. I then screwed it back on tighter and the psi seems to be running more normal now at about 10psi when diverted to pool and spa.
Where you able to find a new oring for this connection? I just went to Ace Hardware today and purchased an oring - 1 11/16" OD by 1.5" ID with 3/32" diameter. I have not tried it but I believe (hope) it fits as I am taking apart my chlorinator this weekend. Hopefully you unscrewed that side screw on it before you unscrewed that housing.
I also plan to get the pool tested for leaks as I believe some air may be getting sucked in because sometimes one of the jets bubbles (bubbles pic) … unless that is normal.
Hard to say. Is it only 1 jet that has bubbles? Does it only occur in SPA Mode?
 
Thread Status
Hello , This thread has been inactive for over 60 days. New postings here are unlikely to be seen or responded to by other members. For better visibility, consider Starting A New Thread.