Help Me ID my valves and pipes please

Gregdole7

Member
Dec 26, 2019
16
Alpharetta, Ga
Hello,

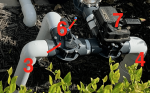
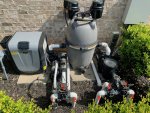
New Pool Owner here and have learned a lot from this site and forum. I understand all of my components and what they do, but am wondering if I can get some help ID'ing my pipes and valves.

I have noticed valve 7 turns when turn on/off spa mode,so assume that is controlling the intake pipes and only pulling from the spa.

What are the others, and do I ever need to adjust them?
 

Attachments

  • IMG_6563.jpeg
    IMG_6563.jpeg
    785.3 KB · Views: 37
Hey Greg. So the valves in the right of the pic (pump) are for your suction side.
#7 should be your spa actuator valve
#4 suction from spa; when the spa is off, you are pulling water from #3 & #6
#6 is right on top of your 3-way valve.. Looks like a line behind it (drain or skimmer)?
#3 is either drain or skimmer

Left side of pic (return/pressure side)
#5 is your spa actuator valve going back to the spa
#1 I'm thinking with the check valve there, that may be return to the spa
#2 Look like return back to the pool

You have a booster pump to the left which should be for a pressure cleaner. You'll have to experimenter with the manual 3-way valve to see what it pulls water from, but that should be pretty close. Don't forget to update your signature! :)
 
  • Like
Reactions: jimmythegreek
Amazing, thank you so much. I believe you are exactly right across the board based on my beginner knowledge and watching this work.

What is the conventional thinking about adjustment (if any) of that 3-way value? I assume it controls how much suction is from spa, skimmer, and main drain. What is the rule of thumb about how much to pull from each, and is there a way to calibrate? I have some basket drain that I've seen commercials for online that talks about trying to pull more from the skimmer to increase the Bernoulli (sp?) effect.
 
The ratio of skimmer versus drain varies from pool to pool. Typically, we find that skimmer suction is more important simply to try and recover debris before it sinks. You can try to adjust valves at about 75/25 (skimmer/drain) to see how that works and adjust from there. There's no true right or wrong. Just see what seems to work best for your pool.
 
  • Like
Reactions: jimmythegreek
And if I'm understanding these correctly, right now, everything is wide open. I need to turn off face one of these two lines, once I determine which is skimmer and which is drain.
 

Attachments

  • Screen Shot 2020-04-06 at 9.42.56 PM.png
    Screen Shot 2020-04-06 at 9.42.56 PM.png
    540.7 KB · Views: 6
Well, I have confirmed that Pipe 3 is skimmer, and 6 is main drain.

The problem is I can only turn off/reduce the skimmer, but not the main drain as if you look closely at this photo, you will see the value can't be closed to 6 because of those raised ridges that stop the movement of the valve. Do I need a different valve, or am I missing something?
 

Attachments

  • r02Da+qHSoa2eS7imDZGSw_thumb_1482c.jpg
    r02Da+qHSoa2eS7imDZGSw_thumb_1482c.jpg
    300.5 KB · Views: 15
Well, I have confirmed that Pipe 3 is skimmer, and 6 is main drain.

The problem is I can only turn off/reduce the skimmer, but not the main drain as if you look closely at this photo, you will see the value can't be closed to 6 because of those raised ridges that stop the movement of the valve. Do I need a different valve, or am I missing something?

Dumb installation of the valve.

Remove the handle and you can cut off the stop that hits the ridge. Or you can grind down the ridge.
 
Well, I have confirmed that Pipe 3 is skimmer, and 6 is main drain.

The problem is I can only turn off/reduce the skimmer, but not the main drain as if you look closely at this photo, you will see the value can't be closed to 6 because of those raised ridges that stop the movement of the valve. Do I need a different valve, or am I missing something?
Dumb installation of the valve.

Remove the handle and you can cut off the stop that hits the ridge. Or you can grind down the ridge.
Or, instead of cutting off the stop or grinding down the ridge......
  • Remove the handle
  • Locate the word "INLET" on the valve lid
  • Remove the 8 screws
  • Carefully remove the lid
  • Rotate the lid so "INLET" faces the port closest to the pump - port on right closest to valve actuator in your pic
  • Seat the lid on the valve - lube the lid o-ring first (with pool lube)
  • Install the 8 screws
  • Install the handle
Doing the above will allow selecting either 3 or 6 individually or any amount of flow from each in combination. And it will also prevent deadheading the port on the right (which can prevent water flow to the pump). All Jandy valves come from the manufacturer with "INLET" facing the bottom of the "T" (facing up as shown in your pic). It is up to the installer to rotate the lid to provide the required flow directions. "INLET" should always face the port closest to the pump - regardless if on the suction side or the pressure side.
 
Last edited:
  • Like
Reactions: jimmythegreek
Or, instead of cutting off the stop or grinding down the ridge......
  • Remove the handle
  • Locate the word "INLET" on the valve lid
  • Remove the 8 screws
  • Carefully remove the lid
  • Rotate the lid so "INLET" faces the port closest to the pump - port on right closest to valve actuator in your pic
  • Seat the lid on the valve - lube the lid o-ring first
  • Install the 8 screws
  • Install the handle
Doing the above will allow selecting either 3 or 6 individually or any amount of flow from each in combination. And it will also prevent deadheading the port on the right (which can prevent water flow to the pump). All Jandy valves come from the manufacturer with "INLET" facing the bottom of the "T" (facing up as shown in your pic). It is up to the installer to rotate the lid to provide the required flow directions. "INLET" should always face the port closest to the pump - regardless if on the suction side or the pressure side.

Much better fix then mine.
 

Enjoying this content?

Support TFP with a donation.

Give Support
Thread Status
Hello , This thread has been inactive for over 60 days. New postings here are unlikely to be seen or responded to by other members. For better visibility, consider Starting A New Thread.