
Fiberglass 16x40 DIY install (PICS)
- Thread starter JPontius6
- Start date
You are using an out of date browser. It may not display this or other websites correctly.
You should upgrade or use an alternative browser.
You should upgrade or use an alternative browser.
Travisblount
In The Industry
Any updates on your APC 365 install? We just set our fiberglass pool yesterday and we have our APC 365 on site. I’m hoping to start the install on the pool cover late next week. Well done on your job thus far! Keep the updates coming.
Any updates on your APC 365 install? We just set our fiberglass pool yesterday and we have our APC 365 on site. I’m hoping to start the install on the pool cover late next week. Well done on your job thus far! Keep the updates coming.
Yes! I've done a bad job of documenting and providing updates, but the pool build is complete! The cover installation had some quirks, but I got a hold of the dealer installation manual, which provided the pictures and detailed instructions I needed. Let me know if you'd like a copy, and I'll happily send a pdf copy. Are you doing your own install?
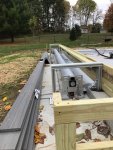
My cover configuration is a little unique - I'm using the 365 coping and tracks for the nice finished look of the recessed cover, but I'm using a deck-mounted reel at the deep end of the pool. The main reason I'm doing this is because I wanted to build a bench along the deep end with a little cascade and some lighting - just a little aesthetic addition. I also thought the deck-mounted installation would be simpler and more accessible, and it turns out it's quite a bit cheaper as well.
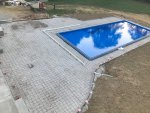
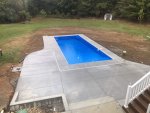
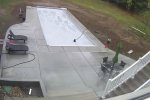
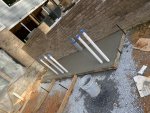
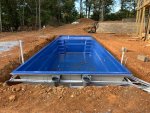
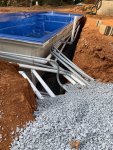
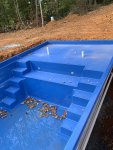
Here are a few more photos of the deck prep process and completed pool. We have LOTS of landscaping and cleanup to do, but winter has arrived so it will have to wait until spring, sadly.
The last pic shows the beginning of my bench frame. It's hard to picture at this point of the process, but the bench will be covered with stone veneer, and have composite decking on the top surface that can be lifted to access the cover and mechanism. A 36" waterfall is located in the middle of the bench, and I'll include a couple LED lights as well. More to come as I finish it up.
Attachments

jtburf
0
Travisblount
In The Industry
Yes! I've done a bad job of documenting and providing updates, but the pool build is complete! The cover installation had some quirks, but I got a hold of the dealer installation manual, which provided the pictures and detailed instructions I needed. Let me know if you'd like a copy, and I'll happily send a pdf copy. Are you doing your own install?
My cover configuration is a little unique - I'm using the 365 coping and tracks for the nice finished look of the recessed cover, but I'm using a deck-mounted reel at the deep end of the pool. The main reason I'm doing this is because I wanted to build a bench along the deep end with a little cascade and some lighting - just a little aesthetic addition. I also thought the deck-mounted installation would be simpler and more accessible, and it turns out it's quite a bit cheaper as well.
Here are a few more photos of the deck prep process and completed pool. We have LOTS of landscaping and cleanup to do, but winter has arrived so it will have to wait until spring, sadly.
The last pic shows the beginning of my bench frame. It's hard to picture at this point of the process, but the bench will be covered with stone veneer, and have composite decking on the top surface that can be lifted to access the cover and mechanism. A 36" waterfall is located in the middle of the bench, and I'll include a couple LED lights as well. More to come as I finish it up.
Wow that looks great! Excellent work and yes I am doing the install myself. To this point I have done just about all of it during the build of our new house (setting the pool, plumbing rough-in, equipment pad. So I have had to toggle my time between finishing the house and the pool plus trying to handle work all at the same time! ?
 Having said that I just finished back filling the pool and will be using Flow Fill tomorrow around noon under the splash pad. I put in the CMP Brilliant Bubblers which were back ordered so it has taken me much longer than anticipated. If you could send me the instructions that would be amazing! I have watched the Youtube on the 365 but after watching them I am definitely feeling overwhelmed with the pre-pour and post-pour work. How long would you estimate it to take to get the Pre-Pour side finished? I am mounting the reel and motor in the concrete like most installs so obviously that will be considerable different then what you have done.
Thanks again for sharing all you have done I will have to upload some pics of my pool and progress.
Travisblount
In The Industry
Yes! I've done a bad job of documenting and providing updates, but the pool build is complete! The cover installation had some quirks, but I got a hold of the dealer installation manual, which provided the pictures and detailed instructions I needed. Let me know if you'd like a copy, and I'll happily send a pdf copy. Are you doing your own install?
My cover configuration is a little unique - I'm using the 365 coping and tracks for the nice finished look of the recessed cover, but I'm using a deck-mounted reel at the deep end of the pool. The main reason I'm doing this is because I wanted to build a bench along the deep end with a little cascade and some lighting - just a little aesthetic addition. I also thought the deck-mounted installation would be simpler and more accessible, and it turns out it's quite a bit cheaper as well.
Here are a few more photos of the deck prep process and completed pool. We have LOTS of landscaping and cleanup to do, but winter has arrived so it will have to wait until spring, sadly.
The last pic shows the beginning of my bench frame. It's hard to picture at this point of the process, but the bench will be covered with stone veneer, and have composite decking on the top surface that can be lifted to access the cover and mechanism. A 36" waterfall is located in the middle of the bench, and I'll include a couple LED lights as well. More to come as I finish it up.
Ahhhh Yes I knew I was forgetting to ask you a question......On the Bonding how exactly did you do it? I am still confused what is required for me? I don't have a metal ladder or handrail in the pool. All the lighting is low voltage led's so I don't know that I have anything metal that will need to be bonded. I was planning on putting in one of the water bonding fittings with the Zinc Anodes in it. Is that all that I will need to add? I have seen several say you have to run a copper wire all the way around the pool? Is that still the case even though I don't have any metal handrails for ladders?
Travisblount
In The Industry
Here are some photos after plumbing and lighting rough-in....
Attachments
-
 CE47D00D-30DE-447C-BF43-00DB779414DB.jpeg489.1 KB · Views: 110
 -
 06E65E69-89D3-4735-A4AB-453B99D08EED.jpeg584.3 KB · Views: 112
 -
 7DF0CA0A-A685-424C-8606-02D4168C4411.jpeg545.6 KB · Views: 113
 -
 54AAD952-33E8-4EBD-ACE7-DAC5B5822598.jpeg524.6 KB · Views: 115
 -
 BA8172F1-720E-4DB3-B7C9-65FD49CE2E15.jpeg414.2 KB · Views: 114
Ahhhh Yes I knew I was forgetting to ask you a question......On the Bonding how exactly did you do it? I am still confused what is required for me? I don't have a metal ladder or handrail in the pool. All the lighting is low voltage led's so I don't know that I have anything metal that will need to be bonded. I was planning on putting in one of the water bonding fittings with the Zinc Anodes in it. Is that all that I will need to add? I have seen several say you have to run a copper wire all the way around the pool? Is that still the case even though I don't have any metal handrails for ladders?
Your pool look awesome - great job! I hadn't heard of Imagine Pools, but I checked 'em out and they look really nice - especially interested in their black gelcoat color. I love your shell design! Looks like the perfect balance of relaxing/swim space. Would you be willing to share the shell price with me (in a PM is fine if you prefer). I'm curious to compare to my Thursday Pool (16 x 40 shell was $28k delivered).
I'll shoot you the manual if you PM me your email - it's a fairly large pdf. The manual and videos are a huge help, and although it seems like a tons of steps, just work through them one at a time and it's easily manageable. You got this! For the pre-pour installation, it took me about 2 hrs to complete by myself. For me, this didn't include the poly box installation, so you'll have those added steps, but they seem pretty straight forward. Maybe another hr or two. The one thing you need to be ABSOLUTELY SURE of is that you keep the pool side walls as straight as possible. This turns out to be quite a challenge with a rectangular shell, as the sides are easily pushed in or out by water/backfill. My recommendation is that you allow the water level to precede the gravel so that they bulge out rather than in. I found it pretty easy to then use a set of ratchet straps across the pool to precisely adjust the walls in and compact the gravel against the sides (just by stomping on it). I spent probably a couple hrs on this process before attaching my coping/encapsulation. If you pools wall bulge in, your only option will be to dig out some backfill until you can get them back out.
Then, assuming no fiberglass pool wall is perfectly straight, you want to be sure to attach the coping/encapsulation rails STRAIGHT (a very tight string guide is the easiest method I found). The rails may not be perfectly flush against the pool lip all the way down the length, but it is more important that the cover glides properly and doesn't bind. Once your deck is poured, there is no coming back to adjust the rails. Also, I was advised that if you ever intend to tile your waterline, let the coping overhang the inside face of the pool by 1/4" so that the tile face isn't proud of the inside coping face. I didn't bother because I don't intend to tile.
Also a side note - I did not pour a separate concrete collar and follow with the deck pour. I basically just shaped/formed my gravel to allow a 10" deep, 10-12" wide collar to be poured at the same time as the deck. I'm not saying this is the preferred method or the absolute best practice, but it worked really well for me, simplified the build quite a bit since I have limited access for a concrete truck, and I feel great about the strength/security of the install. I did drill and place fiberglass rebar through the pool lip every 18" to tie the shell into the collar below and deck above. I'll never know if this made a difference, but I feel good about it.
As far as bonding goes (the way I understand it), you do need a copper wire (minimum 8 ga) that comes from your equipment pad and loops all the way around the pool. It should not be in conduit, except maybe to get through your pad. At the pad, you will bond your pump, heater, SWG, zinc anode, etc to this wire. Basically anything that has a bonding lug needs to be connected to this wire. You can either snake the one wire through all the lugs or you can use short lengths of the same wire type between equipment and connect them at the lug. ONLY USE bonding type connectors (copper split bolt or screw clamp style) - no wire nuts. Around the pool, the bonding wire loop will then need to be connected to steel reinforcement structure (rebar or wire mesh) of your deck, assuming you will have some in your concrete. I used the split-bolt style bonding lugs rated for direct burial, found at Menards, and I connected to the grid in six places - the 4 corners and about the middle of the side walls, all about 2' from the pool's edge. You will also need to connect both ends of the autocover mechanism, as well as each side rail, to your bonding "grid" (wire loop). The frame for the reel mechanism has the bonding lugs attached from the factory at each end, but the rails will need bonding lugs attached to them (available at menards or lowes). My bonding inspector DID check the autocover bond, but did not look for the rails to be bonded (although they should be). That's about it - fortunately with nicheless LED lights and molded steps and swimouts, there's not too much bonding to be done.
I've heard horror stories about bonding inspections, but mine was very straight forward. In fact, my inspector basically just had me walk him through my bonding strategy and explain it to him. He nodded a lot and signed the form. I don't know if he really knew what he was looking at, but he was fully satisfied. After the inspection, he stood around for another 30 minutes asking me how to build a pool. haha. Then for my final inspection, he asked me to show him my throwable flotation device and 12' safety pole, and he was out of there. He literally didn't even ask me to open the cover.
Good luck and great job so far! Happy to answer any other questions you might have along the way!
Last edited:
Ahhhh Yes I knew I was forgetting to ask you a question......On the Bonding how exactly did you do it? I am still confused what is required for me? I don't have a metal ladder or handrail in the pool. All the lighting is low voltage led's so I don't know that I have anything metal that will need to be bonded. I was planning on putting in one of the water bonding fittings with the Zinc Anodes in it. Is that all that I will need to add? I have seen several say you have to run a copper wire all the way around the pool? Is that still the case even though I don't have any metal handrails for ladders?
Also, I forgot to mention - although the zinc anode will bond the water safely, the zinc technically will corrode sacrificially, meaning it will eventually be gone. Potentially, it will eventually not meet the 9 sq in minimum requirement for water bonding. Now, this is a technicality of little real consequence, but just so that I could be confident in my inspection, I used this permacast water bonding fitting in the unused port of my skimmer to establish the water bond as well.
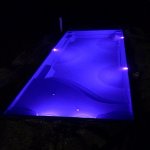
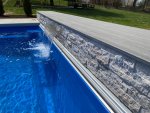
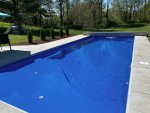
Well, it's been a long time since my last update, and we've been using the pool a TON already this year. I finished the autocover cover (bench) early this spring, and I'm pretty happy w/ how it turned out. Heater is on (90 deg), everything is working perfectly, and the SWG makes maintenance SO easy. There is hardly anything I would change about this pool - Maybe a few more returns to give me options or a little better surface movement, but so far everything is just awesome. We love having a pool and are already so happy we took the dive. Here are some recent images, after landscaping and a little clean-up.
Attachments
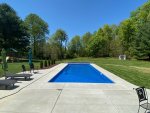
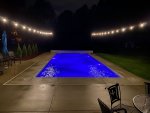
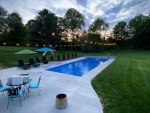
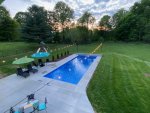
Oh and for anyone considering pool designs, the big tanning ledge is SOOOOO awesome. The kids love it, the wife loves it, and I've even made a handful of different fountains and little water features I can screw into the bubbler fittings that are a ton of fun. We can get about a 30' high jet/fountain of water, a mushroom-shaped dome, an arched water jet into the deep end, the possibilities are almost endless! My next one will be an aimable water cannon ")
- Jun 22, 2014
- 52,203
- Pool Size
- 17888
- Surface
- Fiberglass
- Chlorine
- Salt Water Generator
- SWG Type
- CircuPool RJ-45 Plus

OhioPool911
Member
This looks fantastic! Great job!
I am considering doing the same thing, can't seem to find a reasonable fiberglass installer willing to come out here until September. Can I ask where/how you got the shell? Did they overcharge you? Where did you get your pool equipment? Any regrets on anything?
I am considering doing the same thing, can't seem to find a reasonable fiberglass installer willing to come out here until September. Can I ask where/how you got the shell? Did they overcharge you? Where did you get your pool equipment? Any regrets on anything?
Can I ask where/how you got the shell? Did they overcharge you? Where did you get your pool equipment? Any regrets on anything?
I narrowed my options down to 2 shell manufacturers I was interested in (Thursday pools and River pools) and then contacted all of the dealers near me for both manufacturers asking if they would be willing to quote just a shell, delivered. I was surprised by the number of them that were open to it. The quotes were all over the place - some of them clearly trying to make a quick (big) buck. Others would only quote the whole project, which was a good benchmark for me to compare to at the end of the project. For the Aspen 16x40 I ended up selecting from Thursday pools, my quotes ranged from $28k to $37k. The installer that I eventually purchased from (for 28k) ended up convincing me to hire him to move (from the street), set, and backfill the pool for $2500. It was worth EVERY PENNY. He also ordered my autocover for me to self-install for only a 5% upcharge. Personally, I didn’t feel overcharged by any of that. He even left his skid steer with me for the weekend to move a bunch more gravel and dirt, and he gave me countless pointers on my project. He was a stand-up guy with a good reputation and a lot of experience.
I selected all of my pool equipment piece-by-piece after doing my research and I just shopped online for the best prices, which ended up being from various stores.
All of my plumbing was purchased from Lowe’s/Menards, with the exception of valves. If I knew what all I was going to need, I might have gone to a plumbing supply store, but instead I made 218 trips to the store to get 5 things at a time ?
Side note: at the beginning of this project, I opened two Southwest Airlines credit cards (a personal and a business card), knowing that I was going to be spending quite a bit. The sign-up incentives and points earned totaled enough to earn me a companion pass and about 5 round trip flights (for two people, thanks to the companion pass). This was a nice little bonus that is 100% free. However, now that we have a pool, I plan to never leave my house again. ?
So far, no regrets whatsoever! We love the shell design, are having so much fun with the water features, and the heater allowed us to open our pool on April 8th in Indiana, which is pretty incredible. The autocover works very smoothly and gives us total peace of mind with our little ones. I also had a great experience working with APC Inc to spec out the unique pool cover application I was picturing. And I found their dealer manual to be very well-written and clear as I installed their 365 system.
Overall a great experience, and definitely a very rewarding DIY project.
Last edited:
OhioPool911
Member
That credit card advice is gold!! It is exactly what I was talking with my wife about doing!
Thanks for the thorough reply. We are considering the exact same two pool companies: Thursday and River. We are on the Ohio/PA border, and it seems like River is a little bit better fit for us and cheaper (the 16x36 R pool is $25k delivered).
Did you tamp down the gravel at the base of the excavation? I have a dig sheet from Thursday, but we are worried about getting the slope angle right.
Did you do the concrete pad yourself? If so, was it difficult?
I narrowed my options down to 2 shell manufacturers I was interested in (Thursday pools and River pools) and then contacted all of the dealers near me for both manufacturers asking if they would be willing to quote just a shell, delivered. I was surprised by the number of them that were open to it. The quotes were all over the place - some of them clearly trying to make a quick (big) buck. Others would only quote the whole project, which was a good benchmark for me to compare to at the end of the project. For the Aspen 16x40 I ended up selecting from Thursday pools, my quotes ranged from $28k to $37k. The installer that I eventually purchased from (for 28k) ended up convincing me to hire him to move (from the street), set, and backfill the pool for $2500. It was worth EVERY PENNY. He also ordered my autocover for me to self-install for only a 5% upcharge. Personally, I didn’t feel overcharged by any of that. He even left his skid steer with me for the weekend to move a bunch more gravel and dirt, and he gave me countless pointers on my project. He was a stand-up guy with a good reputation and a lot of experience.
I selected all of my pool equipment piece-by-piece after doing my research and I just shopped online for the best prices, which ended up being from various stores.
All of my plumbing was purchased from Lowe’s/Menards, with the exception of valves. If I knew what all I was going to need, I might have gone to a plumbing supply store, but instead I made 218 trips to the store to get 5 things at a time ?
Side note: at the beginning of this project, I opened two Southwest Airlines credit cards (a personal and a business card), knowing that I was going to be spending quite a bit. The sign-up incentives and points earned totaled enough to earn me a companion pass and about 5 round trip flights (for two people, thanks to the companion pass). This was a nice little bonus that is 100% free. However, now that we have a pool, I plan to never leave my house again. ?
So far, no regrets whatsoever! We love the shell design, are having so much fun with the water features, and the heater allowed us to open our pool on April 8th in Indiana, which is pretty incredible. The autocover works very smoothly and gives us total peace of mind with our little ones. I also had a great experience working with APC Inc to spec out the unique pool cover application I was picturing. And I found their dealer manual to be very well-written and clear as I installed their 365 system.
Overall a great experience, and definitely a
Congratulations! Do you remember which model the telehandler forklift was used? And the 2 cross bars were strapped in by the manufacturer or by you? Thank you.
Thanks for the thorough reply. We are considering the exact same two pool companies: Thursday and River. We are on the Ohio/PA border, and it seems like River is a little bit better fit for us and cheaper (the 16x36 R pool is $25k delivered).
Did you tamp down the gravel at the base of the excavation? I have a dig sheet from Thursday, but we are worried about getting the slope angle right.
Did you do the concrete pad yourself? If so, was it difficult?
Can't go wrong with Thursday or River - In fact, they partnered for manufacturing at one point and are using nearly identical methods/construction.
No, we did not tamp down the gravel base. We used 4" of #11 clean crushed stone, and screeded it by hand using a straight 16ft 2x4. The trick is to set screed boards (rails) running down the long edge of the pool, just far enough apart that they will be outside of the pool's footprint. Start by running diagonal measurements to make sure the rails are placed square. Then use a laser to set their height according to the dig sheet (i believe they give depths every 2'). You can't check these heights enough... it's extremely critical, and if you get the rails right, your screeding should be right. I set the height by screwing these screed rails into 24" steel stakes so they wouldn't move as we screeded. If you use the right stone, and the thickness of the gravel base is fairly consistent, any compaction/settling that happens as the pool is filled with water should be uniform, leaving your pool nice and level.
The only concrete work I did myself was pouring the equipment pad. It was extremely simple - 4' x 8' x 4" with rebar on 18" spacing. I used quikcrete and paid my brother with beer to help out.
Congratulations! Do you remember which model the telehandler forklift was used? And the 2 cross bars were strapped in by the manufacturer or by you? Thank you.
I rented a 10k JCB telehandler from Sunbelt. It was somewhere around $900 for the day. It was right on the edge of being heavy enough, because the narrow side access to the back yard required us to have to pick the pool up from the end, instead of the side, putting the load pretty far out (25' or so). We also had to back it down the side yard instead to keep it from tipping forward. I don't know for sure that it would have, but according to its specifications, we were pushing it. It was a HEAVY piece of equipment and did a number on the yard as we brought the pool back.
The pool was delivered right-side-up with crossbars securely strapped in place from the manufacturer. This may be partially because the Thursday Pools facility is only about an hour from our house. They stayed in place until the pool was almost entirely filled and backfilled.
Nice Job! I believe Thursday's Pools are the best in the business. I spent countless hours researching before I decided to go with the same model, only a little smaller (14'x35'). Unfortunately my pool builder didn't use flowable fill under the tanning ledge and there are spots that feel a little hollow. I'm sure you can rest easy knowing it was done right by doing it yourself. Well done!
Can you share more info on how you made different nozzles for your tanning ledge? Did you drill out different eyeball fittings? I thought about doing the same.
Thanks!
Can you share more info on how you made different nozzles for your tanning ledge? Did you drill out different eyeball fittings? I thought about doing the same.
Thanks!
Can you share more info on how you made different nozzles for your tanning ledge? Did you drill out different eyeball fittings? I thought about doing the same.
The fittings in my tanning ledge are standard wall fittings, meaning they will accept a 1-1/2" threaded adapter. So I just have a few different little fountains that consist of a 1-1/2" male thread, about 10" of 1-1/2" pipe as a riser to the surface of the water, and then variety of different tops:
One is just a 1-1/2" female thread adapter that I can screw eyeball fittings or bubbler fittings like these into to spray straight up. If I shut off the other pool returns and crank up my pump, this will shoot a 40' fountain into the air with filter pressure around 20 psi. It's annoying to have this much water/noise going on, but the kids think it's a water park.
Another has a 45 degree elbow that points toward the deep end when it's screwed all the way into the fitting in the tanning ledge. This is fun for the kids - it'll make a rainbow of water that can shoot all the way to the far end of the pool.
Another one I just capped with a standard domed cap and drilled 7 3/8" holes into the cap (one center and 6 in a circular pattern), which makes a fun little flower-shaped fountain.
I also made another one with the domed cap, but I tapped the holes 1/8 NPT and put in barbed fittings, and then attached about a foot of floppy silicone tubing to each barb. The propulsion from the water makes the tubing fly around like snakes and squirt water randomly everywhere. This one was really fun, but eventually my son kind of fell into it and bruised his side, so I decided the barbed fittings were probably a little dangerous, even when covered by tubing.
The possibilities really are endless, and it's been at least as much fun for me as it is for the kids.
One of our favorite things has been when the air is a little chilly on a spring night, and the pool water is around 90 degrees, we turn the heater set point up and send all the water to the waterfall at the deep end. It's just wide enough for two people to stand under the cascade, which comes out at about 102 degrees from the heater. It feels like a hot tub and makes it VERY hard to ever get out
Thread Status
Hello , This thread has been inactive for over 60 days. New postings here are unlikely to be seen or responded to by other members. For better visibility, consider Starting A New Thread.