DIY - Poolwarehouse build

We over dug ourselves and used the 4" concrete blocks and shingles to get our level.
I my case, I'd still still be a couple inches deep on the bottom itself.... I've pretty much decided to use 3/4 gravel to bring it up and level.

How'd you block up the gaps under the walls? My deepest overdig areas are on the shelf. It might save me some gravel to use block.
 
Day 5 - continued

The excavator showed up around 10AM and took his bob cat... Said he needed gas and wanted to grab his forestry attachment to clean out my honey suckle after he's done digging. Just sent me a text saying he won't make it back out today but he'll drop it this evening to get an early start tomorrow.

So I've lost another day...

I also made the decision to have him use the hopper dirt to build the shelves back up. Then I'll use gravel to finish the bottom off. My local gravel yard is out of 57's. Lol! They said the machine broke and they hope to have it up and running by Friday. It's $100 more at the next closest gravel yard... I can pay the extra to level my bottom and get the walls started late tomorrow/Wednesday or I can lose the whole week...

BUT!!! This have given me some down time to work on water hauling quotes, permits, etc. So that's good!
 
I my case, I'd still still be a couple inches deep on the bottom itself.... I've pretty much decided to use 3/4 gravel to bring it up and level.

How'd you block up the gaps under the walls? My deepest overdig areas are on the shelf. It might save me some gravel to use block.
I put a layer of clay down and then the bond beam over that.

unnamed.jpg
 
Day 7

The dig got done yesterday! It went kinda sorta as planned... Lol

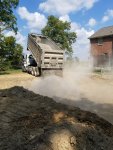
Here's the recap. (most of this has already been posted in pieces above) I have a 3'+ drop from corner to corner. My plan was to raise half of the site by 17" and cut into the other half dropping it and adding a far side retaining wall. I set my laser level at 110" (17" + 4" for cantilevered decking + 42" for the walls + 47" for the height of the level) and started digging. Every time I walked off he dug too deep so I ended up sitting and watching everything he did. Once we got deep it turned out to be all clay. My plan had been to use the fill dirt to raise the grade but I'd read that clay is expansive and shouldn't be used for back fill. Since he'd already been digging too deep and I didn't want to pay for gravel to raise the grade, I decided to reset the elevation on the low corner. For some stupid reason I just subtracted 17" and started digging. That made me 4" too deep everywhere... That plus his desire to hit the earth's core made me as much as 12" too deep in some spots. I debated dropping the surrounding elevation or raising the bottom with gravel or raising the bottom with clay anyway. It turns out that the expansive clay issue is only an issue if you're above the frost line! Since I'm below the frost line, I raised the bottom with the clay. He couldn't get me graded within the tolerance I'd like to see so I'm ordering some gravel anyway. I'm doing a 6' constant slop bottom. No diving board but plenty of room for the grownups and volleyball. I'll add a 3' bolder on my deck to do cannon balls from. The deep end dig went well. I put the end wall up and then dropped 2 pins 3' in from the back and sides. That's the corners of the deep end. I pulled sting between the two and also from the pins to the transition line. (22' long and flared out to meet the walls). I set me level for a 6'2" depth and let him start. We established a slope that felt right and then peeled a few inches at a time off until he hit the depth. I decided to knock the sides off by hand later. I didn't like how crumbly the top soil looked and feared that they'd end up deep under the walls. That would mean forms before I could pour the collar...

I ended up paying him $2,500. I didn't get as many quotes as I should have but it seems fair. I also had him clear out a fence line in the front to make room for the concrete truck and grade all over my yard with the fill dirt. I think he mostly got the grading right for water drainage. There's one area that I might need built up some.

Things I learned about excavation
  • Excavators like to dig. If they have little/no inground pool digging experience they don't appreciate the importance of hitting their depth marks.
  • Grade the site and then dig. He had a lot of trouble working around the edge of the pool to get the surrounding elevation low on the high side.
  • Honestly it might be best to figure #57 (3/4) clean gravel into you budget anyway, I've been reading about guys that use the gravel on the bottom to make things "perfect" and even using pea gravel to fine tune the walls. I'll start on my walls soon and I think it'll make life much easier to have that "perfect" base to work on.
  • Pull string to mark your overdig. I used paint and had PERFECT lines drawn. They were trampled and covered with dirt quickly...
  • Don't ask your excavator if he can dig a pool. He'll say yes. Ask how many pools they've dug in the last year. That's a more direct question that requires a more direct answer.
  • You can make a BUNCH of dirt disappear in your woods. I'd planned on having it dumped on my neighbors land. He's a farmer and says he always need fill dirt for wash outs. The excavator didn't like the rough dirt road he had to drive down. Said it took too long to navigate. He talked me into letting him spread it in my woods. He cleared the honey suckle and fallen Ash trees out of a large area and shaped the fill dirt in. Looks much better!
  • Just a random interesting note. He had a ramp in the corner that he used to get the skid steer in and out. Everyone that stopped by couldn't figure out how he was going to get the ramp out of the hole without getting stuck in the hole! He ended up digging the ramp back until it was outside of the walls of the hole. That gives me a way to get in and out and also leaves me room in the over dig to work on plumbing. I'll back fill with dirt/gravel and bury under my deck later.

GAS PROBLEM - The gas guy just came out to mark a gas line that he missed on his last trip. We got to talking about my pool heater and I've got an issue... Whoever installed the underground propane tank used regulators with 1M BTU capacity but only used 3/8" pipe... According to him, 30' of 3/8" pipe will only push 299k BTU... My heater is 400k BTU. He says it won't turn on at all if the pressure is too low. He'll get back to me later today with a quote to upgrade the pipe to 5/8".

GRAVEL - Just ordered 60 tons of #57. I called about 10 gravel yards and found one at $14/ton. Prices ranged from $14-28. 2nd cheapest was $15.50 and most were around $20. This place is $84 delivery per load. 20 tons per load so 3 trips total. I'm hoping this will be enough to flatten out the bottom and back fill behind the walls. They'll get one load to me tomorrow so I can get the bottom done and walls up. (I should have ordered this a few days ago so I'm not down today...)

CONCRETE - I'll order this when I have some time this afternoon.

Here's a final pic of the hole.
 

Attachments

  • finished hole.jpg
    finished hole.jpg
    610.5 KB · Views: 136
I've had some direct messages on cost so I figured I'd start a running comment on it.

17259 - Pool Warehouse pool kit with upgrades (see my signature for details)
115.81 - Hayward Sharkvac (Won it on an online auction. It's new but missing the power port which I can get for a little over $100 on Amazon)
1895 - Pool crete from Pool Warehouse (90 42# bags)
2500 - Excavating / grading
43.25 - Home Depot (I need to move my Chicken Coop to make room for the fence. This was supplies to brace it and a new foundation.)
28.86 - Home Depot (Marking paint, mason line and grading stakes. Also gloves for helpers to carry the walls.)

=21,841.92 current total
 
Awesome write up that others can learn from in the future. I like how you changed the question around for it to be more direct. Good thinking on that one for sure! digging to the earth's core!!! sigh...........:roll:
 
Day 8

Something finally went well! I've gone around and around for a few days trying to figure out the best way to raise the pool bottom due to it having been dug too deep. I got great input from the TFP folks and the Pool Warehouse tech line. Ultimately I drove to the gravel yard and spent time talking to the owner Jerry Wysong (Wysong Gravel in West Alexandria). He was fantastic at helping me understand the different type of gravels and their uses. I ended up going with what they call small course crush. It's "mostly" clean crushed 3/4 and down gravel. It ended up being $1.25 cheaper per ton than the other stuff!

And then! The driver was able to drop 12 tons in the hole for my leveling project! Woohoo!!! I'd been trying to find a cheap skid steer solution to move the gravel from point A to point B.

PERMITS - I also drove to the permit office downtown for my electric and gas permits. The ladies there were fantastic as well. The gas permit for connecting the furnace was $125 and the electric inspections were $75 x 2. (One inspection for the "lower bond" which is the connection to the light niche to bond the water and one inspection for the "upper bond" which happens after backfill and covers everything else that's bonded. The new 100amp subpanel will also be included in one of the inspections.)

CONCRETE - I went ahead and ordered concrete for 8AM Saturday. I went for 3,000 PSI with 5" slump (per the installation guide) and added the fibermesh after recommendations from TFP. Total will be $127/yd + $6/yd for the mesh + $20 fuel charge.

So! It's 2:28 PM EDT and I have until 8AM EDT to be ready for the concrete collar pour! Here's my to do list:
  1. Spread & level the gravel to get the pool grade right
  2. Get my walls in the hole
  3. Get my 200+ lb cozy cove / swim up spa in the hole...
  4. Set / level the walls
  5. Figure out how to do the cozy cove and get it right (I think I might need a hardware store trip for wood on this)
  6. Set braces
  7. Put the tanning ledge together
  8. Shape the walls of the hopper
  9. Decide if I should go buy some 2x4's to brace the walls from the inside
  10. Temporarily relocate 6 very large Hastas so the concrete truck doesn't destroy them...
Be back later!!!
 

Attachments

  • 20190912_132602 (002).jpg
    20190912_132602 (002).jpg
    418.2 KB · Views: 108

Enjoying this content?

Support TFP with a donation.

Give Support
You are smiling just right to get all of the stuff done! The dumping IN THE HOLE is the best thing ever as I am sure you KNOW!!! WOW! You scored on that one!

So how many friends do you have that like beer & grilled food? Fired up the grill and start calling for help!

Kim:kim:
 
I just realized something.

I'd planned on bringing the water and gravel backfill up together to equalize pressure on the walls.

But, I'm doing concrete coping and I need the liner groove to hold the form. That would mean that I need to do backfill, then decking and then the liner.

Should I be worried about blowing out the walls or is there something I don't know?

Thanks!
 
Gravel is self-compacting, which is one important reason to use it for backfill. The second is that gravel does not really "push" laterally on things...at least, not like damp dirt. Your walls are bolted together, bolted to the brace, and the concrete collar locks in the entire base of the outside of the wall. It is not going anywhere. Just backfill with gravel and pour your deck, then do floor and hang liner.
 
Not sure if this helps but it seems my PB backfilled set bottom installed liner and filled then poured deck. I have no idea which is correct or better but thought I would show you another option.
 

Attachments

  • 17FF0E7E-08AA-48B2-9BBB-8A926714FA40.jpeg
    17FF0E7E-08AA-48B2-9BBB-8A926714FA40.jpeg
    707.7 KB · Views: 158
  • 98077CE0-AD8A-478F-A238-CE8E702EF13E.jpeg
    98077CE0-AD8A-478F-A238-CE8E702EF13E.jpeg
    943.1 KB · Views: 157
I just realized something.

I'd planned on bringing the water and gravel backfill up together to equalize pressure on the walls.

But, I'm doing concrete coping and I need the liner groove to hold the form. That would mean that I need to do backfill, then decking and then the liner.

Should I be worried about blowing out the walls or is there something I don't know?

Thanks!

@jimmythegreek thoughts?
 
Once the collar is poured the pool isn't going anywhere. All you have to contend with at that point is ground water. With heavy rains and clay you could wash alot of the sides of hopper away you gotta work fast. I will tell you yo ne careful with all that over digging and the ramp out of pool. The gravel must be mechanically compacted only the wall backfill doesn't get packed the 3/4 clear is used to avoid damage from the compactor.

As you learned an excavator and a pool digger are two different operators and you cant compare the two. Always check grade as you go and use painted grade pins. I cant tell you how many excavators use their bucket to pound dirt and call it compacted. It's not. I promise that will settle so be careful if thats what he did for you
 
My husband and I are looking into a Pool Warehouse self build next spring. How did it end up going? My apologies if posted elsewhere. I didn't see anything. Thank you for sharing the costs. Do you mind sharing the rest of the costs for electric/plumbing, etc.?
 

Enjoying this content?

Support TFP with a donation.

Give Support
Thread Status
Hello , This thread has been inactive for over 60 days. New postings here are unlikely to be seen or responded to by other members. For better visibility, consider Starting A New Thread.