DIY - Pool Renovation Orlando

Nov 4, 2018
57
Orlando
I've been lurking here for a long time and it is finally time for me to renovate my existing pool. This will be a DIY renovation and trying to stay on a small budget.

The pool was built in 1980. It is a free form "disney" shaped pool. It is currently 3.5' in the shallow end and 8' deep in the deep end. The pool originally had a diving board but was removed a long time ago due to insurance requirements.

Average width is about 14' wide and pool is 30' long.

My Plan Overview:
1. Replace existing skimmer
2. Install auto fill and auto drain
3. Raise deep end depth to have more useable space.
4. Add Tanning Ledge.
5. Replace tile.
6. Resurface pool.
7. Rework equipment pad.

My Plan Elaborated:
1. Existing skimmer has some cracking in the throat area on the PVC. I believe this is an area where the pool slightly leaks from.
2. My existing skimmer has a very small opening currently (only about 3" height) I have always fought to keep the water level at the sweet spot. So I am looking to add a auto fill and auto overflow to be able to always have the pool at the right level.
3. One of the parts I hate the most about the pool is how little area there is in the shallow end. It slopes quickly from 3.5' to 8' and most of the pool is a depth that you can not stand up in. I am looking to make the slope less steep and make the lounging area of the pool larger.
The main drain will be raised to meet the new floor height. I am aiming for 5' water depth for the deep end.
4. This feature is still up in the air. I'm interested in adding a tanning shelf across the existing shallow end. Approximately 7' x 14' in size at a water depth of 15". I would add two umbrella holders in shelf if added.
5. All water line tile will be replaced. The existing tile is a 6"x6" bull nose tile. There is currently no coping installed. So a similar tile will be installed. The step edge tiles will not be replaced and instead a marking tile will be added.
6. The resurface will be sub contracted out to professionals. Planning on doing a quartz finish.
7. The current equipment plan is on a slab that isnt large enough to hold all the existing equipment (My DE filter is sitting off the side on a paver). The slab is soo low below grade that the incomming jandy valves handles are essentially under dirt most of the time. I plan on disconnecting and all the equipment and pouring a large 8" deep slab to get all the equipment high, dry and clean from the surrounding grade.
Existing Pool:

20191019_133405.jpg

20191019_133603.jpg

Area where the tile has already fallen off some:
20191019_133514.jpg
Areas of tile separating from wall:
20191019_133633.jpg
Skimmer Cracks:
20191019_133426.jpg
Equipment Pad Area:
20191019_133537.jpg
 
Last edited:
Pool Drained down. You can see an area where the plaster finish had delaminated in the past and I had patched it. Worked well to buy a couple years before tackling this project.
20191019_170004.jpg

It turns out that my pool has had 4 surfaces (been resurfaced 3 times already). I was originally planning on only chipping out around the fixtures and have the new plaster put over the old, but I figured 5 layers was too many. So I have decided to chip off what easily comes off.
The last two plaster layers (3rd and 4th) are bonded to each other extremely well. I can see some kind of bonding agent (blue) that had been used. These two layers will not be separated. The 2nd layer to the newer two was relatively bonded well (3rd and 4th), however the 2nd layer to the 1st layer is not bonded well at all. This is what I am chipping the plaster off too (2nd, 3rd and 4th layer). The original plaster seems to be very well bonded to the gunite and I plan to leave this.
20191020_113329.jpg
The thickness of the years of plaster can be seen here. Some pieces are 1 or 2 inches thick .
20191024_082326.jpg
 
Last edited:
  • Wow
Reactions: kimmielea
If I where you, I would buy a good chipping hammer and take everything up to the gunite.... do a complete chip out..
I have been thinking about it. Trying to decide if the extra effort is worth it (It has been there 40 years and is still adhere extremely well). My plaster guy seems to think if bondkote is used this time that it will work very well.
 
Spray painted the tanning shelf area and floor area to get an idea of where they may go.
Tanning Ledge:
20191024_082256.jpg
I plan to split the existing steps in half. The front side will still be utilized as steps. The back half will be incorporated into the tanning shelf.

Deep End:
20191024_082211.jpg
This line is actually at 6' water depth. I think I'm going to go even shallower (5' water depth) so this circle should raise about a foot and get larger. The base will be filled with 57 stone/rock to get to the height necessary prior to adding the new rebar.

However, I've been thinking about using some of the plaster I've chipped out as the fill mixed in with the additional stone. Not sure if it is a good idea or not though.
 
I am really liking your plan so far. Here are some thoughts to help tweak it. You are talking about a 5' depth on the far end. Take a tape measure and see where 5' hits the shortest adult in the house. I am 5'5" and it would not be a comfortable depth for me as it would be around my chin/mouth area. A 5' depth is also NOT good for even cannon balls.

So lets talk about how you see the pool being used. You could bring the far depth up to 4'5" so just about every adult could walk in the whole pool or you could bring it up to 6' so it will be safe for cannon balls. Let me know your thoughts after reading this.

I think you could use the chip out for fill but will call in a couple of people who should know for sure @ajw22 @jimmythegreek

Kim:kim:
 
I'm not 100% set on the pool depth, but I would like for the majority of the pool to be able to be walked with a beer in my hand. My biggest gripe with the existing pool is how steep the slope from 3.5' to 8' is. The majority of the pool length is currently over 5 feet deep (80%) and only (20%) can is standing space under 5 feet.

I'm having a hard time deciding on the final depth while seeing the huge hole that currently is there. I think I may add the 57 stone/rock to the bottom and grade it to what appears to be a nice easy slope to get an idea of how deep the pool "naturally" feels right. Then measure how deep it will be based on where I end up (Hopefully i'm in the 4.75 to 5.5 feet range).

I grew up in a house that had a pool that was 3.5 - 6 feet deep. I've been in this current house with this pool for 10 years which is 3.5 - 8 feet deep. I know that I'm hardly in the deep end and rarely have dove into the pool in that time. I don't think diving will be missed. (Also my days of jumping off the roof into the pool are over).
 
I plan to do a 12" on 12" #3 rebar grid in the deep end similar to this. The rebar will be epoxied into the existing gunite shell: (This picture is not of my pool).

Pool Floor.jpg

I believe #3 rebar requires a 7/16" hole drilled.
.
Does anyone know how deep I should drill? Assuming my existing shell is 6" thick. Should I only go half way (3"), Should I try to get better embedment and go 5" deep?
I'm afraid to go too deep and blow out the back of the gunite shell and create the potential for the rebar to rust.
 
set the drill bit with tape at 4" or use the depth guide if it has one. the rebar is more for lateral movement and to avoid any shifting that will break the plaster coat. technically any steel added to the shell should get bonded to the existing rebar for proper bonding, this would have to get inspected and passed in my area and is a pain in the but to do on a floor raise. dont know how old this pool is you may not even have a bonding grid but I would do it if you have one for safety reasons. get rid of the old plaster dont use it as fill. only use graded material for fill, 57 stone is fine. use a bonding agent on the gunite right before you pour your new floor. with the shape of the pool you can easily have a large walking area and make a small bowl shape of 6' in the deep end for cannonballs, or just do a gradual taper down, either is nice in a free form. I also agree that if I was doing this for my own pool as a DIY I would do a full chip out. Its more work but you never have to worry about delamination of the base plaster, its almost always a guarantee at a longer lifespan when you do a full chip out.
 
  • Like
Reactions: kimkats

Enjoying this content?

Support TFP with a donation.

Give Support
I've removed the old main drain, extended up the plumbing and bonded to the rebar with #6 bare copper to bond to rebar in new raised floor.
20191102_121946.jpg
20191102_121952.jpg

This is another area where I will add bonding to the shelf shelf rebar.
20191102_164223.jpg
20191102_164220.jpg

I used these rebar bonding clamps from Amazon to connected my #6 solid copper ground wire to the existing rebar.
Greaves J29-DB Bronze Rebar Ground Clamp #3 Rebar 8-6 AWG Solid Jones Bond

Hydraulic cement will be poured around the exposed rebar to prevent future rusting.
 
Last edited:
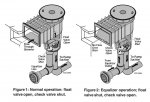
I'm planning on installing a skimmer equalizer line to prevent the pump from ever running dry when the water level drops below the skimmer mouth. Is there any down fall to adding the this line with an appropriate VGB cover? Any suggestions?

Skimmer.JPG
 
Last edited:
Water I beleive is less than half the weight of stone and a third or the weight of cement. I'm not an engineer but I'd say it may ne ok if it's been 40yrs that concrete is old and hard. Gonna depend on the rebar spacing and the soil type below. The shell is a big footing in essence what's ur plan to raise the floor up fill wise?
When I do an equalizer I do a seperate line and make a pair of wall drains just like main drains 3ft or more apart and I stick them up a little higher than the top of the light or about 18" down from coping to center of pipe. Nobody steps on them at that depth or uses their hands to grip them never had an issue. A single isn't really safe even with a VGB cover and wouldnt pass in my area
 
No it must be stone dirt is a no no anywhere on a pool once its excavated. My rule is dirt out stone back once its disturbed. I only use excess for grading otherwise its trucked out. 3/4 clean is the only stone u can dump that is good enough out of the bucket. A hand tamp and your good to go. Anything else needs mechanical compaction in lifts
 
I've been chipping away at the progress of the pool:

Here you can see I have laid out the head blocks to make the "face" of the new bench. I ended up doing this differently later on, but I wanted to include the picture as others may elect to try it this way themselves (If I would have continued this way I would have added rebar vertically in every cell and horizontal rebar in each block.
20191027_113922.jpg
You can see the block I was using. It allows rebar horizontal and vertical in each cell.
20191028_082011.jpg
 

Enjoying this content?

Support TFP with a donation.

Give Support
Thread Status
Hello , This thread has been inactive for over 60 days. New postings here are unlikely to be seen or responded to by other members. For better visibility, consider Starting A New Thread.