I forgot to add some pics

DIY inground pool kit
- Thread starter johnm160
- Start date
You are using an out of date browser. It may not display this or other websites correctly.
You should upgrade or use an alternative browser.
You should upgrade or use an alternative browser.
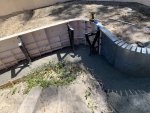
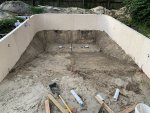
John,So it seems the concrete calculator form the concrete company seems to be geared to selling you more concrete than you need. Had about 3.5 yards left over so we went back around the base of the pool again. Then with what was still left we filled up most of the enormous hole behind the steel steps since I did not have to worry about the pressure bowing that.
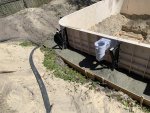
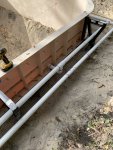
Today I started plumbing the pool up to the edge if the over dig area. Skimmers and returns are complete to that point. I tore the teeth off the hole saw on the first step jet, seems it did not like the steel. Three more to go so that should be fun. Main drain plumbing will be after that. I did not get to pour the pad at the bottom of the hopper. Home Depot sent my nephew back with the wrong fittings twice despite the screen shots of the fittings I needed. Oh well.
Wouldn’t it be easier for you to drill a hole in the plastic next to the metal stairs and direct the eyeball towards the stairs?
Absolutely, I have 3 eyeballs in the plastic already, these are going to be spa jets in the sides of the stairs. Not sure why it tore up the hole saw so badly, hope it does not take one per hole. I am going to go to the store and look at the options this time instead of ordering it online. I still have 3 more holes to do in the plastic for the Colorlogic 320's as well.John,
Wouldn’t it be easier for you to drill a hole in the plastic next to the metal stairs and direct the eyeball towards the stairs?
You need a metal hole saw bit. The regular ones will burn the teeth right off. A dremel with small wheel works too have to be careful tho just lightly run the edge of blade around making a groove to follow
You need a metal hole saw bit. The regular ones will burn the teeth right off. A dremel with small wheel works too have to be careful tho just lightly run the edge of blade around making a groove to follow
Yeah I looked up what I bought and it mentions metal but I suspect it is meant for wood/light gauge metal. I will look for a better saw or give the dremel a shot.
I would hate to be the person to run into that if it ever needed to be dug up.....LOLGood use of the extra concrete. That bad boy is not going anywhere!
Kim
You dont need wall foam.....you want wall foam regardless of pool wall material. Makes it feel nice when leaning on it and protects liner. It's just a sheet of vinyl after all
Got it. Thanks JimYou dont need wall foam.....you want wall foam regardless of pool wall material. Makes it feel nice when leaning on it and protects liner. It's just a sheet of vinyl after all
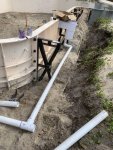
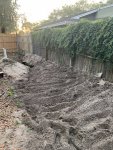
So a small snag today, ran into a bit of a snag today. Ran into two tree stumps in my path for the plumbing from the pool to the pump pad....Might try to burn them out tomorrow.
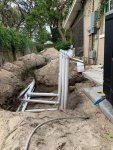
This bypass arrangement looks like a mess, can do this with one 3way valve no?
This bypass arrangement looks like a mess, can do this with one 3way valve no?
Attachments
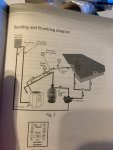
Cant do it with 1 3way. It's an H style bypass. Best to use 3 separate 2way valves. You can do it with 2 3way valves but you might get confused looking at it after some time. With a heat pump you actually need the ability to fine tune the flow. Having a VS pump is great for a heat pump to just adjust flow speed to the needs of the heater. With the stumps just go around them no need for straight runs. You can 45 or 90 around the area use long sweeps if you can if using 90s

Cant do it with 1 3way. It's an H style bypass. Best to use 3 separate 2way valves. You can do it with 2 3way valves but you might get confused looking at it after some time. With a heat pump you actually need the ability to fine tune the flow. Having a VS pump is great for a heat pump to just adjust flow speed to the needs of the heater. With the stumps just go around them no need for straight runs. You can 45 or 90 around the area use long sweeps if you can if using 90s
Ok if best is 3 2way that is what I will do.
I can see how 2 3way could get confusing especially if anyone but me had to use it.
Thank you Jimmy
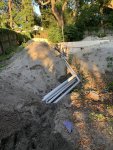
Plumbing is done and she holds pressure. I am extremely happy that there was no leaks. Had to make a couple of 45 degree turns to avoid 2 large tree stumps in my path. Was trenching by hand so no pulling them out at that point.
Attachments
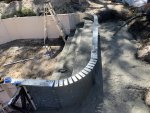
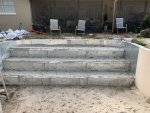
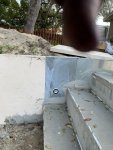
Plumbing inspection passed! Working on the hopper trying to get it ready for pool Krete. Still a little rough but getting close.
Attachments
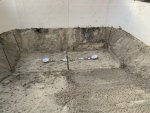
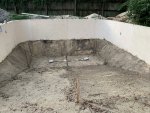
Yeah it is a real pain in the rear to get it to stay in place on the slopes though.
SWEET on the pass!!!!
Kim
HUGE progress!! Hot, sweaty work that needs to be done..............good job!!started filling in the plumbing trench not very exciting. But progress
Kim
Thread Status
Hello , This thread has been inactive for over 60 days. New postings here are unlikely to be seen or responded to by other members. For better visibility, consider Starting A New Thread.
Similar threads
- Replies
- 1
- Views
- 86
- Replies
- 3
- Views
- 197
- Replies
- 2
- Views
- 194
- Replies
- 8
- Views
- 311