Advice needed for installing Stenner pump injector

Pierrot

Active member
Jan 18, 2024
38
San diego
Hi all,

I just got my Stenner pump and now need to install the injector. I could use some guidance :)

Based of what I've read, I see three options:
  1. using a 2" x 2" x 1/4" tee such as this one: 2" x 2" x 1-1/4" Sch 40 PVC Reducing Tee Soc 401-250 . This seems to be the most reliable way to provide a leak-free injection point. But it's also the most intrusive, and I'm terrified at the idea of cutting my pipe.
  2. using a saddle clamp, like this one: Pentair 2 . This is the least invasive method (you just need to drill a hole), but gosh that piece of plastic is expensive.
  3. using an NPT pipe tap to create threads. This seems to be a good compromise between intrusiveness and ease of execution.

So I'm probably going with #3 and if I screw up, fall back to #1. But I have some questions:
  • would this be the correct tap to use? Drill America 1/4 in. -18 Carbon Steel NPT Pipe Tap DWTPT1/4 - The Home Depot . I'm kinda lost between all the standards (NPT, NPTF, ...)
  • if yes, as NPT threads diameter increases the deeper you go, how deep should I tap into my 2" schedule 40 pipe?
  • finally, when it's time to screw in the injector, will I need to use additional sealant material (tape)?

Thanks all!
 
  • Sad
Reactions: Dirk
#3 is going to be far more of a PITA than #1. PVC pipe is easy to cut and glue. It's even easier if you have a small reciprocating saw with the right blade ... cut right through the PVC like a hot knife through butter. As long as you do some very simple measurements of the length needed (including the depth of the glue joint), it's very simple.

Trying to tap plastic and get reliable threads, especially using a hand tap, is a lot harder than it looks. PVC, under certain loads and strain rates, can become quite brittle and crack. Threaded PVC is almost always manufactured during the casting process in the mold and not done after the fact.

 
  • Like
Reactions: Dirk and Pierrot
Also, there isn't a lot of "meat" to a PVC pipe to cut threads into. At most you'd probably only get three or four threads before it taps out. That is not a very reliable connection. When people do drill and tap PVC, they usually do it at an elbow union where there is significantly thicker plastic to work with. The thicker walls also make the union a lot more mechanically stable. Putting an injection valve into a pipe wall with few threads will have almost no tolerance for any kind of bending moment. All someone has to do is swipe it with their pants leg or pull on the tubing too hard and the injection valve will snap right out of the threaded connection.
 
  • Like
Reactions: Dirk and Pierrot
I agree with @JoyfulNoise. I originally used the drill and tap method into a 90 degree elbow. It worked, but I didn't felt confident...and I have extensive mechanical skills. I replaced with a Tee within a few months.

Works great and hasn't been an issue in 4 years.

 
  • Like
Reactions: Dirk and Pierrot
How about the saddle clamp route, any opinion on that method? Is it reliable?
Given the tens of thousand threads I’ve read or responded to, and my experience with them, I think they are as, or more problematic than drilling and tapping.
 
  • Like
Reactions: Pierrot
I’ve never used that saddle clamp before. I have, on the hand, cut and glued a lot of PVC. When you do that right, it can last a decade or more. I can’t say the same for the saddle clamp.
 
  • Like
Reactions: PoolStored
DO NOT try and tap a PVC pipe. There's just not enough thickness for it to be reliable. If you or someone else, or even a pet, bumps the injector, that's enough leverage to compromise the threads and break the seal. Or worse, just weaken it so it can later bust apart (while you're on vacation, of course)! No thanks.

There's nothing wrong with the saddle clamp, but it does rely on an o-ring (not my favorite thing, if it can be avoided).

You're overthinking the PVC work. It's really quite easy, and cheap. And the connections will be literally welded together: very strong, very reliable (you don't really "glue" PVC together, the "glue" is actually a solvent that kind'a melts the PVC, and the bond is more like a weld than anything else).

Buy what you need, and some primer and glue, and then a couple more pieces for practice: a 2' chunk of pipe and a couple couplers or an elbow. That'll only be a few bucks extra. Then just cut and glue them a few times. You don't have to use your pool plumbing to learn how to do it. Once you glue up a few practice pieces, you'll be thinking to yourself, "Gee, well that was easy." Spend a few minutes on YouTube and watch a few tutorials, too. There's really nothing to it.

FYI:
but gosh that piece of plastic is expensive
No, the plastic is quite cheap. It's the logo that is expensive! ;)
 

Enjoying this content?

Support TFP with a donation.

Give Support
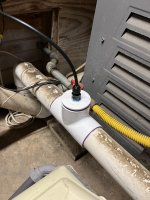
When I plumbed a 1/2"-threaded something into my pool plumbing, I used a 2"x1/2"x2" tee. I was later told I should have used a 2"x2"x2" tee, and then a reducer to get to the 1/2". Something about that being the stronger way to do it. Just as you did. Great job!

The only thing missing is the purple streaks, drips and spills all over the pipes and the ground below. So you were just faking about your PVC plumbing inexperience?! ;)
 
  • Haha
Reactions: JoyfulNoise
The only thing missing is the purple streaks, drips and spills all over the pipes and the ground below. So you were just faking about your PVC plumbing inexperience?! ;)

REAL plumbers wear their purple fingers with pride 😒
 
  • Like
Reactions: Dirk
When I plumbed a 1/2"-threaded something into my pool plumbing, I used a 2"x1/2"x2" tee. I was later told I should have used a 2"x2"x2" tee, and then a reducer to get to the 1/2". Something about that being the stronger way to do it. Just as you did. Great job!

The only thing missing is the purple streaks, drips and spills all over the pipes and the ground below. So you were just faking about your PVC plumbing inexperience?! ;)
I was actually looking for a 2"x1/2"x2" but my local Home Depot only had 2"x2"x2" so went with it with a reducer. I got lucky I guess 🤷‍♂️
As for the missing drips and spills... I cheated... I had put a cardboard on the ground. There was glue all over the place ahah 😅

So how are you controlling the stenner pump...
I just ordered a wifi plug (that one) and configured it to turn on for a given number of minutes every night.
 
How are you limiting the stenner from pumping say the filter pump isn't on.
I run the pump 24/7 (at the lowest speed, motor barely hums, so electricity bill is very low) so I don’t need to worry about when the stenner pump runs.

But yes, if my filter pump were to unexpectedly stop, I don’t have anything in place to prevent the stenner pump from starting.
 
But yes, if my filter pump were to unexpectedly stop, I don’t have anything in place to prevent the stenner pump from starting.
If you ever want to pursue adding this safety measure (which I would recommend), then I'll walk you through a how to...
 

Enjoying this content?

Support TFP with a donation.

Give Support
Thread Status
Hello , This thread has been inactive for over 60 days. New postings here are unlikely to be seen or responded to by other members. For better visibility, consider Starting A New Thread.