Adding mod-lights to an inground steel panel pool - help!

Enzodast

Active member
Jul 22, 2020
38
Connecticut
Pool Size
33000
Surface
Vinyl
Chlorine
Liquid Chlorine
Hey guys,

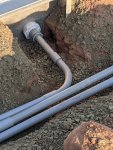
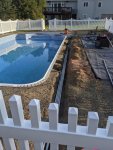
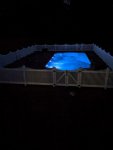
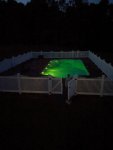
So I just installed my double roman, steel wall and vinyl liner inground pool. We did it all ourselves with the help of a friend in the industry and family/friends with the right equipment. The pool came out great and we've been enjoying it during quarantine and this hot summer.

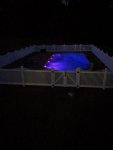
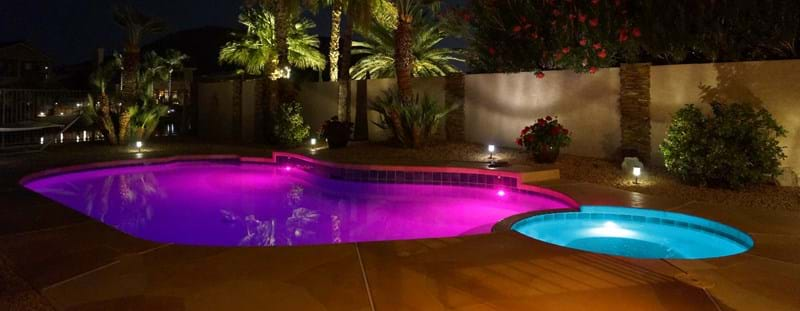
I made a big mistake in not planning out lights during the purchase process and want to add some now.

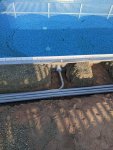
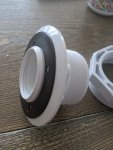
I've done a lot of research and purchased a pooluxe premier from sr Smith and 4 of their mod lites to add. I purchased the proper light housings which require a 3 and 1/8" hole in the steel wall for installation. There is no decking around the pool yet and now would be the time to do this retrofit.

I can find no videos or tutorials of anyone online draining their pool water to the necessary level and then drilling through the liner and steel plate.

These lights are all plastic and only need to be 4" below the waterline not the standard 18". I plan on putting them in line with my returns. I'm planning on lowering the water level to a comfortable level say 4 more inches or so below the install points and then using a metal 3-1/8" bit on a cordless drill to cut through. I would first mock it up on the liner, cut the liner out slightly larger than the necessary 3-1/8" and then cut the hole.

Is this impossible? Do I need to drain the entire pool and remove the liner to do this? Am I over thinking this? Sr Smith feels drilling a hole is not a big deal as long as I'm comfortable with the drill. I'm mostly worried about the liner being ruined during this process and am looking for some advice.

Thank you!
 
@jimmythegreek you think this can be done with the liner in place?

Below was Jimmy's response in this thread...


Any light whether a niche or a nicheless needs the liner removed to be installed. Usually done during a liner swap or can sometimes be done by unhooking a section and draping liner out of the way. This depends on how old the liner is and your skill level. I recommend nicheless lights for this application much easier to do. You need alot of room for a light niche behind the wall and it's a large area to dig out. It must be compacted very well and carefully afterwards otherwise it will settle and the coping/deck will go with it
 
Last edited:
So I got the fittings in. Based on how the fittings look (Sr Smith lns-2v) the fitting needs to go in between the liner and steel panel.

The only way I can do this is when I close the pool reduce the water level to expose the shallow end and take pressure off the liner. Not sure if I have to drain the whole pool to do this.

The lights are low voltage. Only 7w each and only need to be 4 inches below the water level. I'll most likely put them in line with my returns.

Getting to the backside won't be difficult there is no patio yet just dirt and about 10-12" of processed stone. I need to dig a trench along the side of the pool to handle a 1" conduit. The lights only need 4" of clearance behind the wall and into the conduit.

Again these are Sr Smith mod-lites. With a pool lux premier transformer.

Can I unhang the liner as I go if I leave water in the deep end or do I need to drain the whole pool to do this? Prior to winterization seems to make the most sense for me to do this install.
 
Can you post a link to these lights? I've never heard of them before. How would the liner seal if you drill thru the liner and the wall at the same time?
 
Is it a big deal to lower the water level or empty pool entirely before winter. Take down part of the liner to do the job properly then refill before winter? I'm not concerned about water costs just getting it done properly
 
These go into standard return fittings? If so you drill them from the back and you just unhook the liner after lowering the water halfway in shallow end amd wedging a piece of ridgid foam between panel amd liner for protection. Then cut liner after seal has been made on front. You need care to make sure conduit is waterproof
 
These go into standard return fittings? If so you drill them from the back and you just unhook the liner after lowering the water halfway in shallow end amd wedging a piece of ridgid foam between panel amd liner for protection. Then cut liner after seal has been made on front. You need care to make sure conduit is waterproof

I don't know if the fittings are standard. The model of the fitting is LNS-2V. I have to drill a 3 1/8" hole for the fitting to work. I was going to lower water level to below shallow to take pressure off before winterization unhang first half of liner on that side do the first two put liner back up then do the 2 in the deep end. I guess I can drill from backside also if the liner is now out of the way. Is it dangerous or risky to unhang the liner? I would think not as long as I drain enough water.

In regards to the conduit being waterproof tell me why that's important? Couldn't water go into the conduit as long as it doesn't leak water out of the pool this should be fine, no? In the winter they say to drain the pool far enough, remove the light (they twist to unlock) drain water out of the conduit, put the winter caps in place (twist on also) and leave water level below returns and these lights for winter.

What does the Ridgid foam do? And you think lowering water only halfway will take enough pressure off to unhook liner and then hook it back up again when done?
 
I looked at the link they use standard 1.5" return fittings. Umhookimg a liner in the cold is risky for a DIY. You dont need to do that. You go in from the back. You unhook a few feet amd slide a piece of 1" ridgid between pool wall amd liner for protection from the hole saw. You pop fitting in amd screw front together. Then apply trim plate over liner amd screw plate on. Yiu wait to do all of them then do your piping amd last thing is cut liner and fish wires. The conduits are meant to be wet the light isn't meant to be waterproof. You must be sure they are watertight like any pool plumbing is until it gets above the pool coping. We pressure test niche light conduit like pool plumbing
 

Enjoying this content?

Support TFP with a donation.

Give Support
I appreciate this very much. In order to take pressure off the liner to unhook it I need to lower water level quite a bit. I don't think lowering it halfway down the wall will be enough to release the pressure. I'll be doing this probably in mid September when it will start getting too cold to use the pool. The air temp should still be in the 60s by then and I'm sure there will be warmer days in Connecticut but too cold to swim in. I was going to lower the entire shallow end to take all pressure off the walls. Then I would think I can unhook liner. I like your idea of only unhooking a little bit and using the 1"Ridgid foam for safety. I was going to unhook several feet at a time and drop it entirely out of the way before drilling.

I need to figure out what fittings and adapters I need to connect the 1" electrical conduit to these lns-2v fittings. I'll make sure to use glue everywhere so it's water tight. My biggest concern was/is how do I drill these Dang holes. Any videos someone has of a similar install would be fantastic but I can't find anything on you tube remotely similar to what I'm trying to do. Just not sure if liners are meant to be unhooked and rehooked like this or how durable they truly are. It's a 27 mil liner but still seems delicate as all heck
 
Post pics of the return fittings you have. I wouldnt wait until fall no need to. You can lower the water amd leave a foot in shallow end and do this easily in a few hours and fill pool back up same day. No need to cut liner til whenever your ready in the fall. Depending on what style returns you have will determine how much of a pain it will be. Read the install sheet to see how much space behind the fixture you need before you can reduce pipe size. Usually only a few inches. Then you can kick down size to 3/4 or 1". If this isn't getting inspected I would just run white PVC for all of it and transition to grey at the pad above ground
 
Post pics of the return fittings you have. I wouldnt wait until fall no need to. You can lower the water amd leave a foot in shallow end and do this easily in a few hours and fill pool back up same day. No need to cut liner til whenever your ready in the fall. Depending on what style returns you have will determine how much of a pain it will be. Read the install sheet to see how much space behind the fixture you need before you can reduce pipe size. Usually only a few inches. Then you can kick down size to 3/4 or 1". If this isn't getting inspected I would just run white PVC for all of it and transition to grey at the pad above ground

4" behind light to reduce pipe size.

Still confused how lowering water halfway will allow for enough pressure to unhang the liner in that spot. It needs to be lifted to unhook out of the groove.

See attached photos for the fittings
 

Attachments

  • IMG_20200726_093933.jpg
    IMG_20200726_093933.jpg
    378.6 KB · Views: 8
I'm in NJ and so overworked it's not funny. Busiest year to date the covid was good for some people.
Those returns you have are tricky they are Hayward style. If you notice the backside has a star pattern. I cut those with a dremel. It's like that to hold the fitting in place whole you tighten the nut. What type of liner track do you have? Even with a full pool you can slide up on liner and get slack in it. Your not trying to lift the liner off the floor you are stretching the wall area up. That's why you dont want to do this in cold weather. If you unhook and drape liner with no water in shallow side the liner is going to shift. You cannot remove any return fittings or penetrations they will never line back up. It wouldn't be a bad idea to pay a pool guy to mount the returns you do the hard work of digging behind the walls. Just dont cut the liner after you screw the faces on.
What exactly do you cut with the Dremel? Wouldn't I just use a 3 1/8" hole saw to cut an even hole and the locking nut holds everything in place?

I have a beaded liner.

I have a guy that has owned his own company and helped me with the install of my pool. I'll talk to him again to see his comfort level with helping me with this. He did all the other plumbing and return installs.

When you say don't cut the liner after you screw the faces on...why not? Don't I have to cut the opening so I can then run the light into it?
 
You said you want to do this in fall. I explained the liner wont stretch much amd if you do it now you can leave faceplate on and do the hole cutting later pool will be watertight with fitting on until you cut the liner. I also explained the fitting is star backed. Yes you can cut a round hole. It's very hard to tighten a round hole with a liner in the way. The star pattern holds the fitting so you can snug the nut. Take a look at the fitting you have on backside
 
UPDATE @jimmythegreek
Project mostly completed!
This past weekend we drained enough water down in the pool to unhang the liner as we needed to. I was in the pool knee deep and had cardboard taped under every hole we were going to cut with a vacuum running. It worked out well. We drilled 4 returns from the outside in and made sure everything was clean with no shavings. Took maybe 90 minutes to get all 4 installed!!!

Now onto the lights!!!

One challenge im having and can't seem to find much support for this is the connection from the return to the conduit I'm using for the lights. I'm running individual 1" conduit for each light so I can more easily chase new wire down the road if I ever need to. I'm confident the conduit connections will all be water tight but the connection from the return to the conduit was tricky. I bought PVC Connectors that easily screwed into the back of the return housing. My research told me to use ptfe tape or this white dope that I couldn't easily find. I opted for the ptfe tape. Everything seemed to go together very snug and fit well.

I have not backfilled yet and will finish chasing the light wires tomorrow. Should I silicone on the outside of this joint to be sure? What silicone do I use if I want extra protection since this will be buried. I really don't want to go backs and have to undo these connections that will not be very simple but I can if it's an absolute must.

Attaching some photos!
 

Attachments

  • PXL_20200921_211055447.jpg
    PXL_20200921_211055447.jpg
    585 KB · Views: 19
  • PXL_20200921_211048717.jpg
    PXL_20200921_211048717.jpg
    824.1 KB · Views: 19
  • PXL_20200921_210647599.jpg
    PXL_20200921_210647599.jpg
    778.2 KB · Views: 18
Pool is refilled and no leaks thank God. I may just silicone around the joints to be safe. Anyone know what silicone is safe for PVC and conduit and can also be buried?

Can't wait to connect lights to transformer and see how they look (and confirm they work lol)
 
All done. Backfilled and lights look great! Thank you all!
 

Attachments

  • image000002 (4).jpg
    image000002 (4).jpg
    99.2 KB · Views: 18
  • image000001 (5).jpg
    image000001 (5).jpg
    230.6 KB · Views: 16
  • image000003 (2).jpg
    image000003 (2).jpg
    104.1 KB · Views: 16
  • PXL_20200925_232353525.jpg
    PXL_20200925_232353525.jpg
    151.5 KB · Views: 17

Enjoying this content?

Support TFP with a donation.

Give Support
Thread Status
Hello , This thread has been inactive for over 60 days. New postings here are unlikely to be seen or responded to by other members. For better visibility, consider Starting A New Thread.