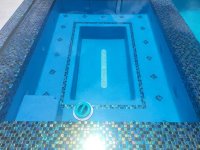
16 July 2024 Finishing Up my OB Pool

03 June 2024: Starting up New Plaster. What a difference a day makes!

As predicted by @JoyfulNoise and other TFP experts pH rose abruptly last night.
pH 8.0
FC 2.5
CC 0.5

And brushing with filter pump running 24/7 is clearing her up nicely as predicted. Building a pool with TFP at my side has been fantastic!

Chris

1717415599379.jpeg

1717415637052.jpeg
 
Building a pool with TFP at my side has been fantastic!
You Got It Yes GIF by MASTERPIECE | PBS
 
OK, with this mornings test results:
pH 8.0
FC 2.5
CC 0.5
and from previous tests
TA 260
CH 300

CSI is now at 0.96

I guess I'll get ready for regular acid and FC additions. Hopefully, my tablet floaters will begin to help with pH and FC at least till CYA gets up to 30 or so. @JoyfulNoise et. al. it looks like I keep the pH 7.6-8.0 and don't worry about CSI .5-1.0 while maintaining CYA at 30 for the next 30 days. Correct?

Chris
 
Did anything happen with the channel drains yet?
No, not yet just waiting on the custom inserts. They actually drain into the basin pretty well as is but the valve will be out of the splash zone once I get the pipe cemented and sealed. Would like to do that before I go to full rpm on the big pump.

Water looks gorgeous today. I'm having a tough time brushing from outside so thinking to put on a shortie wet suit to get several areas. Wish I had my old hose dive gear, don't want to risk the tank in the water but my pump with its 30' hose would be great. Sold it with the boat several years ago. We also have a little touch up on the grout and water proofing in the channels.

Chris
 
  • Like
Reactions: JoyfulNoise
Don't for get to show this off in the plaster thread as well:

That water is clearing up nicely! Robin in for the win with the o-ring LOL
 
  • Like
Reactions: setsailsoon
I took the plunge yesterday to get to hard to reach areas on the plaster. Temp was very comfortable, guessing close to 85 deg F. Noticed some areas where I have white blotches that don't seem to scrub off very well. I'll keep brushing for now and later this month may try a more aggressive brush (50% metal bristles was recommended by the plaster guys if needed). I've read and watched so many different videos on plaster cure methods all from experts that I can rationalize any approach from get aggressive now with a hot acid treatment to don't do anything. I think the approach that makes most sense is to make the environment such that the plaster has good opportunity to cure all the way through before I do anything that leaches out reaction components. After 30 days if the blotches remain I can get more aggressive on the surface and not worry that I'm shortening it's life. This is why I'm taking the @onBalance approach that @JoyfulNoise recommended. It's also a similar approach I've used for decades with concrete and did with my house slab: be gentle and supportive for the curing reaction in the first month when you get 90+% of the cure.

Chris
 
Last edited:
04 June 2024 Update: TFP Plaster Startup Results

What a difference a few days makes! Based on all the new build threads I knew the pool was gonna look pretty bad to start. And I prepared Robin for this. I was very confident with all the choices to use well water and use the TFP approach on curing and I didn't show it to Robin but I was worrying a little internally when we first started with the completely green nasty looking pool that had a lot of white blotches everywhere. This was like the last 4 months of pool construction in 4 days. A little scary when all you have is a massive hole in the ground filling up with ground water and 10+ loads of dirt piled up everywhere. But all of a sudden it starts looking like a pool and construction fun takes over. Same thing happened since we started filling with water last weekend. Looked scary, and nasty but took great comfort from my "instruments" and encouragement from experts here. All of a sudden it looked better and better. Today we're not just seeing light at the end we're almost through the tunnel. It's a fantastic feeling!! You may recall I had some white swirls or blotches all over the bottom of the pool. Didn't have any of these in the spa. The only difference is the spa was accidentally filled mostly with softened water very low in calcium as soon as I noticed this I removed that hose and continued filling with well water that's very high (300 ppm) so I'm guessing the CSI of the blend was below my target of .5 -1. On the other hand the pool ran quickly up to the high end of my CSI target so I've added acid slowly to get CSI closer to .75 or so. Today around noon we noticed some of the white swirls were reduced a little but still very visible. Brushing doesn't seem to help so we may need to deal with it using an acid wash later but I think it's best to give the plaster its 28 day cure time before we get aggressive with surface treatments. I'm getting more and more pleased with the startup approach that @onBalance, @JoyfulNoise and other experts on here have been recommending for a long time.

While I wait for my paver sub to finish the pavers around the outside edge of the pool area I'm focusing to get the equipment all working in manual then turn on the automation one loop at a time. Only thing I'm missing is the 3" valves for my main pump suction line... naturally special order but will be here tomorrow. I could probably drop down to the more available 2"- 2 1/2" valves instead of the 2 1/2"-3" but I've done a lot to minimize the suction line pressure drop including the 4" PVC run all the way up to the pad. The head loss isn't really that significant between the two different sizes even at 250 gpm. I double-checked with my zip level 70" of elevation lift from the basin low level that's well within the 10' max recommended for the pump but at max operating speed the total loss on the suction side is about 9' of head. Will be interesting to see how hard it is to prime.

Chris
1717587683701.jpeg

The view is getting pretty close to the vision we had for the pool way back when we purchased the lot:
1717587787919.jpeg
 
This morning I'm finding pH still stubbornly high, FC dropped after getting briefly high yesterday. CSI still in range but need to get at least mid range so added 32 16 oz acid first thing. Large circular trowel marks and small patches of white (effervescence looking) still prevalent in the pool. Hoping that I can get closer to .5 and that will help with the plaster streaking. It's kind of hard to capture this with the good mid day sun. This photo was taken with sun still in the east behind the house. Any thoughts on this @onBalance @JoyfulNoise @AQUA~HOLICS or others? Plaster is Florida Stucco Gem - azure color. Below my pool is from the website of the plaster manufacturer. Seems like we have a way to go to match their photos.

FC 1.5
CC 0.5
pH 7.9
CSI .82

Chris

1717590752457.jpeg
1717590964854.png
 

Enjoying this content?

Support TFP with a donation.

Give Support
As I follow from a distance, it's been a great project to watch a knowledgeable OB go through the process. We plan to buy & improve or build, next to water, in the shorter term...though not OB'ing...so a lot of lessons to be learned here.

My note on the plaster is to view it as a mix of art and chemistry. Expect artistic aspects to show while continuing with the known best practices. Sometimes easier said than done.
 
  • Like
Reactions: setsailsoon
Speaking about plumbing:

Man, this pool has an incredible amount of plumbing. And it's routed differently than most pools because I have a completely independent filter pump plus the infinity wall basin and other features. So I need to be close-coupled with the plumber. That was the plan anyway, before he went AWOL without even starting. So I've had to learn all about fittings and there are a lot:
  • spa wall and nozzle's - 10 of these
  • return wall/floor fittings and eyeballs - 7 of these
  • Vacuum connection
  • LED wall fittings 7 including the sun deck bubblers
The bubblers were Hayward and came in a complete package with all the fittings and adapters for each one. They even had a nice temporary plastic "hat" to be used during plaster so no plaster picking from the threads and fittings needed... the rest was all "you figure out what you need, find a place to buy it, then figure out how/when to install it". Nothing super difficult but a LOT of time learning stuff I never wanted to know which is why I was supposed to hire a plumber.

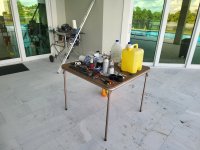
I've done a fair amount of plumbing repairs and remodeling so the piping should be pretty easy... right? Wrong! I guess if I was willing to resort to DWV it might have been easier but that's not the code requirement here even though inspectors overlook it often for pools. Over half the plumbing is 2 1/2" or larger pressure pipe. Try finding that at the big box store. With a little help from experts here I was able to find a commercial irrigation supplier that had the sizes I needed and all the fittings. Horizon has been fantastic to work with. They close at 4:30 and aren't open weekends so no late night runs to get ready for the next morning. And they do accept retail customers. None of the others close do. I way under-estimated how long it would take to get this done myself. Quickly figured out the best way for me is to have a chop saw on a table close by and a sawzall with a new sharp blade went a long way to making this doable. Plus a bullet level, tee square, and tape measure are required. I also found the only way to make things look half decent are to have a complete mock up before gluing with temp supports where needed then mark every fitting both sides. I started at one end gluing and make sure there was a union at the other end. I also found it is way easier to get long runs such as suction pieces done without any tees and check valves plumb and installed then come back and mark the cuts and work back to the union at the pump. Below are a few photos of my work areas and the plumbing so far. Still have a lot of smaller pipe to do but all of the main pump, filter pump, filter, and heater lines have been cut and leak tested except the last piece on the main pump to the heater. Pipe is cut and test fitted but not marked for final glue up. I'm sure a real skilled pool plumber could do this way easier than I did and with many fewer trips to the saws. But for me, I've put in 13,000+ steps every day ever since we started getting ready for plaster.

I thought this post might be helpful.

Chris

1717597829062.jpeg

1717597862563.jpeg

If your over 70 and or your wife is make sure there's a chair nearby

1717597957395.jpeg
 
Last edited:
07 June 2024: High suction lift difficult to prime

The big pump is turning out to be a pain to get primed. We're lifting about 5.5' and the spec is 10' max so that shouldn't be a big issue. I've got 4" pipe to the pump suction where we reduce to 3" straight to the suction flange. I think part of the difficulty is that we've got about 50' of 4" pipe to lift through and the prime cycle isn't long enough to get water up to the check valve. So today I installed a reducing tee on the pump side of the suction check valve with a hose bib installed to prime it with a garden hose so I at least have enough flow to prevent burning up the seal. This should allow me to run several prime cycles in a row. Ran out of daylight today finishing up the piping so I'll try it in the morning. Also removed the covers in the basin drains to be sure the plugs were removed. The were. I figured this might be a little difficult back in the design stage. Any other ideas on this? @duraleigh ,@mas985 in researching this issue I found posts from you. Is the addition of the hose bib valve on pump suction what you were describing as a solution? I'm thinking to just crack a little water in so it can cool the seal while running for a prolonged prime more than a couple minutes. The manual says not to prime for more than 30 minutes. This seems like too long to run it dry to me. I don't think I have any suction leaks since when I run for a couple minutes and then stop I can hear a vacuum break when I remove the suction strainer lid. Weird that I thought the 4" suction line would help with flow could be causing the prime difficulty because it holds more water.

Chris

PS I originally posted this to the wrong thread. Thanks @proavia for alerting me!
 
Last edited:
You need a regular 3” Jandy NeverLube Valve before the pump and one or two 3” Jandy Check Valves after the pump.

Close the valve, remove the pump lid and prime the pump.

Put on the lid, open the valve and start the pump.

Run for about 10 seconds, turn off pump, close valve, remove the pump lid and prime the pump.

Put on the lid, open the valve and start the pump.

Repeat until the pump is primed.
 
You can put a vacuum pump port after the pump and before the check valves to pull the water up into the pump strainer basket.

Use a 1/4" to 3/4" valve after the pump where you can connect a vacuum pump and use the port to prime the pump as needed.

If you need to service the pump, close the valve in front of the pump before opening the pump to keep the water in the suction line.
 
  • Like
Reactions: setsailsoon
You need a regular 3” Jandy NeverLube Valve before the pump and one or two 3” Jandy Check Valves after the pump.

Close the valve, remove the pump lid and prime the pump.

Put on the lid, open the valve and start the pump.

Run for about 10 seconds, turn off pump, close valve, remove the pump lid and prime the pump.

Put on the lid, open the valve and start the pump.

Repeat until the pump is primed.
OK that makes sense. I have one 3" Check valve on the suction right after the elbow comes out of the ground to prevent loss of prime and accidentally siphoning the pool to the basin. Easy to make the changes you are suggesting. I think it's going to take a lot of work to get this primed so extra check valves where possible make a lot of sense.

As always, thanks much for your help!

Chris
 
You can put a vacuum pump port after the pump and before the check valves to pull the water up into the pump strainer basket.

Use a 1/4" to 3/4" valve after the pump where you can connect a vacuum pump and use the port to prime the pump as needed.

If you need to service the pump, close the valve in front of the pump before opening the pump to keep the water in the suction line.
James,

Another great idea, thank you!

Chris
 
A check valve on the suction is ok, but I prefer to avoid anything that adds head loss to the suction.

Also, the water before the pump contains more debris and the check valve is more likely to get clogged with debris and fail.

I would do two 3" Jandy check valves after the pump.

You can open the lid and fill the strainer pot completely, close the lid and turn the pump on.

This lifts the water in the suction pipe about 6" each time.

Once you get it primed the first time, you should be able to keep it primed with the front check valve or the front Jandy regular valve.
 
Last edited:

Enjoying this content?

Support TFP with a donation.

Give Support
Thread Status
Hello , This thread has been inactive for over 60 days. New postings here are unlikely to be seen or responded to by other members. For better visibility, consider Starting A New Thread.