Old D1 rebuild/repair

RDspaguy

In The Industry
Mar 21, 2020
2,050
Cabool, Mo
I got an old Dimension One spa as a flip tub. It was originally installed on unsupported gravel by an above ground pool, and over the next 15-20 years it settled, the gravel sank into the mud created by splashing kids in the pool, and the bottom frame rotted away. That's why I don't recommend gravel.
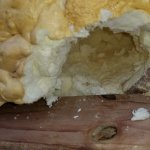
Fortunately for the owner, D1 makes a full-foam spa and the rotted wood did not destroy the spa.
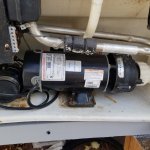
The owner tried a diy frame rebuild but botched it and ended up with an unlevel, partial bottom frame held in place (barely) with spray foam. He then apparently used it for a little while before his controls crapped out and he upgraded to a newer used spa rather than fix his unlevel, ugly old D1. The word is that it does not leak and everything but the board or topside (he's not sure which) is working.
I have my doubts... ;)
20210113_111534.jpg20210113_111537.jpg20210113_111541.jpg20210113_111544.jpg20210113_105921.jpg20210113_105948.jpg20210113_105934.jpg
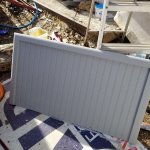
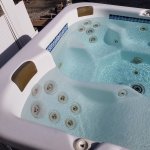
The shell is perfect, which is the main reason I took it, coupled with the fact that I have a box full of new/old D1 parts (unsold items taken off the shelves at a supplier that stopped selling D1 a decade ago). It also has a nearly new cover in perfect condition.
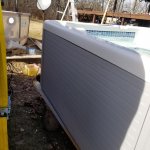
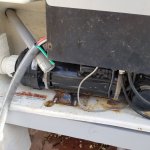
So far I have dug up along the vertical supports to find solid wood to attach to and finished the base. Leveled the base and screwed into the new vertical supports, and added some spray foam to support the new base position.
20210113_115726.jpg20210113_144822.jpg20210113_144829.jpg
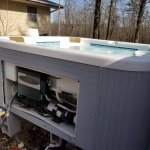
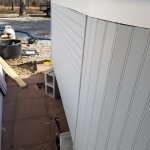
Now I am ready to get some helpers to set this monster down on blocks so I can test the equipment. Once that is going I will fill and run for a week or so to check for leaks (it takes a while to show in a full-foam). Then, if there are no leaks (doubtful), I can re-do the skirting with some beadboard or t1-11. Stain it and seal it, and kick it on down the road.
Best laid plans... :roll:
 
Yeah that was some rotten wood right there! What do you use to dig out the foam?

How will you find the leaks in all of that foam?
Removing foam is easy with a nail bar and my hand. This is soft foam, not like hot springs. You can push your hand in and grab a chunk.
Once on blocks I will wait for it to drip, then track the water up to the leak. This is all open cell foam, and will not channel the water around like hot springs foam does. Much easier to work on. If it had removeable sides I would not necessarily need to block it up, I would use dowel rods to locate the leaks from the side, then stand it up if I need to get at the bottom.
I don't recommend anything but concrete, but if you must use pavers or a plastic spa pad on that gravel you'll probably be fine. Some folks build a wooden grid framework to contain several inches of gravel, which is only as good as the wood used.
Can you help me understand how one would use dowel rods to locate a leak ?
 
Sure. You are inserting them through the foam and leaving them for a minute to absorb the water in the foam and leave a visible wet spot. By noting how far you inserted the dowel, you know how deep in the water is.
Leaks in foam will usually soak the foam below them in a cone. So by tracking with the dowels you can find the level and depth in the foam of the actual leak. At least of the highest actual leak, as leaks below it will be masked by the higher one.
Certain brands will use a closed cell foam, which channels water rather than soaking. These are very difficult to locate leaks in.
 
So, I have had it running and on the back burner due to weather and other projects to do.
In that time pump 1 quit working, and pump 2 was always loud. I am just getting back to it now, and have replaced both rusted out pump motors with used motors I had previously repaired, and put in new shaft seals while it was apart. Getting the wet-ends off of those 25 year old rusted apart motors was fun. If I hadn't been so busy cursing and bleeding I might have thought to take some pics or make video. It would have been an award winner, for sure. I had to completely (and forcefully) dismantle the motors and beat the front plate off of the bearing to access the broken thru-bolts rust welded to the front plate so badly I couldn't pound them out with a hammer. Had to pull two wet end thru-bolt anchors to unscrew them individually and reset them into the wet end. Enough to mess up a perfectly good day, but no hill for a climber. ;)
The carnage:
20210305_125143.jpg
The result, with newer repaired motors installed. Had to scoot the circ pump over as both motors were longer than the originals.
20210305_115747.jpg
I located several small cold leaks (they stop leaking once the spa is warm) and am debating repairs. I am thinking I will not open that can of worms. This type of leak is fairly common on hose clamp fittings in older tubs, as the hose shrinks when cold and swells up when warm. It held water with no drips underneath (it's on blocks so I can see under there) for a month and a half. Drained it to do the pumps and filled it back up to find several drips underneath. All stopped by the time the water reached 70*. If they were easy to reach I would take care of it, but they are all on the heat/circulation system and air injector barbs (those being the only use of clear hose and clamps in this spa) and very difficult (and risky) to get to.
Now I have to finish trimming out the new framework for skirting and get the beadboard installed and painted. Going with gray to match the new cover I have for it. Was going to use a natural finish beadboard and stain but the natural beadboard at my HD was uneven depth on the bead, nearly non-existent about a third of the way up, and beat to heck on one end like the forklift driver was playing bumper-cars with the whole pallet. At $28 a sheet, no thanks. Had to get the primed white beadboard instead, so paint it is.
I'll keep you posted as I continue...
 
so busy cursing and bleeding
So THAT is what I heard down here LOL man that looks like it was NOT fun!!! Bet there were bits and pieces as well as tools flying through the air!

several small cold leaks (they stop leaking once the spa is warm)
So if you leave those alone where does the water go? It it such a small amount it will not be noticed or drain the spa over time?

Do most people keep their spa at a set temp 24/7 and push it up when they want to use it?
 
The water only leaks out while the water is cold from fill. My well water here comes out about 54*. The minimum temp setting is 80*, and the leaks have stopped before then. The water that does leak out is unnoticeable in water level, though it does get some foam wet, which is not ideal, but not the end of the world. I would worry more if it were soaking any of the wood framing, but it is not. The main issue seems to be the heat return in the spa footwell wall. This would require the removal of a suction fitting and related pvc to reach, and removing the suction is very risky.
These shells start out as a flat sheet of uniform thickness. This is heated and vacuum formed (sucked down) into a mold. This stretches the material as it goes, causing the footwell to be significantly thinner than other areas. There is no fiberglass or bonding layer. I have seen this type of shell tear, not crack but tear, on more than one occasion. I even had a job where a stiletto heel pierced the bottom. ;) So I would risk massive damage to the spa shell by trying to remove the suction to access the drip that loses maybe 3 gallons at a fill. Given the price I can expect to get for this tub and everything I have already put into it, I won't risk it. I will let the prospective buyers know of the issue, just as I inform them of any repairs it has had, and they can decide for themselves if it's worth it or not. At $3k, I expect it to go fast.
20210306_183421.jpg20210306_183335.jpg20210306_183320.jpg20210306_183309.jpg
I got most of the skirting on today. Still need to finish the access panel, then fill the staple marks and paint.
 
  • Like
Reactions: CuckooChris

Enjoying this content?

Support TFP with a donation.

Give Support
Good to know about the leaks RD, I have the same issue with mine. When I first filled it I noticed two small leaks on my concrete that went away after a day when it was heated. I almost tore into it to find them, but since they stopped I didn't worry about it.
 
That looks awesome!!!
Thanks. I'm not sure I would say "awesome", but it will look good when I am done.

will you fill the staple holes with? What kind of paint and what color?
Wood putty to fill. Exterior house paint, I think the shade was "flagstone", which is a light gray. I have a nearly new cover for it in gray and wanted it to match. Well, not match exactly, but look good together. I am a little upset that the natural wood finish beadboard at HD was so messed up, I was going to use a gray stain, but had to buy the primered stuff instead.
Good to know about the leaks RD, I have the same issue with mine. When I first filled it I noticed two small leaks on my concrete that went away after a day when it was heated. I almost tore into it to find them, but since they stopped I didn't worry about it.
Yeah, it's very common in older tubs, and I have even seen cold leaks on new spas several times.
And the simple fix, if you can get to it, is to heat the hose up with a heat gun (careful, don't scorch it) and reposition the clamp to a new spot on the hose.
I have seen heater gaskets do the same, and also jet gaskets once the caulk has deteriorated.
The reverse is also a concern. I have seen heater unions and jets, overtightened in cold weather, get cracked from the gasket expanding once the spa is hot.
Ahhhhhh, the joys of spa repair...
 
  • Like
Reactions: CuckooChris
Finished and painted. All the scuffs and accumulated crud magic-erasered gleaming white like new. Ready to go.
 

Attachments

  • 20210308_145510.jpg
    20210308_145510.jpg
    533.3 KB · Views: 27
  • 20210308_145517.jpg
    20210308_145517.jpg
    536 KB · Views: 26
  • 20210308_145526.jpg
    20210308_145526.jpg
    518.9 KB · Views: 28
  • 20210308_145539.jpg
    20210308_145539.jpg
    506.1 KB · Views: 28
  • 20210308_145542.jpg
    20210308_145542.jpg
    489.6 KB · Views: 28
  • 20210308_145555.jpg
    20210308_145555.jpg
    481 KB · Views: 24
  • 20210308_145616.jpg
    20210308_145616.jpg
    419.1 KB · Views: 23
  • 20210308_145626.jpg
    20210308_145626.jpg
    518.9 KB · Views: 23
  • 20210308_145638.jpg
    20210308_145638.jpg
    611.4 KB · Views: 24
  • 20210308_145701.jpg
    20210308_145701.jpg
    453.4 KB · Views: 27
  • Like
Reactions: jseyfert3
Looks awesome! LOL on the head of the testing department! Don't you have one of your own already?
I sold mine a while back to pay off the midwife. I have had 4 flip tubs come thru since then, so we usually have one, but it's not always useable. He just really likes the volcano jet in this one. Once I get my bbq trailer going now that things are starting back up again I plan to continue my retirement from the spa repair business and put another one there for keeps. I only have the electric to run one spa at a time.
Nice testing department!

Don't you bolt those pumps down?
No. In fact, if you read the stickers by the pumps you will see instructions to remove the "shipping bolts" prior to use. The solid connection will transfer pump vibration to the frame and turn your side panels into speakers blasting out pump noise for all the neighborhood to complain about. If I were transporting it on it's side (as they are shipped) I would bolt them down, but I will be hauling it flat.
 
I sold mine a while back to pay off the midwife. I have had 4 flip tubs come thru since then, so we usually have one, but it's not always useable. He just really likes the volcano jet in this one. Once I get my bbq trailer going now that things are starting back up again I plan to continue my retirement from the spa repair business and put another one there for keeps. I only have the electric to run one spa at a time.

No. In fact, if you read the stickers by the pumps you will see instructions to remove the "shipping bolts" prior to use. The solid connection will transfer pump vibration to the frame and turn your side panels into speakers blasting out pump noise for all the neighborhood to complain about. If I were transporting it on it's side (as they are shipped) I would bolt them down, but I will be hauling it flat.
I will now have to go look and see about those stickers...

EDIT TO ADD : Just went and looked at the manual it said nothing about it, But I will pull my panel later and have a look.
 
Last edited:

Enjoying this content?

Support TFP with a donation.

Give Support
Thread Status
Hello , This thread has been inactive for over 60 days. New postings here are unlikely to be seen or responded to by other members. For better visibility, consider Starting A New Thread.