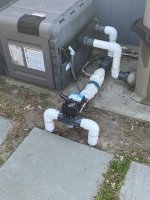
Leak Repair

pb4uswim

Well-known member
Jul 23, 2020
575
Michigan
I asked about this before, but I was focused on a temporary fix. Now I'm working on a permanent fix to be done after I close the pool (or before I open it in the spring) while the pipes are empty of water. The leak is at one of the elbows coming off of the actuator (the right one in the picture). When a pool guy came out a couple years ago and just glued it, he said if it leaks again, it would be necessary to raise that pipe up. I guess that's because you're not supposed to bury and connectors. I'm looking for suggestions from this group on how to route this to repair it. I have a plumber, not a pool plumber, that will do the work but I'd like to make sure I'm routing it, fixing it, the best, most appropriate way. I'll need to get the parts on site so having a good idea of how this needs to look will help me get the proper parts. For example, I'm pretty sure I'm going to have to get a new connector plate for under the actuator. I can certainly add pictures if there's something in particular you need to see. Thank you.

IMG_3736.jpegIMG_3739.jpeg
 
Let's see what @1poolman1 @Lake Placid @wireform suggests.

I think you need to dig down a bit and expose more of the pipe, then cut the pipe and remove the elbow, put a coupler on the pipe stub in the ground, and connect a new elbow. A new elbow can be slipped over the diverter pipe.
 
  • Like
Reactions: pb4uswim
Let's see what @1poolman1 @Lake Placid @wireform suggests.

I think you need to dig down a bit and expose more of the pipe, then cut the pipe and remove the elbow, put a coupler on the pipe stub in the ground, and connect a new elbow. A new elbow can be slipped over the diverter pipe.
If it were mine, or I was doing the repair, I would raise the plumbing over the heater inlet. That would make servicing the SWG cell, Jandy valve, and check valve if needed, easier. It looks to be an easy repair.
With the leaking area cut off flush and a 2.5" coupler properly glued over what appears to be the leaking area at the Jandy valve, a 2.5" - 2" reducer bushing, a little "creative" plumbing with a couple of 45s, a 2" coupler, and a little 2" pipe would save the valve and solve the issue. All the expensive parts should be able to be saved. Some pipe extenders, 90s, couplers, etc. may be needed at the check valve, can't tell from the picture.
By raising the plumbing there is more than enough "play" in the pipes to make lining things up fairly easy. Then I would paint it all flat black to make it look "pretty."
Yes, 2.5" fittings are a bit expensive about $10.00 for the two parts, but a lot less than a new valve.
 
  • Like
Reactions: pb4uswim
I’m thinking of just replacing the diverter and basically rebuild from the SWG back. In the picture, I’ve circled, in red, the section I will take out. I have two blue question marks. First, what is the piece where a wire/sensor is going to. Second, what do I need to do to replace the connection up to the SWG? I think I can rebuild that section for not too much money and keep the plumbing in the same space.

IMG_3739.jpeg
 
My neighbor, a jack of all trades, helped me glue up the new piping last fall. We followed the same path and I did turn over the SWG as was mentioned by someone here. Just opened today but it looks leak free.

IMG_3987.jpeg
 

Enjoying this content?

Support TFP with a donation.

Give Support