Cleaning and repairing a concrete balance tank

Hulaomr

Well-known member
Nov 14, 2021
116
Panama
Pool Size
15300
Surface
Plaster
Chlorine
Salt Water Generator
SWG Type
Pentair Intellichlor IC-40
Hello,

Recently, I decided to take a look inside the balance tank to clean it and inspect the auto valve and everything else. I performed the following activities:
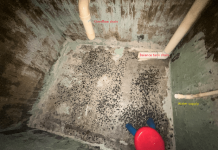
  1. Remove all water inside (using pool pump and later using a wet vacuum)
  2. Apply pressure water (with a pressure jet) to all walls, floor and roof
  3. Get all debris and water with a wet vacuum
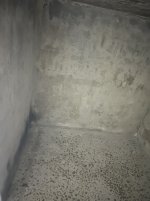
After doing this, below the results.

1709569655623.png

1709569223549.png

Below my findings:

  • All the debris was removed (wet vacuum after various iterations)
1709570383526.png
  • The wall paint (waterproofing coating) is almost disappear (if any). NOTE: the pressure water didn't remove it.
1709569964584.png
1709569991633.png
  • The floor is very damaged
1709570063789.png
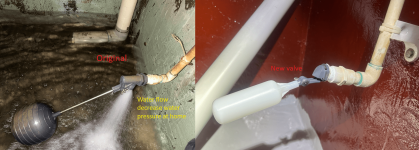
  • The water supply pipe (PVC 1/2in) is not attached to the wall, and it bend when the water supply rise too much. It seems there was an anchor which got rusted. NOTE: I removed the floating valve during cleaning.
1709570133779.png

The balance tank seems much better than before, however it seems obvious it will deteriorate more if I don't do something, and I think now is a good opportunity (its already empty and is still summer by here).

Below some proposals:
  1. Replace the floating valve with a Kerick Valve MA052 which, has a small floating device which could cause less bending to the pipe when the water rise, and it seems good according with the reviews.
  2. I remove water from the pool to avoid water inside the overflow channels
  3. Closed (with PVC glue and end cap) the overflow drain to avoid further water coming inside.
  4. Add a new ancle to attached the water supply pipe to the wall and avoid bending. Perhaps inox or galvanize and cover later with coating.
  5. Repair the concrete (walls and floor):
    1. Apply an acrylic concentrate primer sealer (Lanco® Acry-Seal)
    2. Fill the surface: (options)
      1. Add filler OVERCOAT Z-GRIP (this one, I could buy locally) as they did previously.
      2. Prepare a mix of cement (not quite sure about this yet) and level the surface to have a slope to the tank drain (which goes to the pump) in order to improve debris accumulation
    3. Apply waterproofing coating Polyurethane Based (KB-Pur 214 - KÖSTER)
  6. Remove the cap from the overflow drain
I must wait a while for the concrete to dry in order to perform any activity.

I appreciated any feedback, regarding these proposals and if make any sense. I don't have any experience repairing tanks, but I already use these products in others environments.

Thanks
 
Just an update on the repair proposal.
  • I closed the two pipes (3") with an thread cap
    • Overflow drain
    • Tank drain (goes to a valve and filter pump)
1709585596784.png1709585586139.png

Once these two water leaking sources were sealed, I pass the vacuum again and start removing some filler that was easy to fall. At the end, I removed most of the filler from the floor.

1709585645014.png

I will check again later in order to inspect the humidity on the floor, expecting there is none due other leaking.

Once it's more dry, I will pass a metal brush in order to clean the floor and corner.

I think, I will also remove the tank drain (from the vertical pipe) in order to get access to the corner.

1709585919019.png

Keep you updated. Any advice is appreciated.
 
  • Like
Reactions: Newdude
An update on the repair.

I decided to apply diamond grinder to the concrete in order to remove everything. This task was time consuming and with a lot of dust. This will warranty a good adhesion of any coating.

With this method, I don't need to fill the surface because the grinder could leveling the floor. So, much better.

The drain pipe was removed in order to work in such important area, the corner (wall, floor).

IMG_5901.HEIC_compressed.JPEG

Below some pictures the next day, after it dried.

IMG_5932.HEIC_compressed.JPEGIMG_5933.HEIC_compressed.JPEG

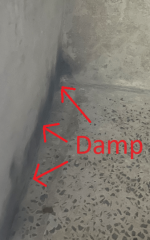
Tomorrow, I expect to applying an Epoxy Coating which be installed over damp concrete. This last feature is very important because there are humid spots on the walls.

1710198898646.png

I keep you posted.
 
An update on the repair.

I decided to apply diamond grinder to the concrete in order to remove everything. This task was time consuming and with a lot of dust. This will warranty a good adhesion of any coating.

With this method, I don't need to fill the surface because the grinder could leveling the floor. So, much better.

The drain pipe was removed in order to work in such important area, the corner (wall, floor).

View attachment 557708

Below some pictures the next day, after it dried.

View attachment 557709View attachment 557710

Tomorrow, I expect to applying an Epoxy Coating which be installed over damp concrete. This last feature is very important because there are humid spots on the walls.

View attachment 557711

I keep you posted.
Try and get an air blower on the damp part to dry it out before applying epoxy.
 
  • Like
Reactions: Hulaomr
Try and get an air blower on the damp part to dry it out before applying epoxy.
Thanks for the suggestion. I used a home fan instead (didn't have a blower in hand) and it get better, at least from the tank door, because the fan is bigger than the door and cannot go inside.

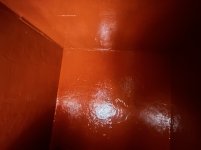
As update, I applied two (2) coats of epoxy already to the walls and ceiling. Below some pictures.

IMG_6015.HEIC_compressed.JPEG

IMG_6016.HEIC_compressed.JPEG

IMG_6017.HEIC_compressed.JPEG
As show the picture below, I worked the room service as well.

IMG_5999.HEIC_compressed.JPEG

I will be applying the finish coat tomorrow (clear urethane) to reduce staining, increase abrasion resistance, brighten and lower maintenance.
 
Following the repairing of the balance tank, some updates below.
  • Applied the finish coat (clear urethane) to the ceiling and walls
  • Applied a single thick coat of epoxy lining to the floor. The layer is around 3mm and I expect it will last many years. As the previous material, the epoxy is used on industrial application (i.e. crude/chemicals storage tanks). I got a sample from the distributor
1710535785744.png

  • Additionally, a custom pipe holder was designed and build (ABS 3D printed) to keep the water supply from moving once the valve close or open. It is attached to the wall by an anchor installed in the previous steps and a inox screw.
1710536231633.png
1710536251907.png 1710536265583.png

I will wait a few days to curing the epoxy and re-make the piping (drain and return). Keep you posted.
 
  • Like
Reactions: Newdude and Bperry
Today, I went to the tank to inspect the epoxy flooring and it was very hard already. According with specs, it could support light load on 18 hours. So, I decided to continue with the piping.
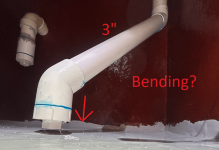
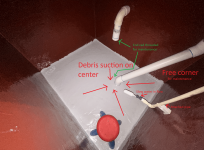
  • I installed the balance tank drain in a different way
    • In order to facilitate the suction of debris
      • The pipe end was placed on the middle of the tank
      • The orientation of end pipe is perpendicular to the floor. Originally, the pipe end was was aligned with the floor on the corner
      • My concern on the new design, will be that the pipe bend and it will touch the floor decreasing the flow and causing problems. Something to monitor... Any suggestion/approach?
    • The wall and corner has space for future maintenance without removing the pipe
    • I keep the pipe end cap threaded in case it need to close the pipe during maintenance (water coming from the valve near the pump)
    • The water supply pipe was fixed with a tie wrap to the custom holder
    • According with the reviews of the automatic valve, it could fill the tank slowly, which it will be great because the previous valve decrease a lot the pressure of water at home once is open. This also damaged the floor more on that part.
1710602604562.png

1710603510760.png

1710602882567.png

1710603212362.png

1710603739984.png

At this stage, I will wait (patiently!) a couple of days to let the coating cure and open the pipes to fill and test the tank!
 

Attachments

  • 1710602651314.png
    1710602651314.png
    387.8 KB · Views: 3
  • 1710602755195.jpeg
    1710602755195.jpeg
    415.2 KB · Views: 3
  • Like
Reactions: Newdude and Bperry
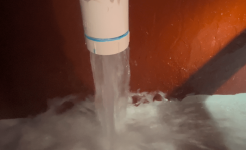
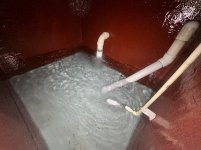
Today, the pipes of the balance tank were open!
  • The automatic supply water valve work as expected.
    • The water flow is small and seems ok.
    • The pipe is fixed and don't move at all.
  • The tank drain pipe seems very strong and without bending with different flow values (RPM on the filter pump).
  • The tank drain seems to be absorbing debris from all directions.
  • The color of the floor (grey) is great to know when the tank need to be clean.
I will monitoring the water supply flow, but this will be another subject.

Thanks all!!

1710805119871.png

1710805150241.png

1710805240653.png

IMG_6126.HEIC_compressed.JPEG
 

Enjoying this content?

Support TFP with a donation.

Give Support
A little update regarding the suction of the debris. It just seem is doing fine, getting debris from all directions. (y)

About the coating, lets wait for longer period. Today, is just look same.

1711561906644.png
 
Thread Status
Hello , This thread has been inactive for over 60 days. New postings here are unlikely to be seen or responded to by other members. For better visibility, consider Starting A New Thread.