bperry’s pool renovation

1692839598354.png

full


1692840108648.png

@JamesW - Looks like you found the same one, but it sure looks like his text is all worn off. Can see the text at the edge but not in the center.

Why they put it on the top side, only they know. Should have put it on the bottom where it wouldn't have worn off.

--Jeff
 
  • Like
Reactions: Bperry and JamesW
View attachment 524682

@JamesW - Looks like you found the same one, but it sure looks like his text is all worn off. Can see the text at the edge but not in the center.

Why they put it on the top side, only they know. Should have put it on the bottom where it wouldn't have worn off.

--Jeff
It does look just like that one but I don’t see any numbers in the center, or evidence there was any. I suppose it’s super smoothed over.
 
Someone showed up this morning to start working. Looks like he’s got bondkote and is grinding out the skimmers so I assume theyre doing that before resurfacing the decking.

Also contacted the contractor and he said a new drain cover is included in the job so I’m not gonna sweat finding a new cover. My pool light bulb also burned out shortly after replacing it last year. When I took it out of the fixture, I can hear the bulb is broken inside and looks like water got inside the fixture. So I assume it’s leaking water through the big seal or where the cable comes in. I replaced the big seal last year so I’m assuming the cable grommet is too old and leaking as there was just a tiny bit of water inside. The guy says they can replace it for me for the cost of the bulb or whatever is bad.
 
Not terribly exciting pictures from yesterday. It’s blazing hot today so I don’t expect anyone to be here.

Looks like he ground and chipped everything that needed it. Ground out expansion joints and cracks in the deck, and then smoothed out the tile line and applied some kind of coating over it, very thin. And chipped around all the fixtures. A couple of them with some exposed rebar, which I now realize may be why my returns barely stuck out of the finished plaster originally. The original installers must have cut the pipes too short, or the gunite shot thin in those areas.

A8A8AA0F-D8E3-4BCA-B868-CC61C2C9F037.jpeg2BA1DFC0-4B51-43B7-BC4D-882634CA3346.jpeg71D1537B-2410-474E-83F4-5D57D6E3FD2E.jpeg9FE33442-DF00-49FA-9BCF-D7B84F6D497E.jpeg
 

Attachments

  • 3B4D2FA8-CE1F-4B1D-BA27-453A135816EE.jpeg
    3B4D2FA8-CE1F-4B1D-BA27-453A135816EE.jpeg
    107.7 KB · Views: 4
  • Like
Reactions: Newdude
Any work done is good word done! Going to be interesting to see how they fix the rebar return. I am getting he will do a fine job of it!
He told me beforehand that they chip around all the fixtures and repack them with hydraulic cement before plastering. I’m assuming that’s what will happen and will be watching for it.

I did just find one goof. The rope holder looks like it got hit with a chipper. Are these things easy to replace? I’d almost rather not have them as it looks like just another leak point.
0B95FE11-C4E5-48D5-9910-DE205B51FF5B.jpeg6776CE13-DD0D-4E07-B7A5-BDC626F06F88.jpeg
 

Enjoying this content?

Support TFP with a donation.

Give Support
The owner was out yesterday working on the tile line, and to drop off the tile. I asked him about the rope anchors and he said he was ok to either replace the damaged one or remove both of them. I opted to remove them both.

He spent a good amount of time patching up the skimmers and flattening out the tile line which he said was important for this style of tile. Looks like he got about halfway done.
IMG_3718.jpeg

And he switched the order of events a little bit. Tile will be going down first which allows them to patch up the coping near the tile joint when they refinish the deck. Once that’s done, they’ll cut an expansion joint above the tile and caulk the joint, then plaster.

I also setup a timelapse camera to see if I can make a video of the whole process. It might be difficult to catch everything since I have to turn it on beforehand when work is being done.
GPTempDownload.jpeg
 
Got some tile down today and then it started raining so they packed up and left. It was 5 o'clock anyway.

They used the hard foam insulation as a tile support nailed to the shell. I was impressed with that idea as I was going to use the more rigid PCV edging for that back when I was going to DIY that part. I’m also impressed they are using a notched trowel and not just dabbing the back of the tile with thinset and pressing it in place. I guess that’d be hard to do with the smaller tile anyway, but still nice to see good workmanship without thinset squeezing out of all the joints.
IMG_3764.jpeg

And they only have a few more to go. Hopefully tomorrow they’ll finish up with the tile. There was a part in my timelapse video where they made a phone call after using the laser level to mark the height for the foam board. I’m wondering if that’s when they noticed the pool is slightly out of level and called the boss to figure out what to do. 🤣
IMG_3765.jpeg
 
Got some tile down today and then it started raining so they packed up and left. It was 5 o'clock anyway.

They used the hard foam insulation as a tile support nailed to the shell. I was impressed with that idea as I was going to use the more rigid PCV edging for that back when I was going to DIY that part. I’m also impressed they are using a notched trowel and not just dabbing the back of the tile with thinset and pressing it in place. I guess that’d be hard to do with the smaller tile anyway, but still nice to see good workmanship without thinset squeezing out of all the joints.
View attachment 527606

And they only have a few more to go. Hopefully tomorrow they’ll finish up with the tile. There was a part in my timelapse video where they made a phone call after using the laser level to mark the height for the foam board. I’m wondering if that’s when they noticed the pool is slightly out of level and called the boss to figure out what to do. 🤣
View attachment 527607
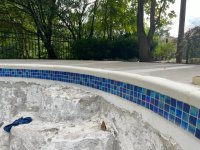
This tile looks killer!!!

--Jeff
 
  • Like
Reactions: borjis and Bperry
They guys were here today prepping for the deck resurfacing. I’m not sure exactly what this stuff they put on the coping is maybe some kind of bond coat? I discovered the contract says “cool deck” not “Kool deck” and so I’ve confirmed it’s not the Mortex product. It’s called “ICT Texture Krete 2000” and is a decorative concrete overlay product thats trowels or sprayed on and then stained and sealed. They pressure washed yesterday and got joints taped and this coping work done. There’s still some missing chunks near the tile line so we’ll see how it turns out tomorrow I suppose.
IMG_3803.jpeg

And the water from recent rain is gross. So hard not to toss some chlorine in there.
IMG_3801.jpeg
 
One final teaser picture before the finale. Renovation is scheduled to be finished by end of the week. I guess that means I have to finish fixing the broken filter tube tonight.

Coping is refinished and they are texturing the rest of the deck today.

IMG_3814.jpegIMG_3810.jpeg
 

Enjoying this content?

Support TFP with a donation.

Give Support
Thread Status
Hello , This thread has been inactive for over 60 days. New postings here are unlikely to be seen or responded to by other members. For better visibility, consider Starting A New Thread.