bperry’s pool renovation

Bperry

Gold Supporter
TFP Guide
Aug 20, 2020
5,912
Knoxville, TN
Pool Size
27000
Surface
Plaster
Chlorine
Salt Water Generator
SWG Type
CircuPool RJ-60
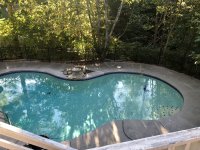
I started a new project trying to level out the existing deck around our pool rather than trying to find a contractor to replace it. I guess all the concrete guys are rolling in cash right now cause they won’t call back.

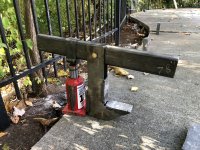
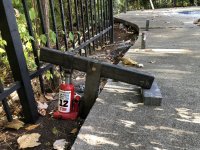
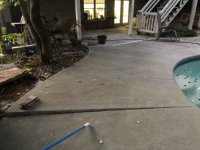
Here’s the first one that I was able to raise up level with a hydraulic jack along with a tool I built to avoid digging out under the slabs. You can see the slab I raised is now a couple inches higher than the adjacent one at the back edge.
5D487263-59A7-4096-AA3B-6BB910D20144.jpeg

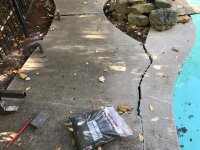
It gets worse as it goes towards the back of the pool which looks like it was built on fill dirt.

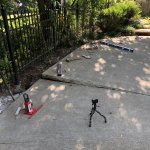
Here’s where I’m at now after raising 8 sections. There’s about a 6 inch drop at the back of the slabs in the worst area.
C8030A5B-E58A-4E70-8705-383919D0A050.jpeg

Plan is to get them all close to level, then a few of them need to be shifted back toward the edge of the pool since they’ve slid back a few inches. Once they’re in place where I want, I need to decide if I want to just try and backfill under them with gravel or try and fill the voids with non-shrink cement grout. Any advice on that front is welcomed.
 
Last edited:
  • Like
Reactions: Brian Malone
I did have a mud jacker come out last year. Is a decent option except for he wouldn’t guarantee the slabs could be moved back into place over the bond beam. (They’ve slid downhill 3-4” as well as sinking) He said sometimes they can lever them over a little but not usually very successful. So I didn’t want to spend $5k just leveling 20 year old concrete if it wasn’t going to fix that part as well. I had a similar place come out for a quote on spray foam underneath to lift it the same way.

I figured this way was almost free to try out and so far it’s working well. I just had to cut the slabs down into smaller chunks. Doesn’t appear any rebar or mesh was used in the deck which is somewhat fortunate.
 
  • Like
Reactions: JamesW
Got all of the sections close to level with my homemade lifting tool. Cost me less than $100 to build.
5C914B23-89B1-45FB-9843-D71D6BCB26F3.jpeg
A105C0DE-1413-4874-A1EB-CE65BBC00A5B.jpeg

This lets me drive the hook under the slab (sledge hammer) without having to first excavate under the slab and then I can just lift it up with the jack on the ground next to it.

Only issue is one slab had broken rather than just sinking at the back side. So the plan is to remove the section over the bond beam and drill the mating faces for rebar pins and epoxy to join it back together.
image.jpg

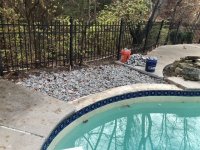
Super happy with how it’s turning out so far. Just had a load of crushed stone delivered to pack the space under the slabs full again to support their new level. Decided to try the stone rather than grout.
44D82695-2994-48CB-8412-EFBAADED067A.jpeg
 
That is some serious DIY work!

Have you considered pouring a footer around the backside of the deck where it had settled so much? Or some kind of supporting piers? Seems like shoving gravel under the slabs won't allow for much compaction, and thus more settling down the road.
 
  • Like
Reactions: Brian Malone
That is some serious DIY work!

Have you considered pouring a footer around the backside of the deck where it had settled so much? Or some kind of supporting piers? Seems like shoving gravel under the slabs won't allow for much compaction, and thus more settling down the road.
Yea, I may pour a small footer at the back side to make sure the joints don’t get misaligned easily. There does seem plenty of space to pour stone back there and jam it in with a 2x4. There’s quite a bit of missing dirt underneath so I have a feeling water may have been leaking from the skimmer at some point and cause some of the supporting soil to wash away. I can easily press a 2x4 all the way under and contact the back of the bond beam.
 
  • Wow
Reactions: Brian Malone
Super long shot, but does anyone know where I can buy single pieces of the styrofoam cantilever coping forms from Stegmeier? They come in boxes of 14 but I only need one. I decided to break up the two sections that had fractured and pour them myself. Backup plan if I can’t find the forms at reasonable cost is to try and create a form myself.
 
  • Like
Reactions: Brian Malone


Enjoying this content?

Support TFP with a donation.

Give Support
Maybe a distributor.

SCP Distributors, LLC.

550 Ambrose St. Knoxville, TN 37921

Phone: (865) 673-6171
____________________________________________
Superior Pool Products

2815 Texas Avenue. Suite 118 Knoxville, TN 37921

Phone: (865) 540-8210
____________________________________________
Swim Distributors of Knoxville

4420 Middlebrook Pike. Knoxville, TN 37921

Phone: (865) 396-9342
____________________________________________
Southern Rebar

4615 Coster Road. Knoxville, TN 37912

Phone: (865) 687-7220
____________________________________________
Ferguson Enterprises Inc.

6422 Deane Hill Drive. Knoxville, TN 37919

Phone: (865) 531-8550

1667226025563.png
 
Many thanks to @Kidswimin who sent me some leftover forms which look like they will work for my small spot to repair. I’ll get some pictures of that when we’re formed up and ready to pour.

Here’s what I’m looking at. My son and I had a “sledgehammer contest” to break up up the old slabs into smaller chucks.

632DCDDB-A850-4042-B099-879C9ACF050C.jpeg

And we piled up the debris to create a mountain bike jump for my son (and I) to practice on after we add some dirt.
60E83CDC-30F5-47C2-8F32-4749D5D2D77C.jpeg

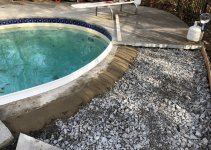
I did end up using 1600lbs of concrete to backfill under the decking after packing as much rock under it as possible. I left a small lip that will get buried with dirt and rock once we’re done landscaping. I am also able to pour grout into the joints and fill any voids under the deck that weren’t reached by the rock or concrete.
6E78737C-205A-417E-A7BC-A1523562D1BE.jpeg

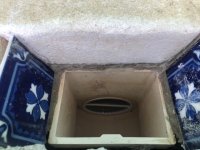
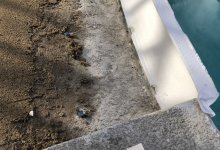
And I also discovered both skimmers had epoxy patches that had failed and were leaking. So I went and cut out the plaster and filled the voids around the skimmer opening with hydraulic cement and then replastered those. (Pics taken upside down cause I’m not getting in the water right now)

3D90CB39-1C2C-49AC-B405-9CE39582929F.jpeg
001FE818-41A3-4016-ABDE-E9E67643BD62.jpeg

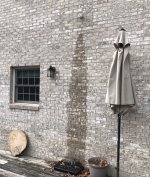
And my son noticed that the water heater overflow drain had some water leaking out onto the deck and wanted to know if that was normal. 🤣and so now my pool replaster fund has a 4 digit hole in it. Can’t complain too much because the water heater has a serial number from either 1997 or 2017. I’m hoping it’s the older one.
EAA11B4F-F716-4061-A934-CBD344878F65.jpeg
 
Last edited:
  • Like
Reactions: Brian Malone
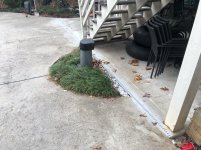
And with the decking leveled out, I managed to install a new deck drain which has a removable lid to clean it out if it gets clogged. The original installer just has an 18” length of drain on the bottom right side area of this picture that just dead ended into the dirt. 😒 The rain gutters on the roof had the same genius installer so you can guess how that worked out. This new drain goes to open air at the back of the property.
B1B57ECC-ECC3-42A6-8D1D-558C2A5AA726.jpeg
 
  • Like
Reactions: Brian Malone
Temperature window for pouring concrete looked miserable for the rest of the next two months except for yesterday with a high of 52F.

753EF258-52A5-4308-8EE1-B38CAE7D7D2E.jpeg
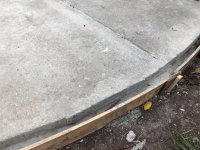
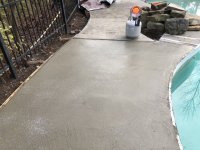
Just over 3klbs mixed on the driveway and then wheelbarrowed around back to the pool. I’m not as young as I used to be so I’m grateful for my son helping out. Since these forms were for a liner track, I remove the clips and they bonded to the tile pretty well, then I added a few screws to the bond beam and used wire poking through the form with a small nail on the end to add some extra insurance that the form wouldn’t move.
5BD2DEA0-F087-4301-BE0C-E56D6826ECD3.jpeg

It was a little tough to bull float because the start was stiffening up faster than the end so I went straight to troweling and finishing the joint even though one end was still a little wet. Spread a little kosher salt over the top to give it a little texture to wash away and hopefully match the rest of the worn 20 year old deck. I think just using sand might have been easier/better.
294C70B1-0CA7-44C2-899F-14A9FCD741A9.jpeg

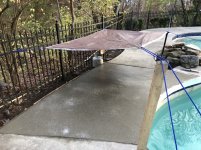
And then the tricky part, the previous evening was down to 29F and the weatherman said it was only going to be 36 this evening and I wanted to make sure this setup enough before it for that cold so hung a tarp over the wettest portion and found a propane heater to keep some of the cold off of it until it could dry enough. I did a check at midnight and it was plenty dry and hard that I shut it off.

BF1A5432-20C8-40DA-BB26-8D4A4DA5B1F6.jpeg

If it’ll stop raining I can go outside and see how it look and walk on it.
 
Last edited:
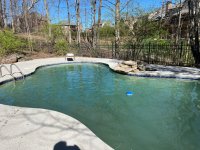
Got the decking pressure washed yesterday, which happened to be after a giant storm rolled through which dumped some junk in the pool. Then the pressure wash crew blew some more junk in. The deck looks much better and the plan is to apply a resurfacing product to it in the next couple months.

The water has never looked this bad before. FC is 6.5ppm and CC=0. The pool is still closed so I may just open it up and get the filter going. 05A481B0-FBD4-440E-A1D6-132C2C3E1FD1.jpeg
 
  • Like
Reactions: Brian Malone
I just found this thread and what a JEWEL of DIY work it is! Well done! You know how to clear that pool right up so not worries there. Just keep the filter running 24/7 so it can do it's job! Make sure to back wash often to help clean the glass media in the filter. You might even have to do a deep clean in the end.
 
  • Like
Reactions: Brian Malone

Enjoying this content?

Support TFP with a donation.

Give Support
Thread Status
Hello , This thread has been inactive for over 60 days. New postings here are unlikely to be seen or responded to by other members. For better visibility, consider Starting A New Thread.