No the only time those have been disconnected was yesterday while pulling the burner tray out. They’re back in the right spot, but the problem has been there before and after the burner came out.

Raypak 156A Explosions upon lighting
- Thread starter Rack55
- Start date
You are using an out of date browser. It may not display this or other websites correctly.
You should upgrade or use an alternative browser.
You should upgrade or use an alternative browser.
- May 23, 2015
- 24,649
- Pool Size
- 16000
- Surface
- Plaster
- Chlorine
- Salt Water Generator
- SWG Type
- Pentair Intellichlor IC-60
I don’t have that capabilityCan you confirm your static and dynamic gas pressures?
- Jul 21, 2013
- 54,775
- Pool Size
- 35000
- Surface
- Plaster
- Chlorine
- Salt Water Generator
- SWG Type
- Pentair Intellichlor IC-60
Then get that capability or hire someone who does.I don’t have that capability
- May 23, 2015
- 24,649
- Pool Size
- 16000
- Surface
- Plaster
- Chlorine
- Salt Water Generator
- SWG Type
- Pentair Intellichlor IC-60
Well, I think all that can be said is that there is a buildup of gas in the firebox and it is not igniting right away. This is causing the explosive startup. It’s either fouled up burners, a bad pilot/igniter, and/or too much gas pressure. Gas equipment is definitely not something you should fool around with on your own if you don’t have the skills or tools to deal with it. Propane is especially more dangerous because it operates at higher delivery pressures and there is a large reservoir of it sitting in a tank on your property (unlike utility gas which is much lower pressure).
At this point, you may need to call in a pro to make sure your gas equipment up to and including the heater’s gas valve is all working within spec.
At this point, you may need to call in a pro to make sure your gas equipment up to and including the heater’s gas valve is all working within spec.

- Jul 21, 2013
- 54,775
- Pool Size
- 35000
- Surface
- Plaster
- Chlorine
- Salt Water Generator
- SWG Type
- Pentair Intellichlor IC-60
Propane is heavier than air and will pool at the bottom of the heater if not ignited properly. That pooling of propane is likely causing the explosion.
Propane heaters are supposed to try igniting only one time before shutting down. Gas heaters will retry igniting three times before shutting down.
Was your heater converted from NG to propane?
What is the full model number of your heater printed on a sticker likely on the inside of a panel?
Propane heaters are supposed to try igniting only one time before shutting down. Gas heaters will retry igniting three times before shutting down.
Was your heater converted from NG to propane?
What is the full model number of your heater printed on a sticker likely on the inside of a panel?
It has been in LPG mode since I bought it new and had it installed.Propane is heavier than air and will pool at the bottom of the heater if not ignited properly. That pooling of propane is likely causing the explosion.
Propane heaters are supposed to try igniting only one time before shutting down. Gas heaters will retry igniting three times before shutting down.
Was your heater converted from NG to propane?
What is the full model number of your heater printed on a sticker likely on the inside of a panel?
Full model number is: P-R156A-EP-C
Thank you all for your advice on this!
- Jul 21, 2013
- 54,775
- Pool Size
- 35000
- Surface
- Plaster
- Chlorine
- Salt Water Generator
- SWG Type
- Pentair Intellichlor IC-60
Full model number is: P-R156A-EP-C
That is an LP model from the factory.
Just checking.

I got a response from Raypak customer service. I will take the burner out again for another good cleaning and try to clean up the pilot. Does anyone have any advice for cleaning the pilot tubing, can I use a wire to ream it out?
The pilot tubing supplies gas to the pilot. Is the pilot lit, and is the flame adequate? If so, then there probably isn't a restriction in the pilot tubing. It would be replaced rather than try to be cleaned.
it sounds like delayed ignition. The pilot is supposed to light the gas in such a way that the burner closest to the pilot lights first, then the next, and so on.
if you dont have experience and the proper equipment to service gas appliances, it would be best to get a trained professional to repair the heater. It only takes a second to have a disaster with a gas appliance. Ive seen guys with experience get their eyebrows and eyelashes burned off...
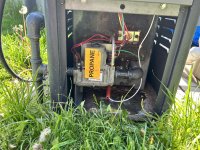
Before I go on, yes I will be bringing my gas guy in to ensure the final connections are done properly when the time comes. I still need to disconnect to re-clean the burners and pilot, or replace parts as needed.
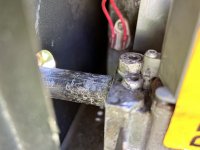
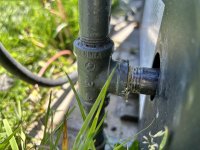
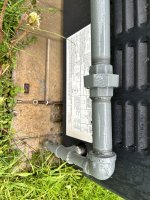
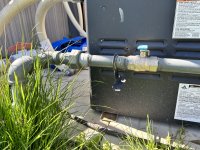
However, the connections all seem to be standard right hand thread, so as far as I can tell there is no way to tighten one connection without loosening another. Is it possible that the gas tech overtightened one side, then backed it off to tighten the other side of any of these connections? Again, I am not going to do the gas work myself, but just trying to wrap my head around how this was hooked up.
It was a major pain in the butt to disconnect everything to remove the burner as every turn to loosen one connection tightened another. I had to remove the bracket holding the ignition valve in so everything could sort of turn a bit at a time.
When I did piece it back together, the connection coming into the ignition valve from outside did not pass the soap test. Tightening this would result in loosening the first connection outside the heater. No good.
Thanks for any input, I appreciate everyone’s time who has read and commented on this!
Attachments
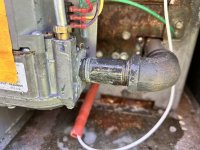
With an installation like that you have to do one piece at a time from the union to the valve. First open union.Before I go on, yes I will be bringing my gas guy in to ensure the final connections are done properly when the time comes. I still need to disconnect to re-clean the burners and pilot, or replace parts as needed.
However, the connections all seem to be standard right hand thread, so as far as I can tell there is no way to tighten one connection without loosening another. Is it possible that the gas tech overtightened one side, then backed it off to tighten the other side of any of these connections? Again, I am not going to do the gas work myself, but just trying to wrap my head around how this was hooked up.
It was a major pain in the butt to disconnect everything to remove the burner as every turn to loosen one connection tightened another. I had to remove the bracket holding the ignition valve in so everything could sort of turn a bit at a time.
When I did piece it back together, the connection coming into the ignition valve from outside did not pass the soap test. Tightening this would result in loosening the first connection outside the heater. No good.
Thanks for any input, I appreciate everyone’s time who has read and commented on this!
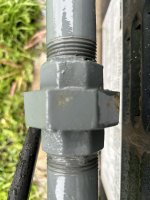
You may have to turn the pipe to the 90 away from the heater to do the next step. Take the pipe and union half out of the 90.
You can then remove the entire T with the two vertical pipes by turning counterclockwise.
Then, remove the pipe into the main valve, re-seal it and work backwards to the union again adding new pipe dope to each fitting. Yeah, its a bit of a pain, but the only way to do it so it won't leak.
Thanks!
Is the union a left hand thread on the other side?With an installation like that you have to do one piece at a time from the union to the valve. First open union.
You may have to turn the pipe to the 90 away from the heater to do the next step. Take the pipe and union half out of the 90.
You can then remove the entire T with the two vertical pipes by turning counterclockwise.
Then, remove the pipe into the main valve, re-seal it and work backwards to the union again adding new pipe dope to each fitting. Yeah, its a bit of a pain, but the only way to do it so it won't leak.
No, all right hand threads. Just completely loosen the large nut holding it together, Usually takes two pipe wrenches. On yours, the nut would loosen by turning the top toward the heater while holding the left portion. Lightly clean the brass mating surface in the union, no need for any sealant between the two halves. Re-tighten securely.Is the union a left hand thread on the other side?
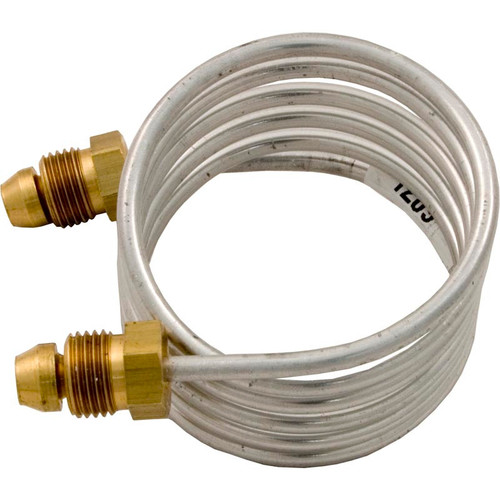
Hey guys, so it’s all taken apart and on closer inspection the pilot appears to be obstructed by rust.
I am ordering a new pilot and tube.
One question, is that the replacement pilot tube is 34” long, where my original is only about 12”. Does anyone see any issues with this?
Thanks again!
I am ordering a new pilot and tube.
One question, is that the replacement pilot tube is 34” long, where my original is only about 12”. Does anyone see any issues with this?
Thanks again!
Is it not an authentic Raypak part? The manuals all have the same part number for the tube for the different sized heaters. 34” doesn’t seem right.
Yes it is the Raypak part and the only one I can find anywhere. It looks like it’s designed to fit all models.
 ca.wildwestpoolsupplies.com
Raypak Pilot Tube Spa Pak 53A Spa Pack | 004078F
Get the 004078F Pilot Tube Spa Pak 53A Spa Pack from Raypak. Save on tons of great Raypak products and receive top-notch service with Wild West.
ca.wildwestpoolsupplies.com
And this is the part number listed in my manual.Yes it is the Raypak part and the only one I can find anywhere. It looks like it’s designed to fit all models.
Raypak Pilot Tube Spa Pak 53A Spa Pack | 004078F
Get the 004078F Pilot Tube Spa Pak 53A Spa Pack from Raypak. Save on tons of great Raypak products and receive top-notch service with Wild West.
Thread Status
Hello , This thread has been inactive for over 60 days. New postings here are unlikely to be seen or responded to by other members. For better visibility, consider Starting A New Thread.